

SFS2X Docs / ExamplesAndroid / android-connector
» Android Connector
» Overview
The following example is based on the Java Connector example and it is built as an Android Studio project so that it can run on any Andorid device.
If you haven't checked the example we highly recommend to do so before proceeding.
The Connector example provides a simple template with which you can create more complex Android-based SFS2X clients: we show the basics of establishing a connection, logging in the server, sending requests and handling the respective responses.
In order to be able to talk to the server, the client must successfully execute two steps:
- Establish a TCP connection
- Log into an existing Zone
A connection allows client and server to exchange messages. Once this is created we can log in the server, specifying which Zone we want to join. A Zone simply represent an application name. Since SmartFoxServer can run multiple applications at the same time, we need to specify which one we want to interact with.
By default every newly installed SmartFoxServer comes with a defaule Zone called BasicExamples which can be used to test our API examples.
>> DOWNLOAD the source files <<
» Installation
» Source code setup
The example sources and assets are contained in a project file and don't require a specific setup. However you will need Android Studio (which is freely downloadable) to open the project. From Studio's File menu choose Open and navigate to the project folder, then click Open.
» Running the example
In order to run the application follow these steps:
- Make sure SmartFoxServer 2X is running
- Open the client project in Android Studio
-
From the main menu choose Run > Run 'SFS2XConnector' or hit the small Run button (1) in the top icon bar.

-
You might be prompted to choose a virtual device (2) to run the Example, if none was created before.
If this is the case, please go ahead and choose a device to use for testing.
» The Java code
» Network permissions
Before we dive in the source files, it is important to note that the example Android project is already configured with permissions to access the network.
These permissions are found in the android-manifest.xml file located under the src/main/ folder in our project.
		<uses-permission android:name="android.permission.INTERNET" />
        <uses-permission android:name="android.permission.ACCESS_NETWORK_STATE" />
» The sources
Similar to the Java Connector example we want to start by creating a ConfigData instance to define the connection parameters, and a SmartFox object to instatiate the client API.
This time, however, we'll do it when the Connect button in the UI is clicked, which triggers the onConnectClick method.
		public void onConnectClick(View sourceView)
        {
            if (sfs == null)
                connect();

            else if (sfs.isConnected())
                sfs.disconnect();

            else
                Log.i(LOG_TAG, "Unexpected application state");
        }

        private void connect()
        {
            EditText txtHost = (EditText) findViewById(R.id.txtHostAddress);
            EditText txtPort = (EditText) findViewById(R.id.txtPort);

            String connHost = txtHost.getText().toString();
            int connPort = Integer.valueOf(txtPort.getText().toString());

            // Disable connection button
            btConnect.setEnabled(false);
            logView.setText("Starting SFS2X connection\n");

            // initialize
            initSFS2X(connHost, connPort);
        }

        private void initSFS2X(String host, int port)
        {
            sfs = new SmartFox();
            cfg = new ConfigData();

            cfg.setHost(host);
            cfg.setPort(port);
            cfg.setZone("BasicExamples");
            cfg.setUseBBox(false);
            cfg.setDebug(true);

            sfs.addEventListener(SFSEvent.CONNECTION, this::onConnection);
            sfs.addEventListener(SFSEvent.CONNECTION_LOST, this::onConnectionLost);
            sfs.addEventListener(SFSEvent.LOGIN, this::onLogin);
            sfs.addEventListener(SFSEvent.LOGIN_ERROR, this::onLoginError);
            sfs.addEventListener(SFSEvent.ROOM_JOIN, this::onRoomJoin);

            sfs.connect(cfg);
        }
In this particular example the Connect button is used as a toggle switch: after a successful connection we'll change its text to Disconnect and use it to close the connection, when clicked.
This is the reason why in the onConnectClick() method we check whether the sfs instance exists or not. If it doesn't we are not currently connected to the server and therefore we can create a new instance of the API. Otherwise we need to trigger a disconnection.
In the connect() method we read the IP address and port values from the relative TextViews and proceed with initalizing the SmartFox instance.
» Handling events
In the Java Connector example we have already learned how to delegate each client-side event to a different method, so essentially we're reusing the same code in this example as well.
For example:
		private void onConnection (BaseEvent evt)
        {
            boolean success = (boolean) evt.getArguments().get("success");

            if (success)
            {
                logView.getText().append("Connection Success!\n");

                //Update button state
                ThreadUtil.runUiThread(() -> {
                            btConnect.setText("Disconnect");
                            btConnect.setEnabled(true);
                        }
                );

                // Send Login Request
                sfs.send(new LoginRequest(""));
            }

            else {
                btConnect.setEnabled(true);
                logView.getText().append("Connection failed. Is the server running at " + cfg.getHost() + ":" + cfg.getPort() + "?\n");
            }
        }

        ...
What is new here is that in some cases we need to execute the UI code in the Android's main thread, to avoid potential runtime issues.
» What's the deal with the UI thread?
By default all UI events are dispatched by the main thread in your Android app. The SFS2X client API uses its own separate threads in order to run concurrently and without interfering with the UI thread.
When an SFS2X event handler is executed, let's say the onConnection() method in our example, the calling thread will be one from the Client API thread pool, rather than Android's main thread.
Since the handler's code needs to interact with the UI it's best to run it the UI thread, hence the apparently unusual code you see above:
		ThreadUtil.runUiThread(() -> {
            btConnect.setText("Disconnect");
            btConnect.setEnabled(true);
        }
Here we're wrapping the UI calls in an anonymous function (also known as lambda) and pass it to the ThreadUtil.runUiThread() method.
ThreadUtil in turn is a small utility class included in the example project:
		public class ThreadUtil
        {
            public static void runUiThread(Runnable runnable)
            {
                final Handler UIHandler = new Handler(Looper.getMainLooper());
                UIHandler.post(runnable);
            }
        }
If you want to learn more about Android's UI thread and multi-threading please check the official documentation here.
» Cleaning up after a disconnection
One important aspect we still need to discuss is taking care of a few resources when the client has disconnected. Let's review the disconnection handler from the example:
		private void onConnectionLost (BaseEvent evt)
        {
            logView.getText().append(":: Connection with server was lost :: \n");

            sfs.removeAllEventListeners();
            sfs = null;

            // Reset button state
            ThreadUtil.runUiThread(() -> {
                btConnect.setText("Connect");
                btConnect.setEnabled(true);
            });
        }
After a conenction is lost we should always release all references to the event handlers via the removeAllEventListeners() method and set the sfs object to null, this way all memory previously used by the API can be freed up.
If the user decides to connect again the process will start from the top, by creating a new SmartFox class and attaching new listeners for the new session.
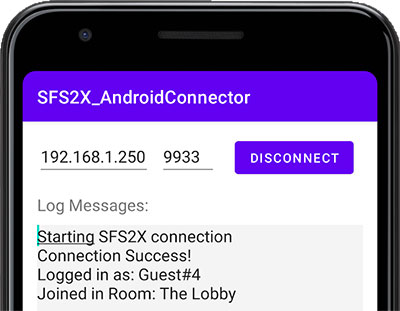
» Testing the example
When running the Android Connector example you will see this UI at start-up:
Keep in mind that you need to edit the 127.0.0.1 address and replace it with the IP of the computer running SmartFoxServer. This is because 127.0.0.1 represent the localhost which is, in other words, the Android device itself.
We don't want to connect to the phone itself, because SmartFoxServer is running on our development machine (or a remote server in case of a production environment).
If you don't know the address of the machine running SmartFox, you can launch a terminal window (Linux/macOS) or a command prompt (Windows) and type:
- (Linux/macOS): ifconfig
- (Windows 7/8/10): ipconfig
Then replace the 127.0.0.1 address in the client UI with the one you have found.