

SFS2X Docs / ExamplesJS / simple-chat
» Simple Chat
» Overview
The Simple Chat example extends the Connector one to create a basic chat environment for connected users.
Exchanging chat messages is the most basic functionality provided by SmartFoxServer 2X: users connected to the same Zone can send public messages to all the other users in the same Room, private messages to specific users (regardless the Room they are in) and a different kind of private messages (called buddy messages) if the Buddy List system is enabled. Also, additional "super powers" are given to users being recognized as moderators or administrators.
The chat functionalities provided by SmartFoxServer 2X can be the core of a fully featured chat website/application, or a complementary system to allow users to exchange messages during game matches or in other kinds of application. In all cases SmartFoxServer provides additional features to build a complete chat system, like moderation controls, anti-flood filtering capabilities and an advanced words filter which supports regular expressions and white-list/black-list modes.
This Simple Chat example just shows how to use the basic public messages, to keep the graphical interface as simple as possible. The Advanced Chat tutorial will describe an extended version, adding Room creation, private messaging, password-protected Rooms and more.
The following topics will be discussed here:
- connect and login
- access the available Rooms in a Zone
- access the list of users in a Room
- send and receive public chat messages
- use Room Variables and User Variables
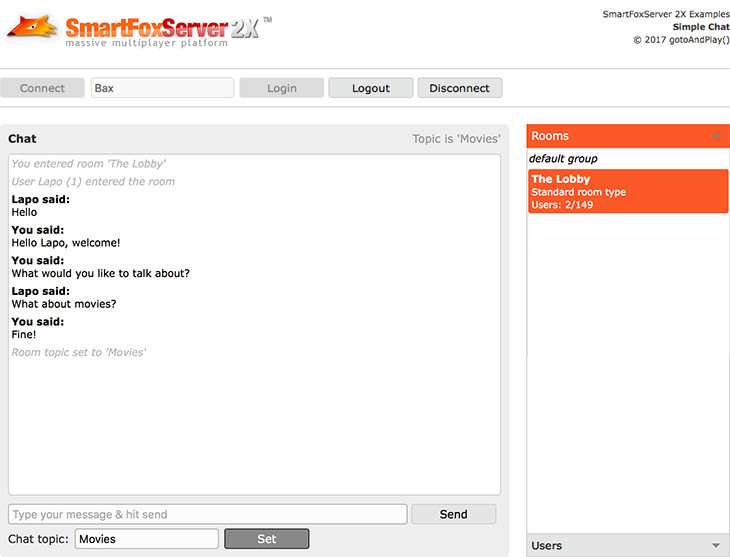
After the application is launched, we are prompted to enter a user name and connect. Once submitted, we are connected to SmartFoxServer 2X and we can log into the BasicExamples Zone, available in SFS2X by default. The accordion on the right shows the list of Rooms and the list of users in the same Room we eventually joined; the two panels also show a few controls to perform some tasks we will discuss later. The main portion of the interface is dedicated to the public chat instead.
>> DOWNLOAD the source files <<
» Running the example
In order to run the example, follow these steps:
- make sure your SmartFoxServer 2X installation contains the BasicExamples Zone definition;
- start SmartFoxServer 2X (v2.13 or later is required);
- make sure WS protocol is enabled in SFS2X configuration (read Server setup in the intro);
- open the
 /index.html file in a browser (Firefox recommended).
» Code highlights
The example interface is set in the main index.html file, where all the controls and widgets are configured right after the page is loaded.
In order to speed up development and provide a refined user interface, this example makes use of the jQWidgets UI Toolkit. The widgets are distributed for learning purpose only and you are not entitled to use them in a commercial product. If needed, please visit the jQWidgets website to acquire a proper license.
The html file also links both the SmartFoxServer API library and the external JavaScript file containing the application logic (see the <head> tag). In particular the init() method in the main.js file is called at the very beginning (see the <body> tag) to instantiate and configure the SmartFox class, which is responsible of the client-server communication. For more information on this step, please refer to the Connector tutorial. The only difference is that a much larger number of event handlers is added, and the connection parameters (address and port) are not typed by the user.
» Connection
The connection code is straightforward: when the button is clicked, the onConnectBtClick() function attempts the connection and the onConnection() listener is called consequently.
	function onConnection(event)
	{
		if (event.success)
		{
			trace("Connected to SmartFoxServer 2X!");

			// Enable interface
			enableTextField("#usernameIn", true);
			enableButton("#loginBt", true);
			enableButton("#disconnectBt", true);
		}
		else
		{
			trace("Connection failed: " + (event.errorMessage ? event.errorMessage + " (" + event.errorCode + ")" : "Is the server running at all?"), true);

			// Enable button
			enableButton("#connectBt", true);
		}
	}
If the connection is established successfully, the listener simply disables the Connect button and enables the Disconnect and Login ones.
Usually the Disconnect button is not strictly necessary, as the disconnection occurs automatically if the browser window is closed; also, a different, behind-the-scenes approach to closing the connection may be used in other scenarios (a mobile app, for example).
» Login
The login step is always mandatory after the connection to the server, to turn an anonymous client into an actual user who is then allowed to interact with the server. In this example we are required to type our name only: in a "real world" scenario the user should also be prompted to enter a password, to allow the access to registered users only (this requires coding a server side Extension, as described in this recipe). Without a password, the user is treated as a guest: in fact if we don't enter a name at all, we will be assigned a name auto-generated by the server.
The login also requires the name of a Zone defined in the SFS2X server side configuration. You can create as many Zones as you want and each Zone is treated like an isolated application. In this example the default BasicExamples Zone is used and its name is passed to the SmartFox class configuration object in the init() method.
The code to send the provided information to the server for a login check is simple and follows the default approach to send any type of request to the server via the SmartFox.send() method. Except for very special requests (essentially just the initial connection), the client will always send the requests in this way.
Given the Zone name was already passed in the configuration and the password is not required, the login request sent on Login button click is very simple:
	var uName = $("#usernameIn").val();
	var isSent = sfs.send(new SFS2X.LoginRequest(uName));
In order to handle the server response to the login request, the event handlers for the LOGIN and LOGIN_ERROR events have been added in the init() method:
	sfs.addEventListener(SFS2X.SFSEvent.LOGIN_ERROR, onLoginError, this);
	sfs.addEventListener(SFS2X.SFSEvent.LOGIN, onLogin, this);
If the login is successful, the onLogin() method is called. Other than updating the state of the interface (including enabling the Logout button — see the note below), this method populates the list of Rooms available in the Zone, as discussed next.
Logout
This example also features a Logout button which, on click, sends a logout request to SmartFoxServer. This makes us leave the current Zone without actually disconnecting from the server. This is usually not needed, but in very complex applications split over multiple Zones (for example a large lobby application giving access to multiple games, each segregated in a dedicated Zone), a behind-the-scenes logout and re-login in a different Zone may be a required approach.
» Rooms list
A Room is a common concept in the realm of socket servers that means "a collection of users". In SmartFoxServer, a Room is a way for users to interact with each other and share data. In this example users interact exchanging public messages; in other scenarios they could play a game together, etc.
Right after the login, the list of available Rooms is displayed in the top section of the accordion on the right: we can then click one to join it. Another possible approach would be to forcefully join the user in a predefined "lobby" Room; this really depends on the app/game logic you need to implement.
The populateRoomsList() method takes care of updating the UI; each item shows the Room name, a lock icon if the Room is password protected, the current number of users in the Room and the max number allowed to join it.
You should also note that a reference to the SFSRoom object provided by the API is "saved" in the item object (see roomObj property below), as we will need it later when joining the Room.
	function populateRoomsList()
	{
		var rooms = sfs.roomManager.getRoomList();
		var index = 0;
		var selectedIndex = -1;
		var source = [];

		for (var r in rooms)
		{
			var room = rooms[r];

			var item = {};
			item.html = "<div><p class='itemTitle'><strong>" + room.name + "</strong>" + (room.isPasswordProtected ? " <img src='images/lock.png'/>" : "") + "</p>" +
						"<p class='itemSub'>Users: " + room.userCount + "/" + room.maxUsers) + "</p></div>";
			item.title = room.name;
			item.roomObj = room;

			source.push(item);

			if (sfs.lastJoinedRoom != null && room.id == sfs.lastJoinedRoom.id)
				selectedIndex = index;

			index++;
		}

		$("#roomList").jqxListBox({source: source, selectedIndex: selectedIndex});
	}
This method is also called whenever the user count in a Room changes, which occurs when a user enters or leaves the Room. This event is processed by the onUserCountChange() listener. Of course this is a rough approach, as we should update the specific item instead of rebuilding the whole list. The choice is due to the will to keep the code simple and easy to follow, but in a real case scenario this is not recommended.
» Join a Room
In order to join a Room, we must click its name in the list, causing the onRoomSelected() function to be called, which in turn sends the JoinRoomRequest instance:
	function onRoomSelected(event)
	{
		var args = event.args;
		var item = $("#roomList").jqxListBox("getItem", args.index);
		var room = item.originalItem.roomObj;

		// Join selected room
		if (sfs.lastJoinedRoom == null || room.id != sfs.lastJoinedRoom.id)
			sfs.send(new SFS2X.JoinRoomRequest(room));
	}
The response to this request is either a ROOM_JOIN or a ROOM_JOIN_ERROR event, handled by the onRoomJoin() and onRoomJoinError() listeners respectively. While the latter just prints an error message and resets the selected Room in the list, the first one enables the public chat area and controls, shows the Room topic (in case it was set before by another user) and populates the list of users in the Room, as described below.
	function onRoomJoin(event)
	{
		trace("Room joined: " + event.room);

		// Enable interface
		enableChatArea(true, true);

		writeToChatArea("<em>You entered room '" + event.room.name + "'</em>");

		showRoomTopic(event.room);

		// Populate users list
		populateUsersList();
	}
A successful join also causes the USER_ENTER_ROOM event to be fired on all clients already joined to the target Room, to notify a new user is now there. This event will be discussed later.
» Public chat
Now we can examine the heart of a chat application: how to send and receive public messages. We already have our textfield ready for use and a Send button, all setup in the UI.
When the button is clicked, a PublicMessageRequest class instance is passed to the SmartFox.send() method, with the content of the textfield:
sfs.send(new SFS2X.PublicMessageRequest($("#publicMsgIn").val()));
All users in the same Room, including the sender himself, receive the public message by means of the PUBLIC_MESSAGE event. The listener for this event has been registered in the init() method:
	function onPublicMessage(event)
	{
		var sender = (event.sender.isItMe ? "You" : event.sender.name);
		var nick = event.sender.getVariable("nick");
		var aka = (!event.sender.isItMe && nick != null ? " (aka '" + nick.value + "')" : "");
		writeToChatArea("<b>" + sender + aka + " said:</b><br>" + event.message);
	}
When the event is received, the onPublicMessage() method prints the the sender name (and possibly nickname — read further on) together with the text message in the chat text area. Both the sender and the message are provided in the event object received by the listener.
» Chat topic
Room Variables are a useful tool to store custom data in a Room to maintain application state. These variables are automatically synchronized between all users in the Room, making it a powerful tool to quickly set game state, game options and other data that should be propagated to all players.
As a proof of concept of the very basic usage of this feature (a more advanced usage involves the properties of the RoomVariable object, as described in the documentation), we implemented a simple chat "topic" for the current Room. This is just a short text that can be set by any user in a Room at any time by typing it in a UI textfield. When the Set button is clicked, the onSetTopicBtClick() method sends a SetRoomVariablesRequest instance to the server:
	function onSetTopicBtClick(event)
	{
		// Set a Room Variable containing the chat topic
		// Null is used to delete the Room Variable
		var topic = $("#roomTopicIn").val() != "" ? $("#roomTopicIn").val() : null;
		var roomVar = new SFS2X.SFSRoomVariable("topic", topic);

		sfs.send(new SFS2X.SetRoomVariablesRequest([roomVar]));
	}
The Room Variable is passed in an array, because multiple variables could be set at once. Setting a Room Variable causes the ROOM_VARIABLES_UPDATE event to be fired on all the clients in the Room, which in turn makes the onRoomVariablesUpdate() listener to be executed:
	function onRoomVariablesUpdate(event)
	{
		// Check if the 'topic' variable was set/updated
		if (event.changedVars.indexOf("topic") > -1)
		{
			var deleted = !event.room.containsVariable("topic");
			showRoomTopic(event.room, deleted);
		}
	}
Note that, as the event returns the key only — in this case "topic" — of the changed Room Variable (whether it was just set for the first time or it was deleted or it was an actual update of its value), we check if the Room actually contains that variable. If not, then it was set to null and so it was deleted.
If the Room Variable was set to an actual value, the code displays the text it contains in the UI through the showRoomTopic() method. This is also called whenever the user joins a new Room, because another user already in the Room may have set it beforehand.
» Users list
The lower section of the accordion widget contains the list of users who joined the same Room we are in. The corresponding list of SFSUser objects is returned by the SFSRoom.getUserList() method on the Room itself; this property is set if the client has joined the Room successfully only.
As mentioned before, the onRoomJoin() listener calls the populateUsersList() helper method. This cycles through all the SFSUser objects contained in the Room, populating an array of objects containing the user name and (if set) his/her nickname. Note that the code also checks if the listed user is... us!
	function populateUsersList()
	{
		var source = [];
		var index = 0;
		var selectedIndex = -1;

		if (sfs.lastJoinedRoom != null)
		{
			var users = sfs.lastJoinedRoom.getUserList();

			for (var u in users)
			{
				var user = users[u];

				var item = {};
				item.html = "<div><p class='itemTitle'><strong>" + user.name + "</strong>" + (user.isItMe ? " (you)" : "") + "</p>";

				if (user.containsVariable("nick"))
					item.html += "<p class='itemSub'>Nickname: <strong>" + user.getVariable("nick").value + "</strong></p>";

				item.html += "</div>";

				item.title = user.name;
				item.userObj = user;

				source.push(item);

				index++;
			}
		}

		// Populate list
		$("#userList").jqxListBox({source: source});
	}
Additionally, in case other users enter or leave the same Room after we joined it, two more methods are used to update the list: onUserEnterRoom() and onUserExitRoom(). They both have been added as listeners in the init() method, for USER_ENTER_ROOM and USER_EXIT_ROOM events. As already mentioned before while discussing the Rooms list, this is a rough approach: we should add or remove a specific item respectively, instead of rebuilding the whole list. Again, in a real case scenario this is not recommended.
» Set a nickname
User Variables represent custom data attached to a user. All updates to that data are received by the users in the same Room(s) where the owner is joined. A common use case is to store custom user profile or game data (score, rank, age, interests, avatar, game achievements, etc).
Just like for Room Variables, we wanted to provide here a very simple usage example of User Variables, setting the nickname of the user. When a text is entered in the textfield above the list of users and the Set button is clicked, a request is sent to the server:
	function onSetUserNickBtClick(event)
	{
		// Set a User Variable containing the user nickname
		// Null is used to delete the User Variable
		var nick = $("#userNickIn").val() != "" ? $("#userNickIn").val() : null;
		var userVar = new SFS2X.SFSUserVariable("nick", nick);

		var isSent = sfs.send(new SFS2X.SetUserVariablesRequest([userVar]));

		if (isSent)
			$("#userNickIn").val("");
	}
In response to this request a USER_VARIABLES_UPDATE event is fired and the onUserVariablesUpdate() listener called on all the clients, including the one sending the request:
	function onUserVariablesUpdate(event)
	{
		// Check if the 'nick' variable was set/updated
		if (event.changedVars.indexOf("nick") > -1)
		{
			populateUsersList();
		}
	}
With the usual, simplified, non-recommended approach, whenever the User Variable representing the nickname is updated, the whole user list is rebuilt to display it as described previously.
To see more advanced uses of SmartFoxServer you can now move onwards to the next examples. In particular, the Advanced Chat tutorial will extend what you have learned so far by implementing more chat-related (but not only) features.
NOTE
You should also read the comments to methods and properties in the example source code for additional informations.
» More resources
You can learn more about the SmartFoxServer basics by consulting the following resources: