

SFS2X Docs / GettingStarted / cryptography
» Protocol Cryptography
In this article we're going to discuss how to activate TLS encryption for all traffic in SmartFoxServer, how to setup an X.509 certificate on your server and how to test your connection.
The provided instructions may differ depending on the connection type. Specifically we will distinguish between regular TCP socket connections, used by most client technologies, and websocket connections (WS/WSS), used by Unity's WebGL builds and native JavaScript clients. More information can be found in the protocol overview document.
» Server setup
Configure SmartFoxServer following these steps. Additionally, if it's a production server, you will need a valid SSL certificate, as described in the next section.
1) Enable HTTPS
To activate the cryptography in SmartFoxServer, the first step is activating HTTPS/WSS under the Web Server tab of the Administration Tool's Server Configurator module. If you are using a websocket client, of course the "Enable WS/WSS" check should already be on.
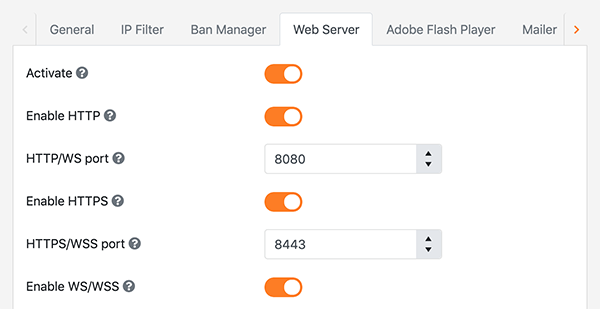
The default HTTPS port is 8443. Whether you keep this value or you customize it, always make sure that you don't have a firewall blocking the communication.
2) Configure your Zone's encryption settings
Under the AdminTool's Zone Configurator module choose your working Zone. Under the General tab Turn on the Use encryption flag and restart the server to activate the changes.
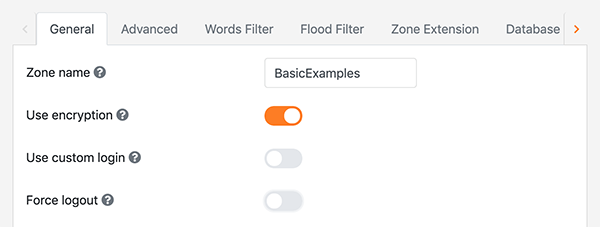
This setting is irrelevant if the Zone serves websocket clients only.
» SSL Certificates
SmartFoxServer 2X is installed by default with a self-signed certificate that can be used to test your games locally. This, however, won't work for a production server. For a live server a signed security certificate is mandatory.
» Production environment
You can acquire a valid SSL certificate from many different Certificate Authorities (such as Symantec, Thawte, CACert, etc) or use an existing one and import it into SmartFoxServer.
Certificates comes in several different file formats. Typically you will get two or three files:
- Certificate (.pem / .cer / .crt)
- Private key (.pem / .key)
- (optional) Intermediary certificate (.pem / .cer / .crt)
1) Create a bundle of the main and intermediate certificates
This step can be skipped if you don't have an intermediate certificate. If you do, all you need is to create a new text file with the same extension of your certificates (e.g. bundle.crt) and copy/paste both the primary and intermediate ones into the same file, one after the other.
2) Create a binary file containing all the components of the certificate
In this step you'll create a .pfx file containing all the elements of our certificate by using OpenSSL.
Linux and macOS users can execute the command below from their OS's terminal.
Windows user will need to download and install the OpenSSL binaries from here before proceeding.
openssl pkcs12 -export -out my-cert.pfx -inkey www.mydomain.com.key -in
	www.mydomain.com.crt -certfile bundle.crt
where:
- my-cert.pfx is the final output file
- www.mydomain.com.key is the key file
- www.mydomain.com.crt is the main certificate file
- bundle.crt is the bundle file we created in step #1
3) Import the .pfx file into a Java keystore file
You can then create the keystore that will be deployed in the web server.
keytool -importkeystore -srckeystore my-cert.pfx -srcstoretype pkcs12 -destkeystore
	key-store-name.jks -deststoretype JKS
where:
- my-cert.pxf is the file we created at step #2
- key-store-name.jks is our output file
4) Deploy to SmartFoxServer
Finally you can deploy the keystore to SmartFoxServer 2X via the AdminTool
- Start the AdminTool and select the ServerConfigurator module
- Click the Web Server tab, scroll down to SSL Certificate and hit the Manage button
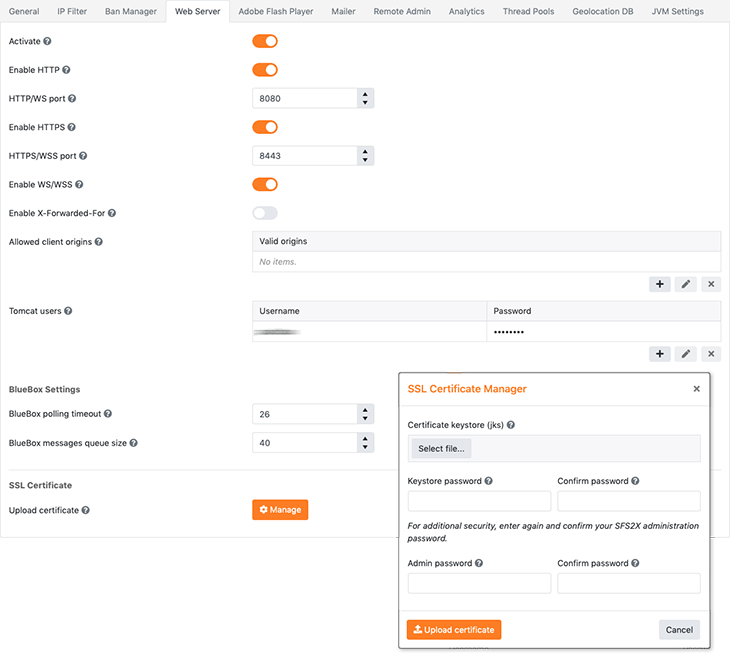
From there you can select your keystore file, specify the keystore password and upload the certificate.
5) (Alternative) Manual deployment
If you need to deploy the certificate manually please read this guide.
» Certificate integrity check
To verify that the SSL certificate is working correctly you can point your browser to
https//:<your-host>:<ssl-port> and make sure that the green lock appears near the domain name.

You should also test the integrity of your certificate using an online SSL diagnostic tool, such as the one provided by Digicert. This is particularly useful to find issues with the SSL certificate chain that may not appear in the browser and yet cause issues during a secure connection.
» Development environment
The simplest way to test your game/application without incurring in security woes is to disable encryption and just test the encryption on the production server, where it is actually required. A simple way to do this is by organizing your connection code appropriately: with the use of a boolean flag (useEncryption for instance), you can make it very simple to switch the cryptography on and off for the development environment vs production.
An example of this approach is provided in the client code examples in the next section of this document.
In general we don't recommend to test locally with the default self-signed certificate. Since it isn't signed by an authority, every runtime (browser, OS, device, etc) will complain in one way or another and stop your application. There may or may not be ways to force the system to use a non-signed certificate but it can be a tricky process.
We highly recommend instead of testing locally without encryption, and testing online with a regular, signed certificate.
If you still want to run local tests with cryptography, we recommend it only if you really understand how the security of your runtime works.
For browser-plugin environments, this is the equivalent of connecting to an HTTPS website with an invalid certificate. The browser will stop the navigation and show a prominent warning. The user is then able to leave or override the warning and continue, ignoring the security risk.
This however will not show up, because the connection is done inside the plugin, so the error may go undetected. The same happens with a Websocket Secure (WSS) connection: the browser will not show a friendly warning screen; instead it will just prevent the connection to happen.
Here are a few tips that will help testing your application locally.
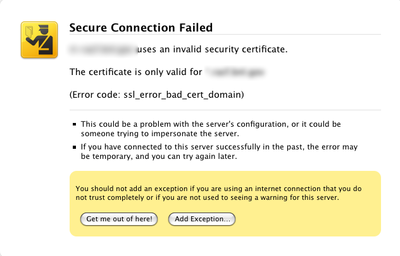
Web based: when testing with a web-based plugin (such as the Flash Player) or a websocket client (Unity WebGL for instance), you can overcome the above issue by adding a security exception to your browser before testing. To do so point the browser to https://<server-ip>:<https-port>. It should show a warning message (similar to the one in the picture above) and you can add an exception or click any equivalent button to instruct the browser that the website can be trusted.
Now the secure connection will be allowed and you can test your application locally. Some browsers will also allow you to remember the "manually trusted" URL so that you don't need to repeat this process every time you close and open the browser again.Java based: with a little extra code it is possible to make the JVM ignore the SSL exception. See the first answer to the question in this StackOverflow discussion.
C# based: we are not aware of ways to circumvent the security errors, therefore we don't recommend to run local tests with the self-signed certificate. Instead use a valid SSL certificate on your production domain.
» Client code
This section will show how to write your base connection code to enable the protocol encryption. The provided examples will use the default ports and also feature a useEncryption flag to easily enable/disable encryption as mentioned before.
» Non-websocket clients
All clients connected over regular TCP socket require a call to the SmartFox.InitCrypto() method after the connection event to add full blown encryption, like in the examples below. But before getting started...
How it works, in a nutshell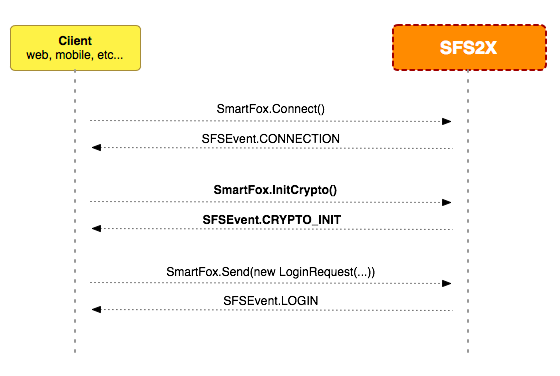
First, a persistent connection is established with the server. Then the InitCrypto() method is called to perform the cryptography handshake. If the the request is successful, the client and server have correctly agreed on a private key that will be used to encrypt the messages.
The SmartFox.InitCrypto() call works in conjunction with the embedded web-server to exchange a unique and secure token over HTTPS. By using an already secure channel for the exchange we can make sure the server is running on a domain with valid SSL certificate, to avoid man-in-the-middle attacks.
The SFSEvent.CRYPTO_INIT event is used to signal the response from the server with a boolean value representing the success of the operation.
Once the private key is acquired the rest of the communication will be transparently encrypted by the API, using AES 128 bit cryptography.
In this Java example we initialize the protocol cryptography as soon as a successful connection is established.
	public class ConnectionExample implements IEventListener
	{
		private SmartFox sfs;

		// Use a flag to easily switch cryptography on and off
		private boolean useEncryption = false;

		public ConnectionExample()
		{
			// Create the SmartFox client instance
			sfs = new SmartFox();

			// Add event listeners
			sfs.addEventListener(SFSEvent.CONNECTION, this);
			sfs.addEventListener(SFSEvent.CRYPTO_INIT, this);
			sfs.addEventListener(SFSEvent.LOGIN, this);

			// Create configuration object
			ConfigData config = new ConfigData();
			config.setHost("mydomain.com");
			config.setPort(useEncryption ? 8443 : 8080);
			config.setZone("BasicExamples");

			// Connect to SmartFoxServer 2X
			sfs.connect(config);
		}

		// Send a login request
		private void doLogin()
		{
			sfs.send(new LoginRequest("Fozzie"));
		}

		@Override
		public void dispatch(BaseEvent event)
		{
			// Handle connection event
			if (event.getType().equals(SFSEvent.CONNECTION))
		    {
		    	boolean success = (Boolean) event.getArguments().get("success");

		    	if (success)
		    	{
			    	// Initialize protocol cryptography if needed, otherwise send a login request
		    		if (useEncryption)
			    		sfs.initCrypto();
			    	else
			    		doLogin();
		    	}
		    }

		    // Handle encryption initialization event
		    else if (event.getType().equals(SFSEvent.CRYPTO_INIT))
		    {
		    	boolean success = (Boolean) event.getArguments().get("success");

		    	if (success)
		    	{
			    	// Send a login request
		    		doLogin();
		    	}
		    }

		    // Handle login event
		    else if (event.getType().equals(SFSEvent.LOGIN))
		    {
		    	System.out.println("Logged in");
		    }
		}
	}
Also in this Unity standalone example we initialize the protocol cryptography as soon as a successful connection is established. This is the same for all Unity's target platforms, except WebGL (see next section).
	public class ConnectionExample : MonoBehaviour
	{
		private SmartFox sfs;

		// Use a flag to easily switch cryptography on and off
		private bool useEncryption = true;

		void Start()
		{
			// Create the SmartFox client instance
			sfs = new SmartFox();

			// Add event listeners
			sfs.AddEventListener(SFSEvent.CONNECTION, OnConnection);
			sfs.AddEventListener(SFSEvent.CRYPTO_INIT, OnCryptoInit);
			sfs.AddEventListener(SFSEvent.LOGIN, OnLogin);

			// Create configuration object
			ConfigData config = new ConfigData();
			config.host = "mydomain.com";
			config.port = 9933;
			config.zone = "BasicExamples";

			// Connect
			sfs.Connect(config);
		}

		// Send a login request
		private void DoLogin()
		{
			sfs.Send(new LoginRequest("Fozzie"));
		}

		// Handle connection event
		private void OnConnection(BaseEvent evt)
		{
			if ((bool)evt.Params["success"])
			{
				// Initialize protocol cryptography if needed, otherwise send a login request
	    		if (useEncryption)
		    		sfs.InitCrypto();
		    	else
		    		DoLogin();
			}
		}

		// Handle encryption initialization event
		private void OnCryptoInit(BaseEvent evt)
		{
			if ((bool) evt.Params["success"])
			{
				// Send a login request
		    	DoLogin();
			}
		}

		// Handle login event
		private void OnLogin(BaseEvent evt)
		{
			Debug.Log("Logged in");
		}
	}
For a full connection example in Unity, featuring conditional compilation for multiple platforms support, encryption activation and more, please check this tutorial.
» Websocket clients
All clients connected over websocket do not require a specific cryptography handshake. You just need to set the proper connection port and protocol (WS or WSS), like in the following examples.
Using the JavaScript native API, the choice between the encrypted (WS) and non-encrypted (WSS) connection is made in the configuration object passed to the SmartFox class constructor.
	(function () {
		// Use a flag to easily switch cryptography on and off
		var useEncryption = true;

		// Create configuration object
		var config = {};
		config.host = "mydomain.com";
		config.port = useEncryption ? 8443 : 8080;
		config.useSSL = useEncryption;
		config.zone = "BasicExamples";

		// Create the SmartFox client instance
		var sfs = new SFS2X.SmartFox(config);

		// Add connection event listener
		sfs.addEventListener(SFS2X.SFSEvent.CONNECTION, onConnection, this);

		// Connect to SmartFoxServer 2X
		sfs.connect();

		// Handle connection event
		function onConnection(evtParams)
		{
			console.log(evtParams.success);
		}
	})();
In Unity WebGL the choice between the encrypted (WS) and non-encrypted (WSS) connection is based on a boolean passed to the SmartFox class constructor.
	public class ConnectionExample : MonoBehaviour
	{
		private SmartFox sfs;

		// Use a flag to easily switch cryptography on and off
		private bool useEncryption = true;

		void Start()
		{
			// Create the SmartFox client instance
			sfs = new SmartFox(useEncryption ? UseWebSocket.WSS : UseWebSocket.WS);

			// Add connection event listener
			sfs.AddEventListener(SFSEvent.CONNECTION, OnConnection);

			// Create configuration object
			ConfigData config = new ConfigData();
			config.host = "mydomain.com";
			config.port = useEncryption ? 8443 : 8080;
			config.zone = "BasicExamples";

			// Connect
			sfs.Connect(config);
		}

		// Handle connection event
		private void OnConnection(BaseEvent evt)
		{
			Debug.Log(evt.Params["success"]);
		}
	}
For a full connection example in Unity, featuring conditional compilation for multiple platforms support, encryption activation and more, please check this tutorial.
» Platform specific notes
» Unity WebGL
The SmartFox.InitCrypto method is not available when building for WebGL: use WSS connection as discussed above.
» Adobe Flash
The Flash IDE will always fail connecting with encryption to a local SmartFoxServer with a self-signed certificate. Similarly does the standalone Flash Player. The only way to test in such setup is to use the browser by pre-authorizing the domain, as explained previously in the article.