

SFS2X Docs / ExamplesIOS / signup
» Sign Up and Login
» Overview
In this tutorial we will show how to create a fully functional Sign Up and Login system by taking advantage of the Sign Up Assistant and Login Assistant components provided with SmartFoxServer 2X starting from version 2.7.
The first part of this tutorial will guide you in setting up the server-side part of the example and it is shared with the Flex / ActionScript 3 tutorial on this same subject.
If you haven't read part one of this example, please read it now before proceeding with the client side.
>> DOWNLOAD the source files <<
» Installation
» Running the example
In order to run the application follow these steps:
- make sure your SmartFoxServer 2X installation contains the SignUp Zone definition;
- start SmartFoxServer 2X;
- make sure the client will connect to the right IP address by editing the <ip> entry in the xml file available under the Supporting Files folder in Xcode;
- select the iPhone Simulator from the Scheme dropdown and click the Run button to launch the simulator.
NOTE: this application uses ARC (automatic reference counting) and Objective-C blocks, if you are not familiar with these concepts you can learn more here:
» Source code setup
The example assets are fully contained in a project file and don't require a specific setup: simply open the SignUp.xcodeproj file contained in the ![]() /source/client/SignUp folder with Xcode.
/source/client/SignUp folder with Xcode.
The example features a server-side Extension. In order to access its code, create and setup a new project in your Java IDE of choice as described in the Writing a basic Extension document. Copy the content of the ![]() /source/server/src folder to your project's source folder.
/source/server/src folder to your project's source folder.
» Client code highlights
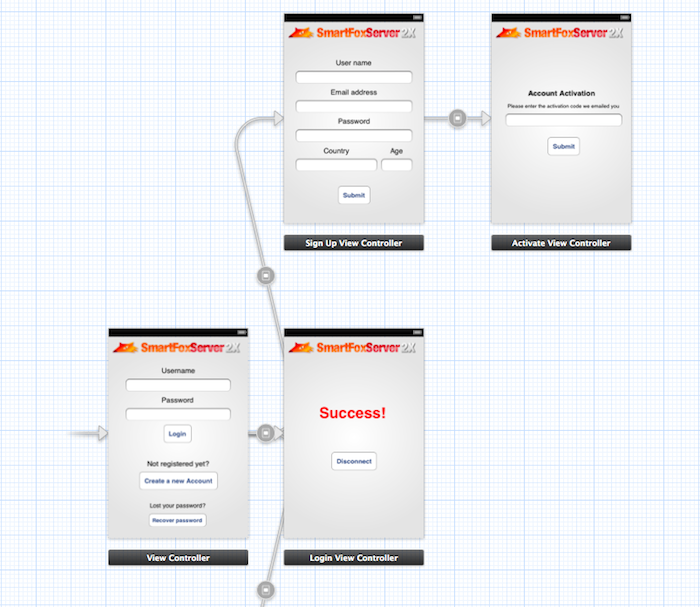
The application uses five different Views, one for each state, that have been designed using the Storyboard.
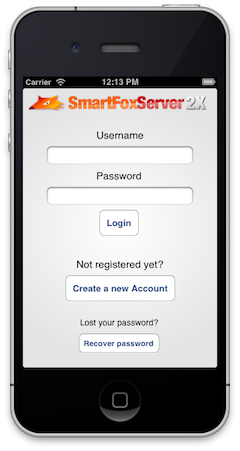
- The main view allows to login or creating a new account or recovering a lost password, it is managed by the ViewController class
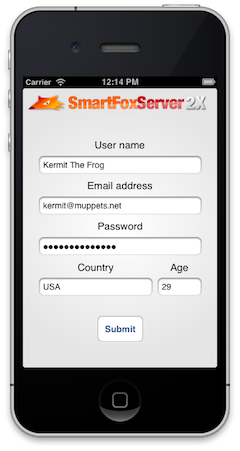
- The sign up view allows the user to create a new account and it is managed by the SignUpViewController
- The activate view lets the user activate his new account and is handled by the ActivateViewController
- The login view welcoms the user with a message that the login was successful and it is managed by the LoginViewController class
- The password recovery view allows the user the obtain a the lost password and is managed by the RecoverPasswordViewController class
Each of these view controller classes will simply take care of handling the input from their controls and invoking public methods on the main application delegate.
Finally the AppDelegate class is where we keep the reference to the SmartFox2XClient instance and where we handle all of its events, by implementing the SFSEvents protocol methods.
In the AppDelegate.h file you will notice that we have defined several connection methods, not just one as we are used to do in the other examples.
	-(void) connectAndLogin:(NSString*)name password:(NSString*)pass;
	-(void) connectAndSignUp;
	-(void) connectAndRecoverPassword;
This is because for each operation we're going to perform (sign up, login, password recovery) we will use a different connection, and when the operation is complete we will close it. Because our example application allows to connect and login for different purposes we also want to keep an application state so that we can choose what to do when the asynchronous server events are dispatched.
Suppose we're connecting in order to sign up a new account. When the server login event is received we will need to know which operation we need to carry on next based on the "intention" of the client. In this case we originally connected in order to register a new account, therefore we will show the SignUp View.
In order to keep track of the current state we have defined a convenient enum:
	typedef enum applicationStates
	{
	    IDLE,
	    CONNECTION_SIGN_UP,
	    CONNECTION_LOGIN,
	    CONNECTION_PASS_RECOVER,
	    LOGIN_SIGN_UP,
	    LOGIN_LOGIN,
	    LOGIN_PASS_RECOVER
	} AppState;

	@property (nonatomic) AppState state;
We then define a property called state that is accessible from the AppDelegate to the other classes.
Let's now take a look at the connection and login process. In the ViewController.m we have the login button handler:
	- (IBAction)loginClick:(id)sender
	{
	    delegate.state = CONNECTION_LOGIN;
	    [delegate connectAndLogin:tf_userName.text password:tf_password.text];
	}
We change the application state to CONNECTION_LOGIN and invoke the connectionAndLogin method:
	-(void) connectAndLogin:(NSString*)name password:(NSString*)pass
	{
	    if (name.length < 1 || pass.length < 1)
	    {
	        [self showAlertMessage:@"A valid user name and password are required" title:@"Login Error"];
	        return;
	    }

	    // Store name and pass for later use
	    tempUserName = name;
	    tempPass = pass;

	    // If connection already exist, send right away
	    if (_smartfox.isConnected)
	        [self sendLogin:tempUserName password:tempPass];

	    // otherwise connect first
	    else
	        [self initSmartFox];
	}
If username and password are not empty we store them in two temporary variables, we then proceed with starting a connection which will trigger the onConnection event handler:
	-(void) onConnection:(SFSEvent *)evt
	{
	    // Conenction success
	    if ([[evt.params objectForKey:@"success"] boolValue])
	    {
	        if (_state == CONNECTION_LOGIN)
	        {
	            [self sendLogin:tempUserName password:tempPass];
	        }

	        else if (_state == CONNECTION_SIGN_UP)
	        {
	            // Login anonymously
	            _state = LOGIN_SIGN_UP;
	            [_smartfox send:[LoginRequest requestWithUserName:@""
	                                                     password:@""
	                                                     zoneName:_smartfox.currentZone
	                                                       params:nil]];
	        }

	        else if (_state == CONNECTION_PASS_RECOVER)
	        {
	            // Login anonymously
	            _state = LOGIN_PASS_RECOVER;
	            [_smartfox send:[LoginRequest requestWithUserName:@""
	                                                     password:@""
	                                                     zoneName:_smartfox.currentZone
	                                                       params:nil]];
	        }
		}

	    // Connection failed
	    else
	    {
	        [self showAlertMessage:@"Connection failed, is the server running?" title:@"Connection Error"];
	    }
	}
Here we can see the state property at work, based on its value we will be able to determine the next action, in this case we want to send the username and password stored in the temp variables, in the login request.
Next we're going to handle the login response from the LoginAssistant component on the server side:
	-(void) onLogin:(SFSEvent *)evt
	{
	    if (_state == LOGIN_LOGIN)
	    {
	        [self.window.rootViewController performSegueWithIdentifier:@"loginOk" sender:nil];
	    }
	    else if (_state == LOGIN_SIGN_UP)
	    {
	        [self.window.rootViewController performSegueWithIdentifier:@"signup" sender:nil];
	    }

	    else if (_state == LOGIN_PASS_RECOVER)
	    {
	        [self.window.rootViewController performSegueWithIdentifier:@"recover" sender:nil];
	    }
	}
Based on the current state property we will move to a different view via a "segue" that has been designed in the Storyboard and to which a specific ID has been assigned. In our case the segue called "loginOk" will be executed.
In order to communicate with the server-side Sign Up Assitant we will need to use three different commands, that we have defined as constants under AppDelegate.m:
	// Setup Extension commands constants
	NSString* const CMD_SUBMIT = @"$SignUp.Submit";
	NSString* const CMD_ACTIVATE = @"$SignUp.Activate";
	NSString* const CMD_RECOVER = @"$SignUp.Recover";
These commands are also used to identify the responses that the Sign Up Assistant will send back to the client, for example in case of an error during the sign up process
We can now take a look at the SignUpViewController class which is responsible for gathering the user input and send it back to the server. In it's relative header file we have created all the necessary outlets to the text fields and added a few actions:
	@property (weak, nonatomic) IBOutlet UITextField *tf_userName;
	@property (weak, nonatomic) IBOutlet UITextField *tf_email;
	@property (weak, nonatomic) IBOutlet UITextField *tf_password;
	@property (weak, nonatomic) IBOutlet UITextField *tf_country;
	@property (weak, nonatomic) IBOutlet UITextField *tf_age;

	- (IBAction)submitClick:(id)sender;
	- (IBAction)onEditingDidBegin:(id)sender;
	- (IBAction)onEditingDidEnd:(id)sender;
In particular let's take a look at the submitClick method:
	- (IBAction)submitClick:(id)sender
	{
	    SFSObject *params = [[SFSObject alloc] init];
	    [params putUtfString:@"username" value:tf_userName.text];
	    [params putUtfString:@"password" value:tf_password.text];
	    [params putUtfString:@"email" value:tf_email.text];
	    [params putUtfString:@"country" value:tf_country.text];
	    [params putInt:@"age" value:[tf_age.text intValue]];

	    AppDelegate *delegate = (AppDelegate*) [[UIApplication sharedApplication] delegate];
	    [delegate submitSignupData:params who:self];
	}
In this method we populate the SFSObject with all the fields and send it to another method in the AppDelegate that will stat up a new connection and send the data to the Extension.
PLEASE NOTE: the key names in the SFSObject must match the respective field names in the database
When the data is sent to the server, the Extension will validate it and reply with either an error message or "success" flag. Let's see how this handled in the onExtensionResponse handler inside AppDelegate.m
-(void) onExtensionResponse:(SFSEvent *)evt
{
NSString *cmd = [evt.params objectForKey:@"cmd"];
SFSObject *sfso = [evt.params objectForKey:@"params"];
if ([cmd isEqualToString:CMD_SUBMIT])
{
if ([sfso containsKey:@"errorMessage"])
{
[self showAlertMessage:[sfso getUtfString:@"errorMessage"] title:@"SignUp Error"];
}
else
{
// Change to the Activation view
if ([tempSender respondsToSelector:@selector(performSegueWithIdentifier:sender:)])
[tempSender performSegueWithIdentifier:@"activate" sender:nil];
}
}
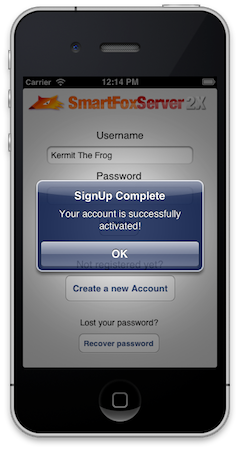
else if ([cmd isEqualToString:CMD_ACTIVATE])
{
if ([sfso containsKey:@"errorMessage"])
{
[self showAlertMessage:[sfso getUtfString:@"errorMessage"] title:@"Activation Error"];
}
else
{
// Dismiss view
[self.window.rootViewController
dismissViewControllerAnimated:YES
completion:^(void)
{
ViewController *vc = (ViewController*) self.window.rootViewController;
vc.tf_userName.text = tempUserName;
[self showAlertMessage:@"Your account is successfully activated!" title:@"SignUp Complete"];
[_smartfox disconnect];
}
];
}
}
else if ([cmd isEqualToString:CMD_RECOVER])
{
if ([sfso containsKey:@"errorMessage"])
{
[self showAlertMessage:[sfso getUtfString:@"errorMessage"] title:@"Recovery Error"];
}
else
{
// Dismiss view
[self.window.rootViewController
dismissViewControllerAnimated:YES
completion:^(void)
{
[self showAlertMessage:@"Your email was sent to your email box!" title:@"Password Recovery"];
[_smartfox disconnect];
}
];
}
}
}
This segment is quite long but it is essentially doing the same thing for all three responses that are handled. Each server response contains either a success boolean set to true or an errorMessage string. All we need to do is check for these parameters and react accordingly. In case of an error we will show a modal alert box by calling the showAlertMessage method.
» Wrapping up
We have completed our tour of the Sign Up / Login example for the iOS platform. You can learn more about the may features of the Login Assistant and Sign Up Assistant server components here: