

SFS2X Docs / ExtensionsJava / overview
» Java Extensions: in-depth overview
In this article we're going to dive deeper into the details and options available when developing server side Extension. If you have skipped the first two chapters in this section we highly recommend to start from there before continuing.
If you need to jump between sections here's a breakdown of the main topics:
» Deployment overview
As seen in the quick start guide, Java Extensions are deployed as .jar file(s) to a folder which represents the name of the Extension itself. The image below shows the main extensions/ folder which acts as the root for all Extensions in the server. Our testExtension folder contains one jar file with all our code.
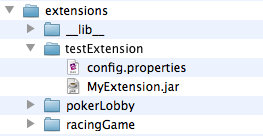
There are a few more things to notice:
- You can deploy multiple jar files under the same Extension folder, for example dependencies or other libraries. They will all be loaded under the same Class Loader.
- There is a special folder called __lib__ where you can put dependencies as well. This way you can choose which libraries are shared across multiple Extensions and which are local to a specific Extension.
Both approaches can be useful depending on what you need to do:
- Libraries deployed under your Extension folder will be loaded in the Extension Class Loader. This means that you can change that specific library without affecting other Extensions.
- Libraries shared under the __lib__ folder are loaded in the top Class Loader. If you change any of these dependencies it will affect all Extensions that use them, but you will save memory resources as the library is load only once.
» Custom configuration
An Extension can auto-load a .properties file with custom settings that are immediately available in your code. By default the server attempts to load a file called config.properties. You can also specify a different file name, if necessary. This is particularly useful when attaching the same Extension to multiple Zones (or Rooms) and you need to pass different settings to each one.
Here is an example of how an Extension is configured in the AdminTool (see the Zone Extension tab or Room Extension tab in the Zone Configurator module documentation for additional informations and important notes):
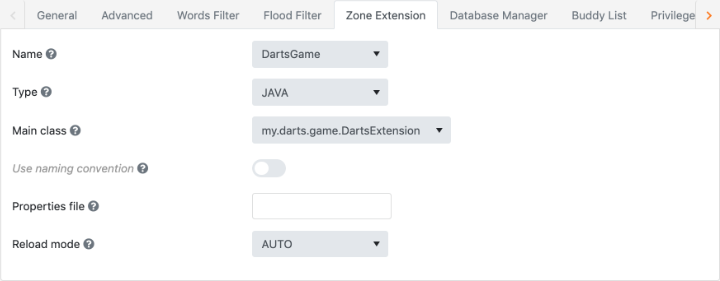
Where:
- Name refers to the name of the folder containing the code;
- Type indicates the type of Extension in use (Java is recommended);
- Main class is the fully qualified name of the main Extension class (or the Python script file name), the one implementing the init() methdo.
- Use naming convention is not an Extension setting: it just activates/deactivates a filter on the Main class field to show only those classes whose name ends with the word "Extension";
- Properties file is an optional name of a .properties file deployed in the Extension folder containing custom Extension settings (default is config.properties);
- Reload mode indicates if the Extension is monitored and auto-reloaded (AUTO), reloaded manually (MANUAL) or not reloadable (NONE).
» Extension reloading
SmartFoxServer 2X provides Extensions hot-redeploy which can be very useful during the development phases. When this feature is turned on (see the Custom configuration paragraph above), the server will monitor your Extension folders and reload your code when a jar file is re-deployed.
All you need to do is configure your Java IDE to build or copy the jar file directly under the Extension folder in your SmartFoxServer path, and you will have a one-click deploy system.
» Logging and extra dependencies
You can log messages directly to the main SFS2X log files (located under SFS2X/logs/smartfox.log) using the trace() method, as in this example:
trace("Hello world, I am testing the logging feature");
This should be enough for most logging and debugging requirements but if you need to fully customize the logging format and behavior you can work with the SFS2X logging API (SLF4J + Log4J) by importing a few extra libraries provided in the installation.
Here is a detailed article on how to customize the Extension logs in SmartFoxServer 2X.
» Anatomy of an Extension
The following diagram shows how an Extension communicates with the server and the outside world:
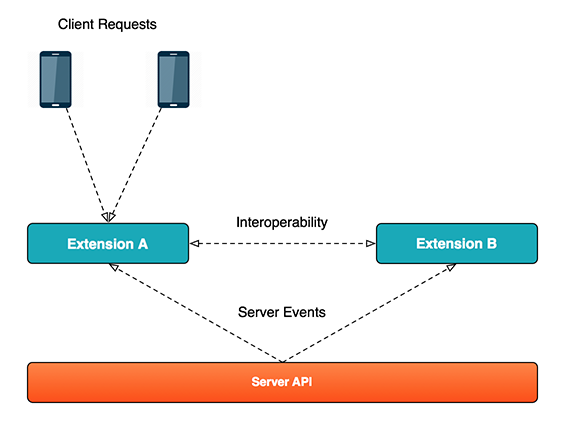
There are three ways of communication:
- Connected clients: by responding to requests or sending notifications
- Server events: by reacting to specific events generated by the server
- Extension interoperability: by sending or receiving messages from other Extensions running in the system.
» Connected Clients
In our "Quick Start" guide we have seen an Extension example receiving two numbers from the client and sending back their sum. The whole process is based upon defining a series of custom commands that the server will recognize and pass to a specific handler registered in the Extension.
On the client side we have something that looks like this (sfs is the SmartFox class instance):
		ISFSObject params = SFSObject.NewInstance();
		params.PutInt("number", 100);
		params.PutBool("bool", true);
		params.PutUtfString("str", "Hello");

		sfs.Send(new Sfs2X.Requests.ExtensionRequest("test", params));
		var params = new SFS2X.SFSObject();
		params.putInt("number", 100);
		params.putBool("bool", true);
		params.putUtfString("str", "Hello");

		sfs.send(new SFS2X.ExtensionRequest("test", params));
		var params:ISFSObject = new FSObject();
		params.putInt("number", 100);
		params.putBool("bool", true);
		params.putUtfString("str", "Hello");

		sfs.send(new ExtensionRequest("test", params));
"test" is the name of our custom command, and params is always an SFSObject containing any parameter we need to send to the server (e.g. player coordinates, user credentials, etc). On the other side, in our Extension code we can declare as many handlers as necessary with this code:
		@Override
		public void init()
		{
		    addRequestHandler("test, TestHandler.class);
		}
Notice how each handler is provided as a class object: in this case (which we recommend) the handler is instantiated and managed by SmartFoxServer. You can also use an alternative signature of the same method that takes an IClientRequestHandler instance, though this way you will be manually managing the life cycle of all your handlers which can be more work and prone to error.
As seen earlier, request handlers extend the BaseClientRequestHandler class and implement the relative logic in the handleClientRequest method.
		public class MyReqHandler extends BaseClientRequestHandler
		{
		    @Override
		    public void handleClientRequest(User sender, ISFSObject params)
		    {
				int number = params.getInt("number");
		        boolean bool = params.getBool("bool");
		        string str = params.getUtfString("str);

				// ... more logic here ...
		    }
		}
» Server side events
Server events can be useful to react to specific state changes in SmartFoxServer, such as a user disconnection, the creation of a Room etc. Extensions can subscribe to a number of events via the addEventHandler method as seen in the quick start example:
		public class MyExtension extends SFSExtension
		{
			@Override
			public void init()
			{
			    addEventHandler(SFSEventType.USER_JOIN_ZONE, ZoneEventHandler.class);
			}

			public class ZoneEventHandler extends BaseServerEventHandler
			{
			    @Override
			    public void handleServerEvent(ISFSEvent event) throws SFSException
			    {
			        User user = (User) event.getParameter(SFSEventParam.USER);
			        trace("Welcome new user: " + user.getName());
			    }
			}
		}
Every event sends the Extension a different set of parameters via the event object, which are all documented in the relative javadoc.
» Extension interoperability
When Extensions need to talk to each other they can do so by implementing and calling the handleInternalMessage method, available from the parent class. This is what the method looks like:
Object handleInternalMessage(String cmdName, Object params)
This is pretty flexible as we can pass any command name and parameter object and obtain any object in return. Here is an implementation example at Zone level:
		@Override
		public Object handleInternalMessage(String cmdName, Object params)
		{
			if (cmdName.equals("test"))
		    {
		    	Vec3D vec = (Vec3D) params;

		        // Do something with parameters
		        return new Vec3D(x, y, z);
		    }
		}
This is how a Room Extension can call the test command on the Zone Extension:
		MyZoneExtension zoneExt = (MyZoneExtension) getParentZone().getExtension();

		Vec3D vec = zoneExt.handleInternalMessage("test", someVec3D);
NOTE
Since objects are cast from the top level java.lang.Object type to whatever is used in these calls, it is important to add extra care in making sure that parameters are cast correctly on both ends of the communication. Cast errors can't be detected at compile time but will rear their ugly head at runtime, with a ClassCastException.
» The destroy() method
Finally we need to take a look at the destroy() method which is called by the server when an Extension is shut down. This happens every time an Extension is re-deployed at Zone Level, or when a Room is removed from the system and the relative Extension needs to be shut down.
Technically it is not mandatory to implement the destroy() method, in fact you can deploy an Extension without implementing such method and everything will work just fine. However there are several exceptions where overriding the method is required: if you're working with files, databases or any other resource that has a complex life-cycle you will need to keep track of those and shut them down in the overridden destroy().
NOTE
You don't need to manually remove event listeners created at init time in your destroy() method. This listeners are already taken care of by the server API.
A good example of the aforementioned exceptions is running a repeating scheduled task:
		public class SchedulerTestExtension extends SFSExtension
		{
		    private class TaskRunner implements Runnable
		    {
		        private int runningCycles = 0;

		        public void run()
		        {
		            try
		            {
		                runningCycles++;
		                trace("Inside the running task. Cycle:  " + runningCycles);
		            }
		            catch (Exception e)
		            {
		                // Handle exceptions here
		            }
		        }
		    }

		    // Keeps a reference to the task execution
		    ScheduledFuture<?> taskHandle;

		    @Override
		    public void init()
		    {
		        SmartFoxServer sfs = SmartFoxServer.getInstance();

		        // Schedule the task to run every second, with no initial delay
		        taskHandle = sfs.getTaskScheduler().scheduleAtFixedRate(new TaskRunner(), 0, 1, TimeUnit.SECONDS);
		    }

		    @Override
		    public void destroy()
		    {
		        super.destroy();

		        if (taskHandle != null);
		        	taskHandle.cancel();
		    }
		}
At init time we create a repeating task running every second. If we don't shut down the task manually it will keep going even after the Extension has been destroyed, causing a memory leak. To avoid this we make sure to cancel it in the destroy().
NOTE
Always make sure to first call super.destroy() in your custom implementation.
» Server API
Besides implementing the Extension's parent method you also have access to a wide variety of API to performa all major tasks in the server, interact with Zones, Rooms, Users, etc.
You can consult the server-side API Javadoc for all the details but we also recommend that you follow all the articles in this section in order as we'll get back on the topic of server-side API more in detail.
» Advanced Extension concepts
Now that we have covered the basics of the new Extension 2.0 architecture we can delve into the more advanced features that allow more sophisticated control over your code.
» Instantiation annotations
We provide several useful annotations that can be used to specify how your handler classes should be instantiated. By default when you declare a request/event handler class this will be instantiated as new on every call. You can change this behavior using the @Instantiation annotation on your classes:
- @Instantiation(NEW_INSTANCE): creates a new instance on every call
- @Instantiation(SINGLE_INSTANCE): uses the same instance for all calls
» Multi handlers and the request dot-syntax
In order to properly organize request names in complex application we have established a convention similar to Java package naming that uses a "dot syntax". Suppose your Extension can handle a number of games and other operations such as user registration and profile editing. You can organize all these requests like this:
register.submitForm
register.passwordLost
register.changeEmail
register. ...
register. ...
profile.changeAvatarType
profile.changeNick
profile.getAvatar
profile. ...
profile. ...
checkers.sendMove
checkers.getMyScore
checkers.leaveGame
checkers. ...
checkers. ...
The Extension API provides a @MultiHandler annotation that can be added to your handler class definition. This will register the class for all requests starting with a certain prefix. Let's implement a multi-handler for the register set of requests:
		@MultiHandler
		public class RegisterMultiHandler extends BaseClientRequestHandler
		{
			@Override
			public void handleClientRequest(User sender, ISFSObject params)
			{
				// Obtain the request custom name
				String command = params.getUtfString(SFSExtension.MULTIHANDLER_REQUEST_ID);

		        if (command.equals("submitForm"))
		        	handleSubmitForm(sender, params);
		        else if (command.equals("changeEmail"))
		        	handleChangeEmail(sender, params);

		        // ... etc ...
			}

		    private void handleSubmitForm(User sender, ISFSObject params)
		    {
		    	// ... app logic here
		    }

		    private void handleChangeEmail(User sender, ISFSObject params)
		    {
		    	// ... app logic here
		    }
		}
In the multi-handler, the specific request id among the "register" ones of the example above is obtained from the parameters object passed to the handler. An if or switch statement can be used then to execute the proper code depending on the request id.
Now we register the class in the init method of the Extension as we learnt before.
		@Override
		public void init()
		{
			trace("Hello, this is my first multi handler test!");

			// Add a new Request Handler
			addRequestHandler("register", RegisterMultiHandler.class)
		}
The only real difference in this example is that the handler class is marked as @MultiHandler. When this is done, the Extension dispatcher invokes the handler on any request id starting with the "register" prefix. In other words it will handle register.*.
NOTE
You can also mix the @Instantiation annotation with the @MultiHandler one.
In conclusion it is also worth to notice that you are not limited to a single "dot" in the request name. You could have multiple nested levelssuch as: games.spacewars.fireBullet or user.profile.avatar.getHairColor, etc. The only recommendation we have is to keep these request names reasonably short since they will be transmitted with the request/response objects.
» Extension Filters
The last advanced feature of this tour is Extension Filters. If you are familiar with the Java Servlet API this will probably ring a bell. Extension Filters in SmartFoxServer are inspired by servlet filters and they serve a similar purpose: they are executed in a chain and they can be used to log, filter, or handle specific requests or events before they get to the Extension itself.
The advantage of pluggable Filters is that they don't get in the way of your Extension code, their execution order can be altered and they can even stop the execution flow if necessary. An example of this could be a custom ban filter where user credentials are checked against a black list before the request is passed to your Login Handler.
This is an example of a simple Extension filter:
		public class CustomFilter extends SFSExtensionFilter
		{
			@Override
			public void init(SFSExtension ext)
			{
			    super.init(ext);
			    trace("Filter inited!");
			}

			@Override
			public void destroy()
			{
				trace("Filter destroyed!");
			}

			@Override
			public FilterAction handleClientRequest(String cmd, User sender, ISFSObject params)
			{
				// If something goes wrong you can stop the execution chain here!
				if (cmd.equals("BadRequest"))
			    	return FilterAction.HALT;
				else
			    	return FilterAction.CONTINUE;
			}

			@Override
			public FilterAction handleServerEvent(ISFSEvent event)
			{
				return FilterAction.CONTINUE;
			}
		}
Filters can be easily added to any Extension at configuration time or dynamically, at runtime:
		@Override
		public void init()
		{
			/*
			* This is your Extension main class init()
			*/

			// Add filters
			addFilter("customLoginFilter", new CustomLoginFilter());
			addFilter("pubMessageFilter", new PubMessageFilter());
			addFilter("privMessageFilter", new PrivMessageFilter());
		}
When a new request or event is sent to your Extension it will first traverse the Filters Chain in the order in which Filters were added. In the example above it will be: customLoginFilter » pubMessageFilter » privMessageFilter » Extension.