

SFS2X Docs / AdvancedTopics / file-uploads
» Uploading files with SmartFoxServer 2X
In SmartFoxServer 2X 2.9.x we have added the ability to easily handle file uploads via regular HTTP Post requests. Since they are available on all supported platforms, the feature allow clients to rapidly upload any type of file from their desktop, laptop or mobile device. This in turn can be handled by custom server Extensions allowing developers to manage uploads of graphics, media, documents, etc.
The upload request is handled via the internal web server which stores the received file in a temporary directory. From there a server side event, called FILE_UPLOAD is sent to the Zone Extension. Inside the Extension code the developer can move the file from the temp folder to the appropriate application directory, applying validation, processing the files, etc.
The diagram below illustrates the process we have just described.
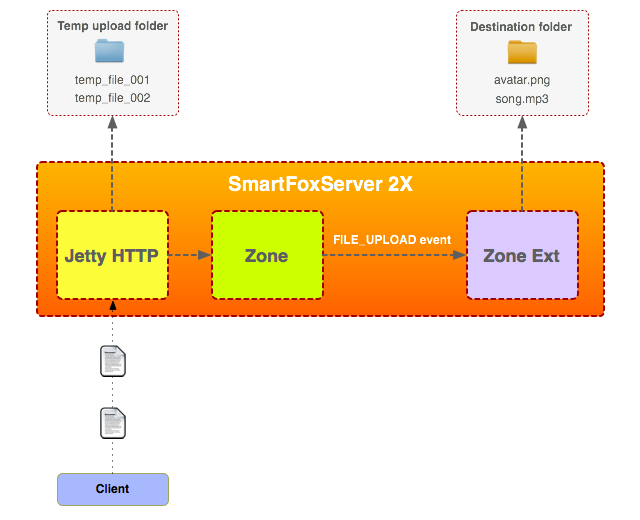
Each uploaded file is stored under {SFS2X}/data/uploads/ with a temporary file name to avoid collisions. From this position the files can then be moved in the application folders and organized according to the application requirements.
The FILE_UPLOAD server side event provides the following parameters:
| Param name | Param Type | Description |
|---|---|---|
| USER | User | The sender of the uploaded file(s) |
| UPLOAD_FILE_LIST | List<UploadedFile> | List of uploaded files containing the original file name and the temp file name |
| UPLOAD_HTTP_PARAMS | Map<String, String> | A map of custom parameter names passed in the HTTP POST request |
» Basic HTTP Request
Let's see how this work in practice with a basic HTML form. This in turn will help to understand how the POST request can be created programmatically from other languages.
It is important to note that SFS2X will only accept upload requests coming from logged in Users. A generic HTTP upload request, coming from an anonymous web page, will be refused.
In order for the following example to work correctly we assume that the following form is submitted after the client is already logged in the system, using the HTML/JavaScript 5 API.
	<form action="http://localhost:8080/BlueBox/SFS2XFileUpload" method="post" enctype="multipart/form-data">
		<strong>Select one or more files to upload:</strong>
		<input type="file" multiple name="fileName">
		<input type="hidden" name="sessHashId" value="01234567890abcdef" id="sessHashId">
		<input type="submit" value="Upload Files">
	</form>
The mandatory parameters are:
- The proper target HTTP url, pointing to http://<SFS-IP-Address>:<Port>/BlueBox/SFS2XFileUpload where the parameters in brackets are the actual server IP and HTTP port (default = 8080).
- An hidden field called sessHashId containing the current Session Id of the logged in User
The sessionId is obtained by reading the SmartFox.sessionToken after a successful login.
» Custom parameters
From the same upload form we can also send extra custom parameters that will be received by the Extension running in SmartFoxServer 2X. This option can be useful to provide extra data accompanying the uploaded files.
We can easily add any number of additional parameters by adding new hidden fields in the form and prefixing them with a double underscore ( __ ). All fields starting with this token will be passed in the UPLOAD_HTTP_PARAMS parameter of the server side FILE_UPLOAD event.
Here's the previous example form with additional custom fields:
	<form action="http://localhost:8080/BlueBox/SFS2XFileUpload" method="post" enctype="multipart/form-data">
		<strong>Select one or more files to upload:</strong>
		<input type="file" multiple name="fileName">
		<input type="hidden" name="sessHashId" value="01234567890abcdef" id="sessHashId">
	    <input type="hidden" name="__color" value="Green" id="__color">
	    <input type="hidden" name="__random" value="1255" id="__random">
		<input type="submit" value="Upload Files">
	</form>
» Uploading from code
Let's now take a look at how the same HTML form can be transformed into an HTTP request from pure code.
Before we proceed we need to clarify that the upload request can be sent only after having logged in the server. Since all the details about how connecting and logging in are already described in the "Development Basics" section and in the examples provided we take for granted that you are already familiar with those two simple operations.
» Unity
In Unity it's best to stick with the classes provided by the engine itself instead of using .Net objects. Here's an example of how to upload using WWW and WWWForm.
	IEnumerator UploadFileCo(string localFileName, string uploadURL)
	{
		WWW localFile = new WWW("file:///" + localFileName);
		yield return localFile;

		if (localFile.error != null)
		{
				Debug.Log("Open file error: "+localFile.error);
				yield break; // stop the coroutine here
		}

		WWWForm postForm = new WWWForm();
		postForm.AddBinaryData("theFile", localFile.bytes, localFileName, "application/octet-stream");

		WWW upload = new WWW(uploadURL,postForm);
		yield return upload;

		if (upload.error == null)
				Debug.Log("Upload done :" + upload.text);
		else
				Debug.Warn("Error during upload: " + upload.error);
	}

	void UploadFile(string localFileName, string uploadURL)
	{
		StartCoroutine(UploadFileCo(localFileName, uploadURL));
	}

	// Upload file
	UploadFile("/path/to/upload/file.zip", smartFox.httpUploadURI);
If you need extra parameters to be sent along with the upload you can add a properly formatted query string to the upload url like this:
	string customParams = "&__color=green&__random=42";

	// Upload file
	UploadFile("/path/to/upload/file.zip", smartFox.httpUploadURI + customParams);
» C# / .Net (not Unity)
Using .Net WebClient class we can easily upload any file to SFS2X.
	public void UploadTest()
	{
	    // Create the WebClient object and send the file
	    WebClient wc = new WebClient();
	    wc.UploadFile(smartFox.httpUploadURI, "/path/to/upload/file.zip");
	}
In the example we no longer need to build the upload URI ourselves. We can use the SmartFox.httpUploadURI property and pass it directly to the C# WebClient object.
In order to add custom parameters to the request, as we have seen in the HTML example, we can simply chain them as a query string to the httpUploadURI string, like this:
	public void UploadTest()
	{
		// Custom parameters
	    string customParams="&__color=green&__random=42";

	    // Create the WebClient object and send the file
	    WebClient wc = new WebClient();
	    wc.UploadFile(smartFox.httpUploadURI + customParams, "/path/to/upload/file.zip");
	}
Don't forget to always start the custom parameter string with an & (ampersand) symbol and use the same symbol to concatenate all other parameters. Also don't forget to prefix each parameter name with the __ (double underscore).
» Java
In Java we highly recommend Apache's HttpClient library which offers a rich set of HTTP API to perform all sorts of operations including file upload.
	private void testFileUpload()
	{
		// Select a file to upload
		File uploadFile = new File("/path/to/upload/file.zip");

	    // Prepare the upload encoding
	    MultipartEntity entity = new MultipartEntity();
	    entity.addPart("file", new FileBody(uploadFile));

	    HttpPost request = new HttpPost(smartFox.getHttpUploadURI());
	    request.setEntity(entity);

	    HttpClient client = new DefaultHttpClient();
	    try
	    {
	        HttpResponse response = client.execute(request);
	    }
	    catch (IOException e)
	    {
	        e.printStackTrace();
	    }
	}
» HTML5 / JavaScript
In HTML we can use two different modalities for uploading files. The regular HTML form-based option or a more modern, Ajax-based approach. The latter involves adding one or more third-party libraries to your project in order to be able to upload files.
In this article we have already seen how to use the form-based approach in the opening of this tutorial. We will need to point the form to this URL:
http://<server-ip>:<port>/BlueBox/SFS2XFileUpload
where server-ip is the SmartFoxServer address and port is the tcp port number used by the embedded web server (default is 8080).
It is also mandatory to send a sessHashId parameter whose value must be the current "session token" obtained after logging in the server. In order to do this we can use jQuery to dynamically set the form field once the login event is received.
Let's take a look at this example:
	var sfs = null;

	function init()
	{
		// Create configuration object
		var config = {};
		config.host = "localhost";
		config.port = 8080;
		config.zone = "BasicExamples";

		// Create SmartFox client instance
		sfs = new SmartFox(config);

		// Add event listeners
		sfs.addEventListener(SFS2X.SFSEvent.CONNECTION, onConnection, this);
		sfs.addEventListener(SFS2X.SFSEvent.LOGIN_ERROR, onLoginError, this);

	    sfs.connect();
	}

	function onConnection(evt)
	{
		if (evt.success)
			sfs.send(new SFS2X.Requests.System.LoginRequest(""));

		else
			alert("Connection Failure!");
	}

	function onLogin(evt)
	{
		// Set session token
		$("#sessHashId").val(sfs.sessionToken);
	}
The HTML form to perform the upload is this:
	<form action="http://localhost:8080/BlueBox/SFS2XFileUpload" method="post" enctype="multipart/form-data">
		<strong>Select one or more files to upload:</strong>
		<input type="file" multiple name="fileName">
		<input type="hidden" name="sessHashId" value="" id="sessHashId">
		<input type="submit" value="Upload Files">
	</form>
If you want to learn more about Ajax-based uploads we recommend checking these external resources:
» ActionScript 3
Using the FileReference class we can similarly upload any file to SFS2X.
	private var fileRef:FileReference = new FileReference();

	fileRef.addEventListener(Event.SELECT, onFileRefSelect);
	fileRef.addEventListener(Event.COMPLETE, onFileRefComplete);

	function onFileRefSelect(evt:Event):void
	{
		trace("File selected: " + fileRef.name);

		var req:URLRequest = new URLRequest(smartFox.httpUploadURI);
		req.method = URLRequestMethod.POST;

		fileRef.upload(req);
	}

	function onFileRefComplete(evt:Event):void
	{
		trace("Upload Complete!")
	}
» Handling the server side event
Let's now see how the upload event is handled in the server side extension.
This is the main Extension class:
	public class UploadTestExtension extends SFSExtension
	{
		@Override
		public void init()
	    {
	    	addEventHandler(SFSEventType.FILE_UPLOAD, UploadTestHandler.class);
	    }
	}
Next we create the server event handler:
	public class UploadTestExtension extends BaseServerEventHandler
	{
		@Override
		public void handleServerEvent(ISFSEvent event) throws SFSException
	    {
	    	User sender = (User) event.getParameter(SFSEventParam.USER);
	        List<UploadedFile> upFiles = (List<UploadedFile>) event.getParameter(SFSEventParam.UPLOAD_FILE_LIST);
	        Map<String, String> httpParams = (Map<String, String>) event.getParameter(SFSEventParam.UPLOAD_HTTP_PARAMS);

	        String color = httpParams.get("__color");
	        int random = Integer.parseInt(httpParams.get("__random"));

	        ...
	    }
	}
The FILE_UPLOAD event is only received at the Zone Level.
» Moving and deleting files
We have mentioned that the uploaded files are momentarily parked in the temp "upload" folder with a random name to avoid file name collisions. At this point it's the developer responsibility to verify that the files are valid and withing the expected size ranges before moving them to the proper application folders.
If during the validation process on or more files don't seem to comply with the allowed formats or file sizes these files should be removed from the upload folder to avoid wasting disk space.
In order to either move or delete the uploaded files we will use the convenient FileUtils class from the Apache's common-io library bundled with SmartFoxServer 2X. For more details about the many useful methods in this class check their official documentation.
	public class UploadTestExtension extends BaseServerEventHandler
	{
		@Override
		public void handleServerEvent(ISFSEvent event) throws SFSException
	    {
	    	User sender = (User) event.getParameter(SFSEventParam.USER);
	        List<UploadedFile> upFiles = (List<UploadedFile>) event.getParameter(SFSEventParam.UPLOAD_FILE_LIST);

	        // Loop through uploaded files
			for (UploadedFile uf : upFiles)
			{
				File tempFile = new File(uf.getTempFilePath());

				if (isValidFile(tempFile))
				{
					// Valid file, move it to the destination folder
					File targetFile = "/path/to/destination/" + uf.getOriginalName();

	                try
	                {
						FileUtils.moveFile(tempFile, targetFile);
	                }
	                catch(IOException ioe)
	                {
	                	// Handle error...
	                }
				}
				else
				{
					// Invalid file, remove from disk
	                try
	                {
						FileUtils.forceDelete(tempFile);
	          		}
	                catch(IOException ioe)
	                {
	                	// Handle error...
	                }
				}
			}
	    }

		// Apply file validation criteria here
		private boolean isValidFile(File file)
		{
			...
		}
	}
» Downloading the uploaded files
In order to render the uploaded files accessibile via HTTP, you will need to store them under the SFS2X/www/ROOT/ folder which represents the root of the web server embedded in SFS2X.
For example if you upload a file called image.png under SFS2X/www/ROOT/ you will be able to download it via this url:
http://<server-domain>:8080/image.png
Any folder structure can be created under the root to organize your uploaded files.
» Security aspects
The ability to upload files can be activated on a per Zone basis, with the default setting turned off. From the AdminTool > ZoneSettings you can activate the FileUpload option.
As we have seen only logged in users will be able to upload files to the server and the FILE_UPLOAD event allows developers to add custom validation and logic for handling the files.
There is also an upload limit of 100MB per file or request, meaning that the client can upload one or more of files up to that size. For larger uploads the files will have to be split in chunks.