

SFS2X Docs / ExamplesUnity / lobby-matchmaking
» Lobby: Matchmaking
» Overview
This tutorial is the last in a series of three in which we lay the foundations for a lobby application to be used as a template in multiplayer game development. A lobby is a staging area which players access before joining the actual game. In a lobby, users can usually customize their profile, chat with friends, search for a game to join or launch a new game, invite friends to play and more.
This example expands those described in the Lobby: Basics and Lobby: Buddies tutorials by adding a match-making system, to help users find the right Game Room to join based on their skill, and invitations, to let friends meet and play with each other.
In this document we assume that you already went through the previous tutorials, where we explained the subdivision of the application into three scenes, how to create a GlobalManager class to share the connection to SmartFoxServer among scenes and how to implement and manage a buddy list.
>> DOWNLOAD the source files <<
» Setup & run
In order to setup and run the example, follow these steps:
- unzip the examples package;
- launch the Unity Hub, click on the Open button and navigate to the LobbyMatchmaking folder;
- if prompted, select the Unity Editor version to use (v2021.3 or later is recommended);
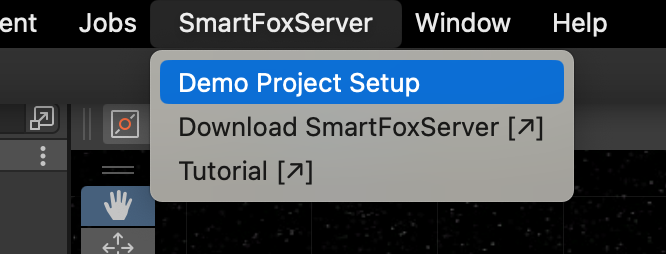
- click on the Window → SmartFoxServer → Demo Project Setup menu item in the Unity UI, and follow the additional instructions provided in the appeared Editor window.
From now, all mentioned project's paths must be intended as relative to the /Assets folder.
The client's C# code is in the Unity project's /Scripts folder, while the SmartFoxServer 2X client API DLLs are in the /Plugins/SmartFoxServer folder. Read the introduction to understand why multiple DLLs are used.
» Introduction to code
The base code for this example is the same of the previous one, expanded to implement the new features.
The LobbySceneController and GameSceneController classes have been updated to add the logic related to the Game Room creation and join, and the logic to send invitations.
» The updated user profile
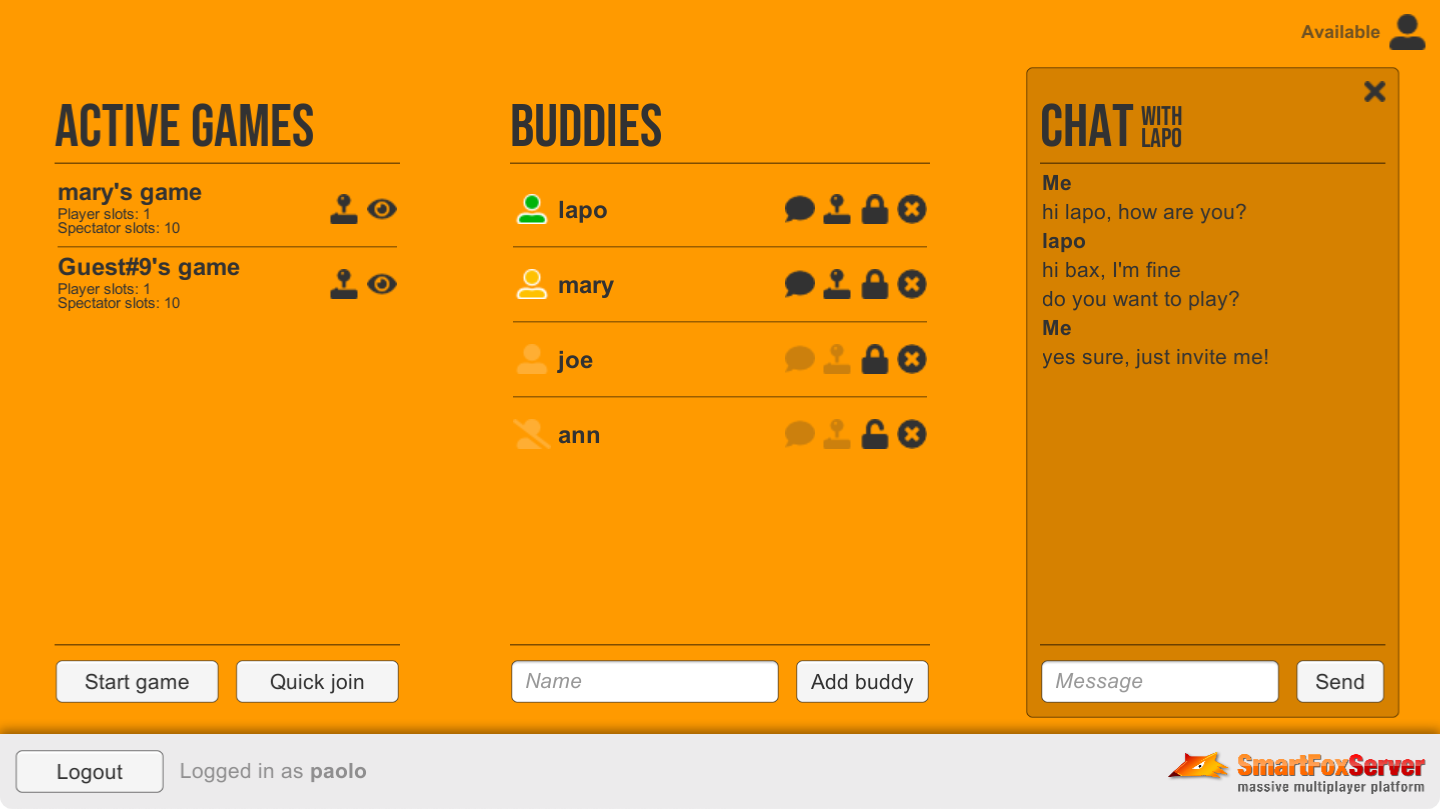
In order to describe and show how the match-making system works in SmartFoxServer, we need to define some player properties (which we'll call matching criteria) to filter the Game Rooms a user should be able to join, as explained later on. A common approach in multiplayer games is to let players face opponents with a similar skill level, so we made up the fictitious experience and ranking properties: hypothetically, the more a user plays over a time period, the higher their experience should be; or the more they win, and the higher their ranking should be. Of course this should be determined by the game logic automatically, based on the player behavior and performance, but just like in the previous examples, we are not creating an actual game yet (we are still concentrating on the lobby features). So we added the experience and ranking to the user profile panel, making them manually editable to help testing different conditions for learning purposes.

The experience and ranking of a user are set to their default values when the Lobby scene is loaded for the first time during the current session, but in a real-case scenario their values should be retrieved from a database where the user state is stored and updated at the end of each game. As already mentioned before, in our simplified example those values are updated manually, and they get lost once the user disconnects from SmartFoxServer.
In order to keep track of the current values, and have a direct access to them when executing the match-making, we make use of User Variables. A User Variable is one of the fundamental data structures in SmartFoxServer and it represents custom data attached to a User object.
	private void InitPlayerProfile()
	{
		// Check if player details are set in User Variables
		if (sfs.MySelf.GetVariable(USERVAR_EXPERIENCE) == null || sfs.MySelf.GetVariable(USERVAR_RANKING) == null)
		{
			// If not, set to default values
			SFSUserVariable expVar = new SFSUserVariable(USERVAR_EXPERIENCE, "Novice");
			SFSUserVariable rankVar = new SFSUserVariable(USERVAR_RANKING, 3);

			sfs.Send(new SetUserVariablesRequest(new List<UserVariable>() { expVar, rankVar }));
		}
		else
		{
			// If yes, display player details in user profile panel
			userProfilePanel.InitPlayerProfile(sfs.MySelf);
		}
	}
Just like for the Buddy Variables described in the previous tutorial, changing the experience or ranking in the profile panel causes a custom event to be dispatched by the attached script. The event is handled by the scene controller script, which updates the respective User Variable by means of the SetUserVariable request.
	public void OnPlayerDetailChange(string varName, object value)
	{
		List<UserVariable> userVars = new List<UserVariable>();
		userVars.Add(new SFSUserVariable(varName, value));

		// Set User Variables
		sfs.Send(new SetUserVariablesRequest(userVars));
	}
Whether the variables are set for the first time or they are updated later, the USER_VARIABLES_UPDATE event is fired by the SmartFox API. In the event handler we have to check which user the event refers to: if the current user, we have to update the profile panel (required in particular if the User Variables have been set for the first time), otherwise we can ignore the event because in our example we are not showing the user experience or ranking anywhere else.
	public void OnUserVariablesUpdate(BaseEvent evt)
	{
		User user = (User)evt.Params["user"];

		// Display player details in user profile panel
		if (user == sfs.MySelf)
			userProfilePanel.InitPlayerProfile(sfs.MySelf);
	}
The reason why the client is notified when other users update their own variables too is that in this example all users join a common Room (not game) as soon as the Lobby scene is loaded. This behavior is related to the user invitation upon game creation and it will be discussed later.
» Public and private games
All the Game Rooms in this example are of type SFSGame, which we have not seen yet in previous examples and has special, game-related characteristics.
Generally speaking, a Room in SmartFoxServer can be public or private (password-protected). Rooms can be joined if there are player slots available and, when private, if the correct password is transmitted.
In case of SFSGames other restrictions apply. In fact a public SFSGame can be joined by a user provided the matching criteria set at creation time are met, as described in the next section of this tutorial. A private SFSGame instead can be joined upon invitation only: in fact SmartFoxServer sets a random password for the SFSGame (unknown to all clients) and grants the access only to users which are invited and accept the invitation, as discussed below. That's why the AddGameListItem() method, which is called in a loop after the Lobby scene is loaded and every time a Room is created, excludes all password-protected Rooms: the user wouldn't be able to join them anyway, because the password was set by the server.
If the matching criteria are not met or the Room is already full (the maximum number of players — set to 2 in our example — was reached), the ROOM_JOIN_ERROR event is fired and the OnRoomJoinError() listener shows an alert with the error message.
» Start a new game
When the Start game button is clicked, a popup panel is displayed to launch a new Game Room.

First of all, the user must select if the game must be public or private. If the game is private, the right side of the panel gets enabled. The panel also recaps the matching criteria that will grant access to players: in our example we want the Room to accept players with the same experience of the user creating the Room (the current user) and ranking equal to or greater than user's ranking.
If the game is public, it will appear in the games list in the Lobby scene and players will be able to join it if their properties match, as discussed above.
If the game is private instead, as the note on the panel reminds, the server will send automatic invitations to users to reach the minimum number of players required to start the game (two in our example, including the current user). As the code below shows, the users to be invited are searched in Rooms belonging to the listed Groups (only one in our example). That's why all users join a common Room (appropriately called "The Lobby") and leave it when joining a game: when in the lobby, they can be automatically invited when a new private game is launched. Note that in this case the matching criteria set for the Room also apply, which means only users matching the given criteria will be invited by the server.
It is also possible to force the invitation of one of the buddies listed in the panel: a buddy can be selected if their state is appropriate (not offline, not blocked, not away playing another game) and in this case their properties are ignored and the matching criteria don't apply. Note that in this example, where the Game scene represents a 2-player game, the opponent (in a private game) is either invited automatically or selected in the list. In games with more than two players, if the user doesn't select enough buddies to reach the minimum number of players set for the game, the server will send additional automatic invitations to fill the remaining player slots. Finally, note that the message sent to all invited users can be customized in the panel.
When the Start game button on the panel is clicked, the OnStartGameConfirm() method of the scene's controller takes care of actually creating the Room of type SFSGame.
	public void OnStartGameConfirm(bool isPublic, string buddyName)
	{
		// Configure Room
		string roomName = sfs.MySelf.Name + "'s game";

		SFSGameSettings settings = new SFSGameSettings(roomName);
		settings.GroupId = GAME_ROOMS_GROUP_NAME;
		settings.MaxUsers = 2;
		settings.MaxSpectators = 10;
		settings.MinPlayersToStartGame = 2;
		settings.IsPublic = isPublic;
		settings.LeaveLastJoinedRoom = true;
		settings.NotifyGameStarted = false;

		// Additional settings specific to private games
		if (!isPublic) // This check is actually redundant: if the game is public, the invitation-related settings are ignored
		{
			// Invite a buddy
			if (buddyName != null)
			{
				settings.InvitedPlayers = new List<object>();
				settings.InvitedPlayers.Add(sfs.BuddyManager.GetBuddyByName(buddyName));
			}

			// Search the "default" group, which in this example contains the static default Room only
			settings.SearchableRooms = new List<string>() { "default" };

			// Additional invitation parameters
			ISFSObject invParams = new SFSObject();
			invParams.PutUtfString("room", roomName);
			invParams.PutUtfString("message", startGamePanel.GetInvitationMessage());

			settings.InvitationParams = invParams;
		}

		// Define players match expression to locate the users to invite
		var matchExp = new MatchExpression(USERVAR_EXPERIENCE, StringMatch.EQUALS, sfs.MySelf.GetVariable(USERVAR_EXPERIENCE).GetStringValue());
		matchExp.And(USERVAR_RANKING, NumberMatch.GREATER_OR_EQUAL_THAN, sfs.MySelf.GetVariable(USERVAR_RANKING).GetIntValue());

		settings.PlayerMatchExpression = matchExp;

		// Request Room creation to server
		sfs.Send(new CreateSFSGameRequest(settings));
	}
Most of the method code is dedicated to collecting the settings of the game Room to be created. This is done through the SFSGameSettings class, which extends the RoomSettings class (mentioned in the Lobby: Basics tutorial) by adding parameters specific to SFSGames.
The most noticeable parameters are the following:
- groupId is the name of the group in which the Room should be included; all Rooms created by this example are grouped under "games".
- minPlayersToStartGame and notifyGameStarted control the client notification by means of a reserved Room Variable that the game should be started because the minimum number of players was reached. This is not particularly useful in the 2-player game we are mimicking in this example, so the notification is turned off. Still, the minPlayersToStartGame parameter is needed to tell SmartFoxServer how many invitations to send in private games.
- isPublic sets the game as public, as discussed previously.
- leaveLastJoinedRoom makes the server auto-remove players from the Room they are inside when they are invited to join a new one and accept. This also applies to the user creating the Room.
- in case of a private SFSGame, invitedPlayers contains the list of specific buddies to invite (if selected in the start game panel); they are passed as Buddy instances returned by the API.
- searchableRooms is a list of SFSRoom objects or Room Group names (as in our code) where to look for users to invite to play, as discussed above; we pass the "default" group, which in our example only contains the lobby Room.
- invitationParams is a generic SFSObject containing some custom parameters that will be used in the invitation process (see below).
The last (but not least) important setting passed to the request object is the playerMatchExpression (the reason for the player prefix is that you can set a spectatorMatchExpression too — not supported in this example).
A MatchExpression is a logical condition which allows to create search criteria in a very natural way to perform any type of queries on Room and User objects. Specifically, when one or more conditions are "attached" to a SFSGame, they are used as "access criteria" that the server checks each time a player (or spectator) wants to join that game.
In the code above we concatenate two expressions with the And() method, representing one of the available logic operators (the other one is represented by the Or() method of course). The parameters passed to each MatchExpression are: the name of the User Variable to check on users trying to join the SFSGame, the match operator (which is different for strings, numbers and booleans) and the value to compare, taken from the corresponding User Variable of the user creating the SFSGame.
As this example only scratches the power of MatchExpressions, we strongly recommend that you check the linked resources at the bottom of the page to learn more.
After the Game Room configuration is ready, it is time to request its creation by sending a CreateSFSGame request. As the name denotes, this request is specifically tailored to create a SFSGame.
If the Room is created successfully, the owner is automatically joined in it and the ROOM_JOIN event is fired. It's handler switches the current scene from Lobby to Game. Also, all clients receive the ROOM_ADD event, which in turn causes the Game Room to be displayed (if public) in the list on the scene.
In case a private game was created, invitations are also sent to matching (or directly selected) users.
» Quick game join
The quick join is another feature of SFSGame Room type. It is a special request allowing a user to enter a game Room selected by SmartFoxServer automatically. The selection is based on the matching criteria set on the Room when created and additional criteria passed to the request itself. And, of course, the Room must have free player slots.
When the Quick join button is clicked, the QuickJoinGame request is sent to the server.
	public void OnQuickJoinButtonClick()
	{
		// Quick join a game in the "games" group among those matching the current user's player profile
		sfs.Send(new QuickJoinGameRequest(null, new List<string>() { GAME_ROOMS_GROUP_NAME }, sfs.LastJoinedRoom));
	}
The request class constructor accepts three parameters. The first one is a MatchExpression: this is used to set special search criteria which SmartFoxServer must apply to select the game to join. In this example we are not setting these search criteria, because we already assign matching criteria to the Rooms themselves upon creation. In any case everything we discussed in detail before applies to this MatchExpression too.
The second parameter is a list of Room Group names. In SmartFoxServer 2X, Rooms of any type (regular, game, SFSGame, etc) can be grouped together by assigning them a "label" indicating a Group name. This feature allows to organize Rooms into logical "collections", separated from each other. Clients are then able to subscribe for events occurring in groups they are interested in only, ignoring all the others.
In particular in this example all game Rooms are assigned to the "games" group, as mentioned before. The BasicExamples Zone is configured to automatically register all clients to the "games" group; using a different group name would require the client to "subscribe" that group with a specific request (or change the Zone configuration to include that name).
By means of this parameter we can tell the server "where" to search a joinable game.
The last parameter indicates the Room to leave when joining the new one. This example doesn't support multi-Room joining, so we always leave the previous Room when entering another one.
If the server finds a Room with a free player slot and whose matching criteria are met by the current user, it automatically makes the client join it. Then the ROOM_JOIN event is notified by the SmartFox API and its handler switches the current scene from Lobby to Game. If, for any reason, no valid Room is found by the server, the ROOM_JOIN_ERROR event is fired.
Speaking of Game scene, remember that in our example it is supposed to represent a 2-player game. Given the game could be joined by users who are not each other's buddies, it is useful to provide a way (in this case a simple button) to allow players to add each other in their buddy lists.
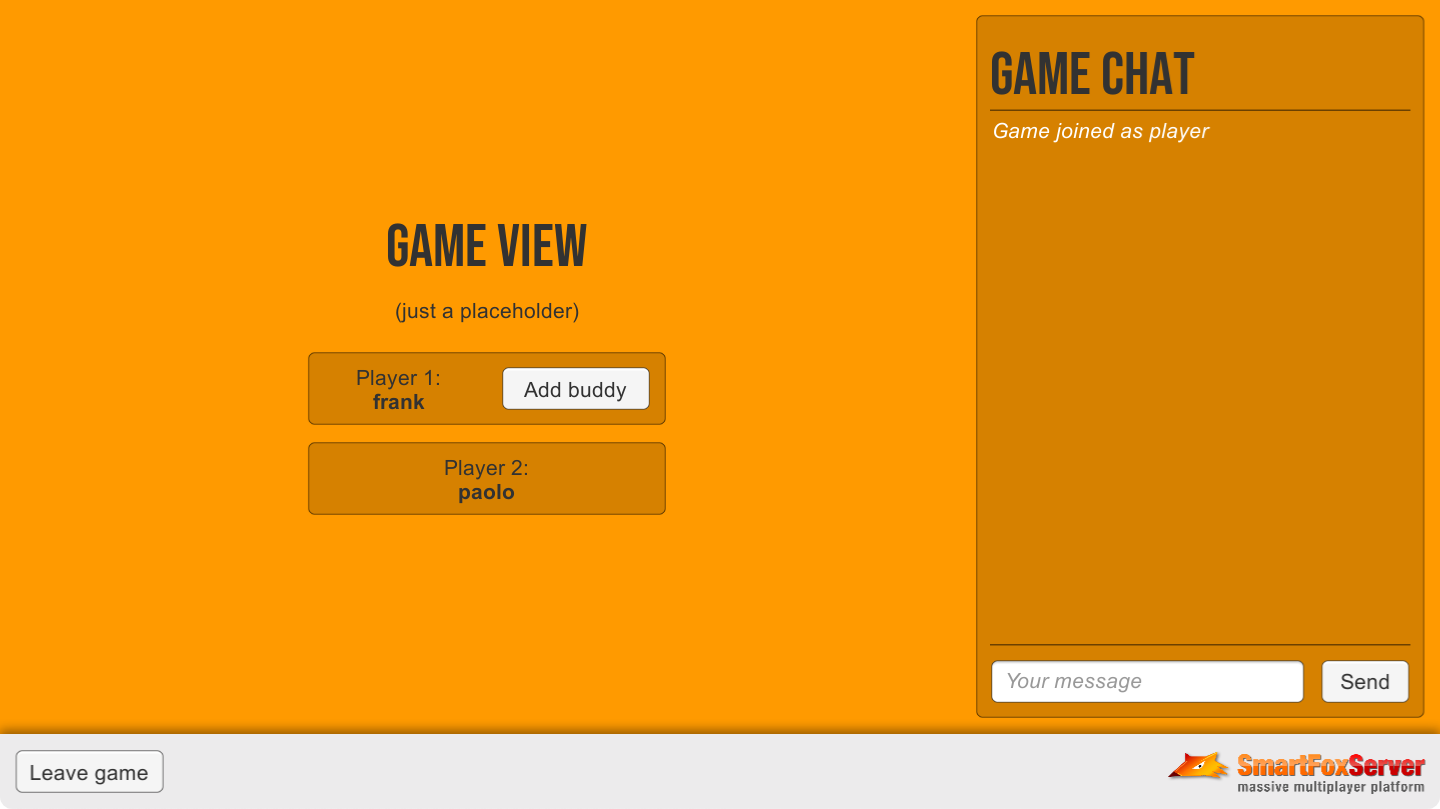
Clicking the Add buddy button sends an AddBuddy request, which in turn triggers the BUDDY_ADD event, for which we added an handler to those discussed in the previous tutorials. The event handler simply hides the button in the UI.
» Invitations
We already mentioned invitations, which are automatically sent by the server when a private game is started. In our example we also implemented a way to directly challenge a buddy by means of a dedicated button in the buddy list item. When the Play button (the joystick icon) is clicked, a custom event is received by the scene controller script, which in turn calls the OnStartGameConfirm method we already described before, passing the name of the buddy to invite.
When the server sends an invitation, the INVITATION event is dispatched to the recipient's client. This is handled by the OnInvitation() listener. As a user could receive multiple invitations during the time it takes to accept or refuse one, the method implements a queue where to hold new invitations while previous ones are processed. Invitation is wrapped in a custom class saving the date and time when it was received.
	public void OnInvitation(BaseEvent evt)
	{
		Invitation invitation = (Invitation)evt.Params["invitation"];

		// Add invitation wrapper to queue
		if (invitationQueue == null)
			invitationQueue = new Queue<InvitationWrapper>();

		invitationQueue.Enqueue(new InvitationWrapper(invitation));

		// Trigger invitation processing
		ProcessInvitations();
	}

	private void ProcessInvitations()
	{
		// If the invitation panel is visible, then the user is already dealing with an invitation
		// Otherwise we can go on with the processing
		if (!invitationPanel.IsVisible)
		{
			while (invitationQueue.Count > 0)
			{
				// Get next invitation in queue
				InvitationWrapper iw = invitationQueue.Dequeue();

				// Evaluate remaining time for replying
				DateTime now = DateTime.Now;
				TimeSpan ts = now - iw.date;

				// Update expiration time
				iw.expiresInSeconds -= (int)Math.Floor(ts.TotalSeconds);

				// Display invitation only if expiration will occur in 3 seconds or more, otherwise discard it
				if (iw.expiresInSeconds >= 3)
				{
					invitationPanel.Show(iw);
					break;
				}
			}
		}
	}
The ProcessInvitations() method takes care of extracting the first invitation wrapper from the queue, then checks the time passed since the invitation was received and updates the wrapper's internal expiration countdown: if there's still time for the user to reply to the invitation (at least 3 seconds in our example) an invitation panel is displayed in the scene.

The base parameters of the SFSInvitation object are the inviter (a SFSUser object representing the user who sent the invitation) and the secondsForAnswer (the number of seconds after which the invitation expires). Additionally the invitation provides the params field, containing the custom parameters attached to the event on game creation: in our example the Room name and a message from the inviter.
All the parameters are used by the invitation panel script to display the required information, so that the invitee can accept or refuse the invitation.
	public void Show(InvitationWrapper iw)
	{
		this.invitationWrapper = iw;

		// Display invitation message
		string message = "";

		if (iw.invitation.Params.GetUtfString("message") != "")
			message += "<i>" + iw.invitation.Params.GetUtfString("message") + "</i>\n";

		message += "You have been invited by <b>" + iw.invitation.Inviter.Name + "</b> to play <b>" + iw.invitation.Params.GetUtfString("room") + "</b>";

		invMessageText.text = message;

		// Set expiration time
		timer = iw.expiresInSeconds;
		timerEnabled = true;

		// Display remaining time for replying
		ShowCountdown();

		// Show panel
		this.gameObject.SetActive(true);
	}
The panel script also takes care of executing the countdown and automatically refuse the invitation if the time runs out. Whether this happens, or the user actively refuses or accepts the invitation by clicking on one of the two buttons on the panel, the script fires a custom event containing the original SFSInvitation object and a boolean indicating if the invitation is accepted or not. The event is caught by the Lobby scene controller which executes the OnInvitationReplyClick method.
	public void OnInvitationReplyClick(Invitation invitation, bool accept)
	{
		// Accept/refuse invitation
		sfs.Send(new InvitationReplyRequest(invitation, (accept ? InvitationReply.ACCEPT : InvitationReply.REFUSE)));

		// If invitation was accepted, refuse all remaining invitations in the queue
		if (accept)
		{
			// Refuse other invitations
			foreach (InvitationWrapper iw in invitationQueue)
				sfs.Send(new InvitationReplyRequest(iw.invitation, InvitationReply.REFUSE));

			// Reset queue
			invitationQueue.Clear();
		}

		// If invitation was refused, process next invitation in the queue (if any)
		else
			ProcessInvitations();
	}
Here we have to actually reply to the invitation by sending an InvitationReply request to SmartFoxServer: its constructor requires the original SFSInvitation object instance and one of the constants in the InvitationReply enum indicating if the invitation is accepted or refused. If the invitation is accepted, the server will automatically join the invitee in the game Room, causing the usual ROOM_JOIN event to be fired, etc. If the invitation is refused, nothing else happens.
The last portion of the method checks if other invitations were received while the user was deciding whether to accept or refuse the first invitation: if the queue is not empty and the user accepted the invitation, all the subsequent ones are automatically refused; if the first invitation was refused, the next one is then processed by calling the ProcessInvitations() method again.
You can now proceed to the next example in this Unity series to learn new features of SmartFoxServer.
» More resources
You can learn more about the SmartFoxServer concepts discussed in this example by consulting the following resources:
- Server Variables (User Variables and more)
- Game API (MatchExpressions, Invitations and SFSGame class)