

SFS2X Docs / ExamplesJS / simple-mmo
» Simple MMO World
» Overview
The Simple MMO World example introduces a special type of Room object available in SmartFoxServer 2X, the MMORoom, which supports local interaction among users based on their spatial proximity.
In regular Rooms, whenever a user generates an event (for example sending a public message or setting his own User Variables), this is broadcasted to all users who joined that Room.
In case a Room represents a large virtual space (like in MMO games for example) with hundreds of players, this can be a huge waste of resources, because usually the user just "sees" a small portion of the whole space: in 2D or 2.5D games this is usually limited by the viewport size and in 3D games by the camera viewing angle and the distance from the user's character. Why delivering an event to a user which is not affected at all by that event?
The MMORoom extends the functionality of regular Rooms by adding an Area of Interest (AoI in short) to set the distance within which events generated by other users are received by our client. To achieve this, the MMORoom requires that each user declares its own position in the virtual space representing the MMORoom itself. Detailed informations are available in the documents linked at the bottom of this page.
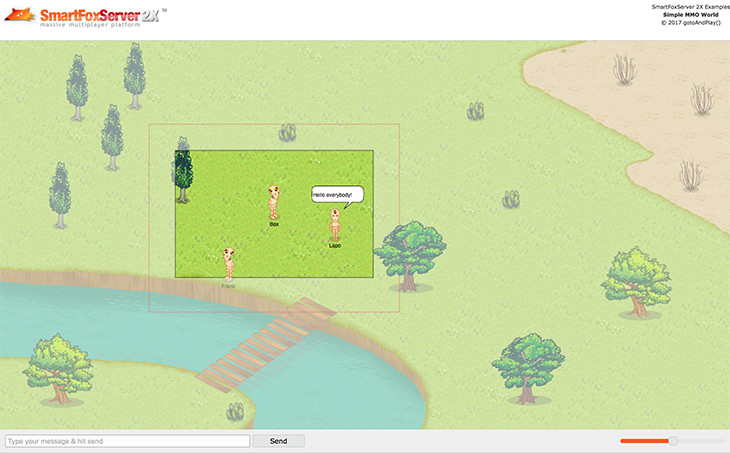
In this example all users are represented by an avatar (a crash test dummy) that can be moved around in a simple environment representing the MMORoom. In order to better show the inner working of MMORooms, instead of the expected fixed viewport and scrolling background, we have a fixed background and a viewport following our avatar's movement. The AoI is represented by a red rectangle: notice that only the avatars inside this area are visible on the stage at any one time, no matter if the user is moving around or others are. The reason is that each user is only aware of (in other words receives events related to) the users inside his own AoI.
Also, the AoI is larger than the viewport, represented by the black rectangle: this is done on purpose because the PROXIMITY_LIST_UPDATE event, which updates the client about users entering or leaving his AoI, is not triggered in realtime (the update rate can be configured by means of the proximityListUpdateMillis property of the MMORoom). In 2D games in particular, the delay in receiving the update could make an avatar "pop" in or out of the client viewport: the additional space between the AoI and the viewport, if carefully configured based on the avatars maximum speed and background scrolling behavior, can prevent this from happening.
Bleaching the area outside the viewport, using the slider in the bottom right corner, helps visualizing the final result.
As it regards the avatars movement on the map, this is based on a dual approach: when it is first created and during the movement, our avatar constantly updates his position in the MMORoom by means of the SetUserPositionRequest, which triggers the PROXIMITY_LIST_UPDATE event we already mentioned; additionally, we use two User Variables, "x" and "y", that represent the current position of our avatar on the map, or the target position during the movement. When we create or update these variables, all the clients already having our avatar in their AoI are notified and they can display it in the right location, or make it move from one place to another.
Other than the position variables, we use a third User Variable, called "dir", in which we store the direction faced by the avatar, among the eight possible ones. This variable allows us to display the avatars in the right direction as soon as they are created.
As this is a simple example, made for educational purposes, our avatars move in a straight line, without anything acting as an obstacle on their path, except non-walkable areas defined by an image representing the hit-area. When the map is clicked and during the whole movement of the avatar, the target coordinates are checked against the hit-area and, if needed, the movement is stopped.
The upcoming Simple MMO World 2 tutorial will further refine and expand this example, adding a server side Extension, dynamic map loading, multiple maps, map entry points and MMOItems.
>> DOWNLOAD the source files <<
» Running the example
In order to run the example, follow these steps:
- copy the SimpleMMOWorld.zone.xml file (containing the Zone configuration) from the
 /deploy/zones folder to your SFS2X installation folder, under /SFS2X/zones;
 - start SmartFoxServer 2X (v2.13 or later is required);
- make sure WS protocol is enabled in SFS2X configuration (read Server setup in the intro);
- open the /index.html file in a browser (Firefox recommended).
» Code highlights
In order to speed up development and provide a refined user interface, this example makes use of the jQWidgets UI Toolkit. The widgets are distributed for learning purposes only and you are not entitled to use them in a commercial product. If needed, please visit the jQWidgets website to acquire a proper license.
The example also uses the free createJS and TweenLite frameworks to deal with the HTML5 Canvas and animations respectively.
The <head> tag of the main index.html file links the mentioned libraries and their dependancies, the SmartFoxServer API library and the external main.js and Avatar.js files, containing the application logic and the Avatar class respectively.
As discussed in previous tutorials, the controls and widgets defining the user interface are configured right after the page is loaded. The <div id="main"> tag contains the four sub-divs representing the loading, login, Room join and game views.
The init() method in the main.js file is responsible of instantiating and configuring the usual SmartFox class you should know quite well by now, if you went through the previous tutorials. The method is called by the <body> tag's onLoad event.
The method also makes use of the createJS library to preload all the graphical assets required by the application: the background image, an image showing the map's walkable areas in a solid color (while non-walkable areas are transparent) and the sprite sheets for the avatar, the chat balloon and the trees and bushes decorating the map.
	// Preload assets
	loadQueue = new createjs.LoadQueue(false);
	loadQueue.addEventListener("complete", onPreloadComplete);
	loadQueue.loadManifest([
		{id: "background", src:"images/background.jpg"},
		{id: "hitArea", src:"images/hitarea.png"},
		{id: "ssAvatar", src:"images/spritesheet_avatar.png"},
		{id: "ssBalloon", src:"images/spritesheet_balloon.png"},
		{id: "ssEnvironment", src:"images/spritesheet_environment.png"}
	]);
As soon as the loading is complete, the onPreloadComplete() listener configures the sprite sheets and shows the login view. In order to switch from one view to the other, the setView() method is called. This is responsible of configuring the requested application view before switching to it.
» Connect, login and join the MMORoom
 The connection and login process has been unified with respect to previous tutorials in this series, requiring a single user interaction. When the Connect & Login button is clicked the SmartFox.connect() method is called; as soon as the connection is established successfully, the onConnection() listener sends a LoginRequest to the server, which in turn triggers the onLogin() listener. This shows the MMORoom join view. If any error should occur in the process, this is handled gracefully.
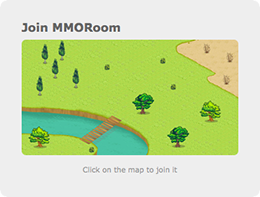
The UI now shows the thumbnail version of the only map available in this example, to be selected by clicking it. Note that the onMinimapClick() function saves the click position, to make our avatar appear in the same place (with some caveats) on the actual map. Of course this is a simplified approach, as usually maps have predefined entry points.
	this.onMinimapClick = function(e)
	{
		// Save minimap click position with respect to minimap size,
		// to be converted later to map access coordinates
		var offset = $(this).offset();
		minimapClickXRatio = (e.clientX - offset.left) / $("#minimap").width();
		minimapClickYRatio = (e.clientY - offset.top) / $("#minimap").height();

		// Join MMORoom
		sfs.send(new SFS2X.JoinRoomRequest(MMO_ROOM_NAME));
	}
The JoinRoomRequest is then sent, providing the predefined MMORoom name: in fact in this example the Room corresponding to the map is statically defined in the Zone's configuration file, so it is already available and we don't have to create it (but in other scenarios we could — all approaches are valid).
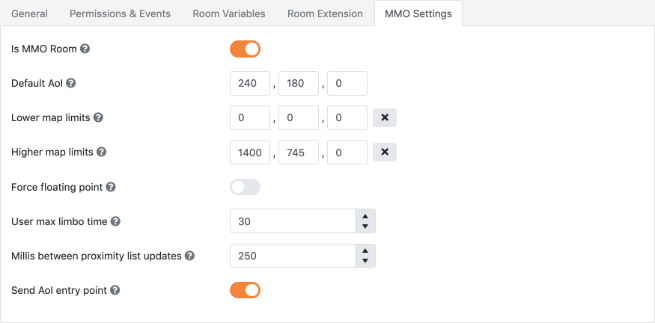
An MMORoom extends a regular Room by adding some specific settings. Here we show them in the AdminTool's Zone Configurator; when the Room is created by the client, the MMORoomSettings class is used instead. The fundamental settings are the Area of Interest size, the map limits and the PROXIMITY_LIST_UPDATE event rate.
If the Room is joined successfully, the ROOM_JOIN event triggers the onRoomJoin() listener.
	function onRoomJoin(evtParams)
	{
		trace("Room joined: " + evtParams.room);

		// Create an array that will contain all map objects, including avatars, used for sprites sorting purposes
		mapObjects = [];

		// Switch view
		setView("game");

		// Draw curtain
		curtain = new createjs.Shape();
		stage.addChild(curtain);

		// Calculate avatar access coordinates
		var accessX = Math.round(minimapClickXRatio * $("#map").width());
		var accessY = Math.round(minimapClickYRatio * $("#map").height());

		// Avoid making the avatar appear in the middle of the river
		// (non-walkable area) by excluding the map's bottom left corner
		if (accessY > 430)
			accessX = Math.max(accessX, 830);

		// Set starting direction to a default value
		var dir = AVATAR_DIRECTIONS[2];

		// Create current user's avatar
		createAvatar(sfs.mySelf, accessX, accessY, dir);

		// Arrange map objects sorting
		arrangeMapObjects();

		// The position is saved in the User Variables, so that changing it later will trigger the avatar animation
		setAvatarVariables(accessX, accessY, dir);

		// Declare current user's position in the MMORoom, to get the proximity list of users
		updateServerPosition();
	}
The method is responsible of the following tasks.
Switch to game view
This uses the usual setView() method already mentioned before. In particular for the main game view, the method is responsible of setting up the stage on the Canvas object, displaying the map background, creating a container for all the sprites, configuring the hit-area for walkable areas of the map (including the click listener for avatar movement) and placing the sprites of trees and bushes on the map.
The approach with static map items like trees is very rough; it has the only purpose of having a richer map while still keeping the code simple to follow. In a real case scenario you will probably have some kind of map descriptor indicating where to place all static items. An example will be provided in the next tutorial.
Create the avatar
In order to create the avatar, we calculate the access coordinates based on minimap click position; a rough adjustment is also applied if needed, to avoid placing the avatar on a non-walkable area of the map.
Also the initial direction faced by the avatar is set.
	function createAvatar(user, x, y, dir)
	{
		// Instantiate avatar
		var avatar = new Avatar(user.id, user.name, ssAvatar, ssBalloon);

		// Set avatar position and initialize "next" coordinates too (see moveAvatar method)
		avatar.x = avatar.nextX = x;
		avatar.y = avatar.nextY = y;

		// Set initial avatar graphics
		avatar.setGraphics("stand", dir);

		// Add avatar to container
		container.addChild(avatar);

		// Add avatar to array used for sorting
		mapObjects.push(avatar);

		if (user.isItMe)
		{
			// Show viewport and Area of Interest boundaries
			var room = sfs.lastJoinedRoom;
			avatar.setAOIFrame(room.defaultAOI.px * 2, room.defaultAOI.py * 2);

			// Draw curtain masking area outside of viewport
			drawCurtain();
		}
	}
The createAvatar() method instantiates the Avatar class, providing the user id (which constitutes a unique identifier for the sprite on the stage), the name of the user (to be displayed below the avatar's feet) and the sprite sheets containing the graphics for the avatar itself and the chat balloon.
After the coordinates and the starting graphic (avatar standing still facing the passed direction) of the sprite are set, the avatar is added to the stage and to the global array of map objects.
Last but not least, as the method is now creating our own avatar, it also draws the AoI and viewport rectangles and the "curtain" which hides the map around the viewport.
Arrange sprites on the map
As shown before, the onRoomJoin() listener creates a container array for all the map objects, which in this example include trees, bushes and avatars: this array is processed by the arrangeMapObjects() method to sort the sprites on the stage (z-sorting) to give them the right depth based on their y coordinate (so that they overlap correctly).
Please note that, being be out of the scope of this example, we didn't put too much effort in the sorting method used to rearrange the avatars depths. In fact this method is not particularly efficient, because at each animation step all avatars and trees are rearranged (as we will see later).
Set avatar position
The last step after creating our avatar is to set its position on the map. The setAvatarVariables() method uses a SetUserVariablesRequest to save our avatar's position and facing direction in the User Variables. These will be read by the clients when notified of our presence in their Area of Interest to display our avatar.
Then the updateServerPosition() method declares our position in the MMORoom. This is a core step when using MMORooms as it: (A) triggers the PROXIMITY_LIST_UPDATE event described below; (B) makes us "visible" by the other users in the Room; (C) enables our client to receive the events generated by the other users inside our AoI.
This is just a matter of sending a SetUserPositionRequest with a vector containing our coordinates. Note that if the position is not set within a certain amount of time (configurable with the userMaxLimboSeconds property of the MMORoom), the user is kicked out of the MMORoom.
	function updateServerPosition()
	{
		var myAvatar = getAvatar(sfs.mySelf.id);

		// Save the coordinates corresponding to the saved position, to be checked during the next tween update
		myAvatar.lastUpdateX = Math.round(myAvatar.x);
		myAvatar.lastUpdateY = Math.round(myAvatar.y);

		var pos = new SFS2X.Vec3D(myAvatar.lastUpdateX, myAvatar.lastUpdateY, 0);
		sfs.send( new SFS2X.SetUserPositionRequest(pos) );
	}
» Proximity list update
As soon as our position is set in the MMORoom, our client will start receiving the PROXIMITY_LIST_UPDATE event, handled by the onProximityListUpdate() listener. This event lets us know which users entered or left our AoI, making it possible to add/remove their avatars to/from the map accordingly.
Similarly, all other users we are near to will receive the same event notifying our presence in their AoI.
	function onProximityListUpdate(evtParams)
	{
		// Loop the removedUsers list in the event params to remove the avatars no more visible
		var removed = evtParams.removedUsers;
		for (var ri = 0; ri < removed.length; ri++)
		{
			var ru = removed[ri];
			var ra = getAvatar(ru.id);

			if (ra != null)
				removeAvatar(ra);
		}

		// Loop the addedUsers list in the event params to display the avatars now visible
		var added = evtParams.addedUsers;
		for (var ai = 0; ai < added.length; ai++)
		{
			var au = added[ai];

			// Get user entry point
			var vec = au.aoiEntryPoint;

			// Get avatar direction from User Variables
			var dir = au.getVariable(USERVAR_DIR).value;

			// Create avatar
			createAvatar(au, vec.px, vec.py, dir);

			// Make the avatar move towards the coordinates set in the User Variables if they are different from the entry point
			if (au.containsVariable(USERVAR_X) && au.containsVariable(USERVAR_Y))
			{
				var px = au.getVariable(USERVAR_X).value;
				var py = au.getVariable(USERVAR_Y).value;

				if (px != vec.px || py != vec.py)
					moveAvatar(au);
			}
		}

		// Arrange map objects sorting
		arrangeMapObjects();
	}
In order to know in which position on the stage the avatars have to be created, we use a special property assigned to each SFSUser object contained in the list of "added" users: SFSUser.aoiEntryPoint. This is a Vec3D object containing the position that the user had in the MMRoom when he entered our AoI (see note below).
We can now create the avatars in the right place and check if they are moving through their User Variables. In fact the User Variables contain the movement's target coordinates, saved each time a user clicks on the stage (see the next paragraph). In other words if the AoI entry point and the target coordinates match, the user avatar is standing still; otherwise it is moving on the stage towards the target coordinates and we need to start the motion tween accordingly (in the moveAvatar() method).
Let's highlight a few words from the text above: "the position the user had in the MMRoom when he entered our AoI". This statement is very important and needs to be emphasized for better understanding.
What is the difference between the current coordinates and those at the time the user entered our Area of Interest, saved in the User.aoiEntryPoint property?
Take a look at this simplified flow:
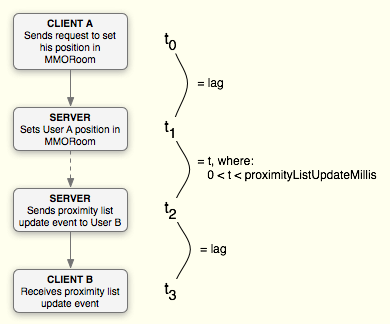
Client A sets his position at time t0; the server processes the request and if A entered the AoI of client B, it sends an event to B which receives it at time t3. Other than the usual lag between the clients and the server, we have to take into account that the PROXIMITY_LIST_UPDATE is not fired immediately by the server, but a variable time passes, depending on when the timer controlled by the proximityListUpdateMillis property of the MMORoom will fire.
So at time t3 client B receives, through the aoiEntryPoint property, the coordinates that A had at time t0: they aren't the current coordinates of user A, because in the meantime he might have changed his position.
In some circumstances, like the example we are now examining, this is not an issue. In fact we don't need a strict synchronization between the clients: what matters here is just the target position that the avatar must reach, which is saved in the User Variables.
Other scenarios might need a different approach which could lead to entirely ignore the aoiEntryPoint property, compensate the lag, fine tune the proximityListUpdateMillis time, execute a server side "master" simulation and what more.
» Avatar movement
When we click the map, the onMapClick() method calculates the target coordinates and the direction faced by the avatar during the movement to reach them (keep in mind that an avatar moves on a straight line, so it will always be in the same direction). Then those coordinates and direction are set in the User Variables by the setAvatarVariables() method already mentioned before.
This causes a USER_VARS_UPDATE event to be delivered to our own client and to all clients having us in proximity: the onUserVarsUpdate() listener calls the moveAvatar() method which starts the animation tween.
It is important to notice that, while the target coordinates are set only once when we click on the map, during the movement of our avatar its position in the MMORoom is updated continuously at each animation step by the onAvatarTweenUpdate() method; this allows users entering and leaving the AoI to be rendered accordingly, as discussed before.
Other tasks of the tween are: (A) stopping the movement if a non-walkable area is going to be crossed and (B) rearranging the sprites z-sorting as already described before.
» Public chat
Public messages work just like in regular Rooms, through the PublicMessageRequest sent on Send button click. The only difference, again, is that the PUBLIC_MESSAGE event is fired on the clients having the sender in their AoI only.
The onPublicMessage() listener is responsible of locating the avatar of the sender and call the Avatar.showChatMessage() method. This shows the chat balloon over the avatar's head, as if it is talking. A queue of messages and the avatar's container _tick() function make it possible to show multiple subsequent messages and make them disappear automatically after a few seconds.
To see other advanced uses of SmartFoxServer, including complete turn-based and realtime games, you can now move onwards to the next examples.
NOTE
You should also read the comments to methods and properties in the example source code for additional informations.
» More resources
You can learn more about the SmartFoxServer basics by consulting the following resources: