

SFS2X Docs / ExamplesJS / game-lobby
» Game Lobby
» Overview
The Game Lobby example is a browser application showing how to create a "lobby" where users can meet and invite each other to play games. The app is mostly based on the advanced Game API available in SmartFoxServer 2X, which includes Match Expressions, Invitations and the SFSGame Room type; reading the feature's documentation before or after this tutorial is highly recommended.
This example also relies on various concepts introduced in previous tutorials (like Zones, Rooms, User Variables, public chat, etc) which won't be covered again here.
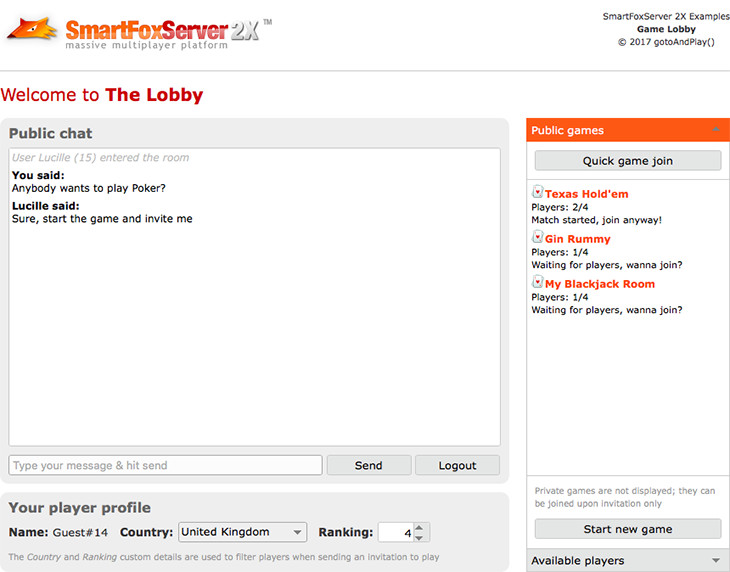
The game is made of three views: a login view, to enter the credentials and log into the system; a lobby view, where users can chat publicly, set their simplified profile, start a new game or join an existing one; a game view, which is a simple mockup view representing a generic game.
» Login view
In the login view, a user can connect to the server, enter a name and log into a predefined SmartFoxServer Zone. Of course this is a simplified approach, because users should also enter a password and the credentials should be validated on the server. This is not part of the tutorial, but you can find for more information in the Custom login paragraph at the bottom of this page.
» Lobby view
The lobby view is the core of the application: users automatically join a predefined Room existing in the Zone, where they can chat using the public chat UI controls as discussed in other tutorials.
At the bottom of the interface a user can set his profile by means of a couple of User Variables (country and ranking, with a limited number of predefined values). Again, this is a simplified example (which and how many variables to use depends on the application requirements) to keep the code more understandable, but still providing a path to follow in real-case scenarios. The variables are used for matchmaking purposes, as discussed later.
On the right side of the viewport, the Public games section of the accordion provides the controls to join a game Room in three different ways: ask the server to quickly join me in an existing Room, based on configurable criteria; join an existing public game by selecting it in the list; start a new game and wait for (or invite) other players to join. The Available players section instead shows a list of users to send a direct invitation to play.
» Game view
As mentioned before, the game view is just a mock up: there's no actual game, because the focus of this example is the Game API of SmartFoxServer 2X only, not the game logic itself. In any case the view still showcases a couple of useful features of Rooms of type SFSGame, allowing automatic notifications to be sent when the minimum number of players to start the game has joined it. Again this shows a path to follow in real-case scenarios.
>> DOWNLOAD the source files <<
» Running the example
In order to run the example, follow these steps:
- make sure your SmartFoxServer 2X installation contains the BasicExamples Zone definition;
- start SmartFoxServer 2X (v2.13 or later is required);
- make sure WS protocol is enabled in SFS2X configuration (read Server setup in the intro);
- open the
 /index.html file in a browser (Firefox recommended).
» Code highlights
In order to speed up development and provide a refined user interface, this example makes use of the jQWidgets UI Toolkit. The widgets are distributed for learning purposes only and you are not entitled to use them in a commercial product. If needed, please visit the jQWidgets website to acquire a proper license.
The main index.html file links both the SmartFoxServer API library and the external JavaScript file containing the application logic (see the <head> tag). In particular the init() method is called at the very beginning (see the <body> tag) to instantiate and configure the SmartFox class, which is responsible of the client-server communication.
The controls and widgets defining the user interface are configured right after the page is loaded. The <div id="main"> tag contains the three sub-divs representing the three game views mentioned before. In order to switch from one view to the other, the setView() method is called: depending on the connection state, it updates the UI enabling or disabling buttons and other controls, populating the list of Rooms and users in the lobby, etc. The view is then actually switched using the switchView() function.
	function setView(viewId, doSwitch)
	{
		// Check connection/login status to enable interface elements properly
		if (viewId == "login")
		{
			// Connect and disconnect buttons
			enableButton("#connectBt", !sfs.isConnected);
			enableButton("#disconnectBt", sfs.isConnected);

			// Login textinput and button
			enableTextField("#usernameIn", (sfs.isConnected && sfs.mySelf == null));
			enableButton("#loginBt", (sfs.isConnected && sfs.mySelf == null));

			// Hide create game window if open
			$("#createGameWin").jqxWindow("closeWindow");
		}
		else if (viewId == "lobby")
		{
			// Logout button
			enableButton("#logoutBt", (sfs.isConnected && sfs.mySelf != null));

			// Chat area
			enableChatArea((sfs.isConnected && sfs.lastJoinedRoom != null), doSwitch);

			if (sfs.isConnected && sfs.mySelf != null)
			{
				// Populate room & user lists
				populateRoomsList();
				populateUsersList();
			}
			else
			{
				// Clear room & user lists
				$("#roomList").jqxListBox("clear");
				$("#userList").jqxListBox("clear");
			}
		}
		else if (viewId == "game")
		{
			// Nothing to initialize
		}

		// Switch view
		if (doSwitch)
			switchView(viewId);
	}

	function switchView(viewId)
	{
		if ($("#" + viewId).length <= 0)
			return;

		$('.viewStack').each(function(index) {
			if ($(this).attr("id") == viewId) {
				$(this).show();
				$(this).css({opacity:1}); // Opacity attribute is used on page load to hide the views because display:none causes issues to the NavigationBar widget
			}
			else {
				$(this).hide();
			}
		});
	}
» Connection and login
The connection and login process is straightforward and follows the usual sequence described in details in previous tutorials: 1) when the Connect button is clicked the SmartFox.connect() method is called; 2) as soon as the connection is established successfully — see the onConnection() listener —, the Login button and username textfield are enabled; 3) on button click, a LoginRequest is sent and the onLogin() listener is called immediately after:
	function onLogin(event)
	{
		trace("Login successful!" +
			  "\n\tZone: " + event.zone +
			  "\n\tUser: " + event.user);

		// Set user name
		// NOTE: this always a good practice, in case a custom login procedure on the server side modified the username
		$("#usernameIn").val(event.user.name);
		$("#usernameLb").html(event.user.name);

		// Set default player details
		onPlayerProfileChange();

		// Join lobby Room
		joinLobbyRoom();
	}
After tracing some information and displaying the user name in the UI (see the Your player profile box), the listener calls the onPlayerProfileChange() method to set the player profile — consisting in the user country and a generic 'ranking' — to the default values pre-selected in the UI's dropdowns. This is a simplified approach to go to the core of the feature we want to showcase in the example (Matchmaking): in a real-case scenario the profile data should be persisted on a database and loaded when the user credentials are validated on login. We'll discuss the player profile in a minute; by now it is suffice to say that profile details are saved in two User Variables.
NOTE
The connection and login process is split into multiple steps requiring the user interaction twice (click on Connect button and again on Login button). This is done for learning purpose, but actually is not the best approach in real-case scenarios. In fact you will usually show the Login button only and execute the connection and login steps in a row, automatically.
» Joining the lobby
With respect to the previous examples, in which the user could click the Rooms list to select the first Room to join, here the onLogin() listener automatically joins the user in a default Room called "The Lobby". For this purpose a separate joinLobbyRoom() method is used, because it will be useful to re-join the main lobby Room when leaving a game Room too.
	function joinLobbyRoom()
	{
		if (sfs.lastJoinedRoom == null || sfs.lastJoinedRoom.name != LOBBY_ROOM_NAME)
			sfs.send(new SFS2X.JoinRoomRequest(LOBBY_ROOM_NAME));
	}
It is worth to notice that joining an initial Room is not mandatory. In this example we do it to allow users to chat and invite each other to play, to showcase the Invitations feature.
In fact, as soon as the lobby Room is joined successfully and the ROOM_JOIN event is fired, the onRoomJoin() listener takes care of identifying the Room that was joined (in fact the same listener is called whether it's the lobby Room or a game Room) and switching the view, as until now we were still showing the initial login view.
The setView() method discussed before is responsible for enabling the chat area controls and calling the populateRoomsList() and populateUsersList() methods. The first one shows the list of public games in the right sidebar:
	function populateRoomsList()
	{
		var rooms = sfs.roomManager.getRoomList();
		var source = [];

		if (sfs.lastJoinedRoom != null && sfs.lastJoinedRoom.name == LOBBY_ROOM_NAME)
		{
			for (var r in rooms)
			{
				var room = rooms[r];

				if (room.isGame && !room.isPasswordProtected && !room.isHidden)
				{
					var players = room.userCount;
					var maxPlayers = room.maxUsers;
					var isStarted = room.getVariable(SFS2X.ReservedRoomVariables.RV_GAME_STARTED).value;

					var item = {};
					item.html = "<div><p class='itemTitle game'><strong>" + room.name + "</strong></p>" +
						"<p class='itemSub'>Players: " + players + "/" + maxPlayers + "</p>" +
						"<p class='itemSub'>" + (isStarted ? "Match started" + (players < maxPlayers ? ", join anyway!" : "") : "Waiting for players, wanna join?") + "</p></div>";
					item.title = room.name;
					item.roomObj = room;

					source.push(item);
				}
			}
		}

		$("#roomList").jqxListBox({source: source});
	}
Provided the user is in the lobby Room (otherwise doing the following would be useless, as the game view doesn't show the list of Rooms), the method goes through the list of Rooms returned by the SFSRoomManager.getRoomList() method and creates the items that will be displayed in the UI. The if statement excludes all non-game Rooms; that's the reason why the default lobby Room is not displayed; the if also excludes Rooms which are password-protected (which are those set as "private" upon creation) and hidden Rooms. The latter is a utility flag which can be set on Room creation to easily identify Rooms that shouldn't be displayed by clients. For example instead of excluding non-game Rooms, we could have set the lobby as hidden (we didn't do it because the same BasicExamples Zone is used by other examples).
Each item shows the Room name, the current number of players over the maximum number allowed to join the Room and a string indicating the game state (started or not yet started). This is based on a reserved Room Variable called RV_GAME_STARTED that we'll discuss later.
The source SFSRoom object is also associated with the list item through the roomObj property, so we can access its properties when needed.
The populateUsersList() method shows the list of users currently in the lobby Room:
	function populateUsersList()
	{
		var index = 0;
		enableButton("#inviteUserBt", false);

		// "main" indicates the main user list contained in the right accordion of the lobby view
		// "sec" indicates the secondary user list contained in the invitation tab of the game creation panel

		var mainSource = [];
		var mainSelectedIndex = -1;
		var mainSelectedUser = ($("#userList").jqxListBox("selectedIndex") > -1 ? $("#userList").jqxListBox("getSelectedItem").title : null);

		var secSource = [];
		var secSelectedIndexes = [];
		var secSelectedItems = $("#userSelector").jqxListBox("getSelectedItems");
		var secSelectedUsers = [];

		for (var o in secSelectedItems)
			secSelectedUsers.push(secSelectedItems[o].value);

		if (sfs.lastJoinedRoom != null && sfs.lastJoinedRoom.name == LOBBY_ROOM_NAME)
		{
			var users = sfs.lastJoinedRoom.getUserList();

			for (var u in users)
			{
				var user = users[u];

				if (!user.isItMe)
				{
					// MAIN USER LIST
					var mainItem = {};
					mainItem.html = "<div><p class='itemTitle'><strong>" + user.name + "</strong></p>";

					if (user.containsVariable(USERVAR_COUNTRY))
						mainItem.html += "<p class='itemSub'>Country: <strong>" + user.getVariable(USERVAR_COUNTRY).value + "</strong></p>";

					if (user.containsVariable(USERVAR_RANKING))
						mainItem.html += "<p class='itemSub'>Ranking: <strong>" + user.getVariable(USERVAR_RANKING).value + "</strong></p>";

					mainItem.html += "</div>";

					mainItem.title = user.name;
					mainItem.userObj = user;

					mainSource.push(mainItem);

					if (user.name == mainSelectedUser)
						mainSelectedIndex = index;

					// SECONDARY USER LIST
					secSource.push(user.name);

					if (secSelectedUsers.indexOf(user.name) > -1)
						secSelectedIndexes.push(index);

					index++;
				}
			}
		}

		// MAIN USER LIST

		// Populate list
		$("#userList").jqxListBox({source: mainSource});

		// Set selected index
		$("#userList").jqxListBox("selectedIndex", mainSelectedIndex);

		// Make sure selected index is visible
		if (mainSelectedIndex > -1)
			$("#userList").jqxListBox("ensureVisible", mainSelectedIndex + 1);

		// SECONDARY USER LIST

		// Populate list
		$("#userSelector").jqxListBox({source: secSource});

		// Set selected indexes
		for (var i = 0; i < secSelectedIndexes.length; i++)
			$("#userSelector").jqxListBox("selectIndex", secSelectedIndexes[i]);
	}
The method is quite articulated because the example makes use of two lists of users: the one displayed in the main accordion in the lobby view (Available players tab) and a secondary one in the game creation panel, to select players to invite (as explained later). At the beginning of the method the source arrays for the two lists are initialized, saving the currently selected values too (in case the list is rebuilt while a user is selected in the main list or multiple users are selected in the secondary list).
Users in the joined Room (returned by the SmartFox.lastJoinedRoom property) are retrieved by means of the SFSRoom.getUserList() method: the for statement runs through the list and, excluding the current user himself, creates the corresponding <div> elements to display in the UI (for the main players list; the secondary one just shows the names). Each item shows the user name and the values of the User Variables defining the user profile. The variables are returned by the SFSUser.getVariable() method, passing the keys used to set them.
The last part of the method assigns the two lists to the corresponding UI controls, setting the selected indexes too.
» Player profile
As already mentioned before, the simple user profile consists in his country and a generic ranking. When those values are changed in the UI, the onPlayerProfileChange() method is called:
	function onPlayerProfileChange()
	{
		var country = $("#countryDd").jqxDropDownList("getSelectedItem").value;
		var countryVar = new SFS2X.SFSUserVariable(USERVAR_COUNTRY, country);

		var ranking = Number($("#rankingIn").jqxNumberInput("getDecimal"));
		var rankingVar = new SFS2X.SFSUserVariable(USERVAR_RANKING, ranking);

		var isSent = sfs.send(new SFS2X.SetUserVariablesRequest([countryVar, rankingVar]));
	}
The method sets the selected values in two User Variables by sending a SFSUserVariable request. The values are associated with the user until he disconnects, and are sent to all the clients sharing the same Room joined by that user.
The request causes the USER_VARIABLES_UPDATE event to be fired; the onUserVariablesUpdate() method checks if one or both the profile User Variables have been changed: if yes the populateUsersList() method discussed before is called, rebuilding the full list of users. As already discussed in other examples, a better solution would be to update the specific item corresponding to the user, not the full list.
The two properties are used during the creation of a game Room as custom access criteria: a Room accepts players from the same country of the Room's owner (in other words the user who started the game) and with a greater or equal ranking. Of course these are just examples; any kind of criteria can be set, provided it can be expressed as a string, a number or a boolean.
» Public and private games
All the game Rooms in this example are of type SFSGame, which provides special, game-related features. One of these is the possibility to set the game Room as public or private.
A public SFSGame can be joined by any user, provided there are player slots available and the access criteria are met (if set, as in our example); a private SFSGame can be joined upon invitation only: in fact SmartFoxServer sets a random password on private Rooms (unknown to all the clients) and grants the access only to users which are invited and accept the invitation, like discussed further on. That's why the populateRoomsList() method, called after the lobby Room is joined, excludes all password-protected Rooms: the user wouldn't be able to join them anyway, because the password was set by the server.
When the user clicks a public game listed in the UI, a JoinRoomRequest is sent to the server:
	function onRoomSelected(event)
	{
		var args = event.args;
		var item = $("#roomList").jqxListBox("getItem", args.index);
		var room = item.originalItem.roomObj;

		// Join selected room
		sfs.send(new SFS2X.JoinRoomRequest(room));
	}
If the access criteria are not met or the Room is already full (the maximum number of players was reached), the ROOM_JOIN_ERROR event is fired and the onRoomJoinError() listener shows an alert with the error message.
In case the Room is joined successfully (ROOM_JOIN event), the same onRoomJoin() listener already discussed before is called and the else statement kicks in, switching the UI to the game view.
Additionally the setGameState() method is called, as described in the Game view paragraph below.
» Quick game join
The quick join is another feature of the SFSGame type of Rooms. It is a special request allowing a user to enter a game Room selected by SmartFoxServer automatically. The selection is based on the access criteria set on the Room when created (if any) and additional criteria passed to the request itself. And of course the Room must have free player slots.
When the Quick game join button is clicked, the QuickJoinGameRequest is sent to the server:
	function onQuickJoinBtClick(event)
	{
		sfs.send(new SFS2X.QuickJoinGameRequest(null, [GAME_ROOMS_GROUP_NAME], sfs.lastJoinedRoom));
	}
The request class constructor accepts three parameters. The first one is a MatchExpression: this is used to set special search criteria based on which the server will select the game to join; for example we'd like to play a specific type of game, or we are looking for a game for beginners, etc. In this example we are not setting search criteria, because we already assign access criteria to the game Rooms themselves upon creation. We will discuss MatchExpressions in greater detail when describing the game Room creation.
The second parameter is a list of Room Group names. In SmartFoxServer 2X, Rooms of any type (regular, game, SFSGame, etc) can be grouped together by assigning them a "label" indicating a group name. This feature allows to organize Rooms into logical "collections", separated from each other. Clients are then able to subscribe for events occurring in groups they are interested in only, ignoring all the others.
In particular in this example all game Rooms are assigned to the "games" group (see the Start a new game paragraph). The BasicExamples Zone is configured to automatically register all clients to the "games" group; using a different group name would require the client to "subscribe" that group with a specific request (or change the Zone configuration to include that name).
By means of this parameter we can tell the server "where" to search a joinable game.
The last parameter indicates the Room to leave when joining the new one. This example doesn't support multi-Room joining, so we always leave the previous Room when entering another.
If the server finds a valid Room, it automatically joins the client which will then receive the ROOM_JOIN event as discussed in the previous paragraph. If, for any reason, no valid Room is found by the server, the usual ROOM_JOIN_ERROR event is fired.
» Start a new game
When the Start new game button is clicked, a popup panel is displayed, divided into two tabs:
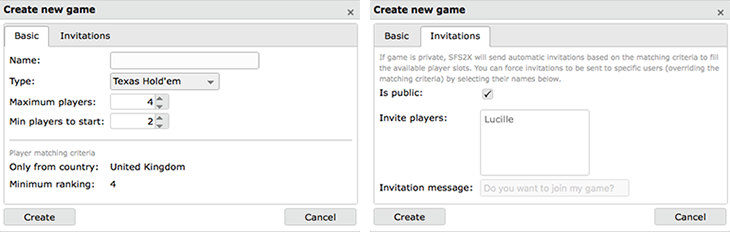
The top section of the Basic tab requires the user to enter a few game settings: the name of the game Room, the game type selected from a list of four cards games, the maximum number of players and the minimum number required to start the game. This approach is for an educational purpose: probably in a real-case scenario users wouldn't set the Room name (letting the app auto-generate it), and the other settings would be implicit in the selected game type (provided different game types would be supported).
The bottom section of the Basic tab is a reminder that the values set in user profile will be used as player matching criteria: only users from the same country of the Room creator and with a ranking greater than or equal to his own will be allowed to join the game.
It is important to notice that the criteria apply to direct Room join requests only (the standard JoinRoomRequest and the special QuickJoinGameRequest). Users specifically invited to join a game will be accepted regardless of their profile.
In the Invitations tab the user can set the game as public or private, as discussed before. As the note in the UI says, if a game is private, the server will send automatic invitations to users in the lobby, to reach the minimum number of players required to start the game. In this case the matching criteria set for the Room also apply. It is also possible to invitate one or more specific users listed in the panel, this time regardless of their profile settings. Again the server will send additional automatic invitations to fill the remaining player slots.
When the Create button is clicked, the onDoCreateGameBtClick() method is executed:
	function onDoCreateGameBtClick(event)
	{
		if ($("#gameNameIn").val() != "")
		{
			// Basic game settings
			var settings = new SFS2X.SFSGameSettings($("#gameNameIn").val());
			settings.groupId = GAME_ROOMS_GROUP_NAME;
			settings.maxUsers = Number($("#maxPlayersIn").jqxNumberInput("val"));
			settings.minPlayersToStartGame = Number($("#minPlayersIn").jqxNumberInput("val"));
			settings.isPublic = $("#isPublicCb").jqxCheckBox("checked");
			settings.leaveLastJoinedRoom = true;
			settings.notifyGameStarted = true;

			// Additional settings specific to private games
			if (!settings.isPublic) // This check is actually superfluous: if the game is public the invitation-related settings are ignored
			{
				// Retrieve users to be invited (if any)
				var users = $("#userSelector").jqxListBox("getSelectedItems");
				if (users.length > 0)
				{
					settings.invitedPlayers = [];

					for (var i = 0; i < users.length; i++)
						settings.invitedPlayers.push(sfs.lastJoinedRoom.getUserByName(users[i].value));
				}

				// Search the "default" group, which in this example contains The Lobby room only
				settings.searchableRooms = ["default"];

				// Additional invitation parameters
				var invParams = new SFS2X.SFSObject();
				invParams.put("gameType", $("#gameTypeDd").jqxDropDownList("getSelectedItem").value, SFS2X.SFSDataType.UTF_STRING);
				invParams.put("room", $("#gameNameIn").val(), SFS2X.SFSDataType.UTF_STRING);
				invParams.put("message", $("#invitationMsgIn").val(), SFS2X.SFSDataType.UTF_STRING);
				settings.invitationParams = invParams;
			}

			// Players match expression
			var matchExp = new SFS2X.MatchExpression(USERVAR_COUNTRY, SFS2X.StringMatch.EQUALS, $("#countryDd").jqxDropDownList("getSelectedItem").value);
			matchExp.and(USERVAR_RANKING, SFS2X.NumberMatch.GREATER_THAN_OR_EQUAL_TO, Number($("#rankingIn").jqxNumberInput("getDecimal")));
			settings.playerMatchExpression = matchExp;

			// Send CreateSFSGame request
			var isSent = sfs.send(new SFS2X.CreateSFSGameRequest(settings));

			// Close panel
			if (isSent)
				$("#createGameWin").jqxWindow("closeWindow");
		}
	}
Most of the method code is dedicated to collecting the settings of the game Room to be created. This is done through the SFSGameSettings class, which extends the RoomSettings class discussed in the Advanced Chat tutorial by adding parameters specific to SFSGames.
The most noticeable parameters are the following:
- groupId is the name of the group the Rooms should be included in; as discussed before, all Rooms created by this example are grouped under "games".
- minPlayersToStartGame in conjunction with notifyGameStarted control the notification that the game should be started because the minimum number of players was reached; the notification uses a reserved Room Variable with the global property set to true: this makes the variable "visible" outside the Room too, so we can display a specific message in the list of public games, as discussed in the Joining the lobby paragraph.
- isPublic sets the game as.. public, as discussed previously.
- leaveLastJoinedRoom makes the server auto-remove players from the Room they are inside when they are invited to join a new one and accept.
- invitedPlayers is the list of specific users to invite (if selected in the game creation panel); they are passed as SFSUser instances returned by the API.
- searchableRooms is a list of SFSRoom objects or Room Group names (as in the code above) where to look for users to invite to play in the new Room; we pass the "default" group, which in our example only contains the lobby Room. In other words the server will invite players who are currently waiting in the lobby.
- invitationParams is a generic SFSObject containing some custom parameters that will be used to display the invitation to the recipients (more on this in a moment).
The last (but not least) important setting passed to the request object is the playerMatchExpression (the reason of the player prefix is that you can set a spectatorMatchExpression too — not supported in this example).
A MatchExpression is a logical condition which allows to create search criteria in a very natural way to perform any type of queries on Rooms and users. Specifically when one or more conditions are "attached" to a SFSGame, they are used as "access criteria" that the server checks each time a player (or spectator) wants to join that game.
In the code above we concatenate two expressions with the and() method, representing one of the available logic operators (the other one is the or() method). The parameters passed to each MatchExpression are the name of the User Variable to check, the match operator (which is different for strings, numbers and booleans) and the value to compare.
As this example only scratches the power of MatchExpressions, we strongly recommend that you check the linked resources at the bottom of the page to learn more.
NOTE
The game type has no other usage than sending it in the invitation custom parameters. A more useful approach in an actual lobby application supporting multiple games would be to save it in a global Room Variable too. This would be helpful to: 1) show the game type in the games list, so that users in the lobby can choose the Room knowing what game they will play; 2) load the appropriate content after the game is joined. In this example this wasn't implemented because, respectively: 1) global Room Variables require a server side Extension to be set, which is an advanced concept outside the scope of this tutorial; 2) there's no actual game loaded and played, as the game view is a mockup only.
After the game Room configuration is ready, it is time to request its creation by sending a CreateSFSGameRequest. As the name denotes, this request is specifically tailored to create a SFSGame.
If the Room is created successfully, the owner is automatically joined in it and all the clients receive the ROOM_ADD event, which in turn causes the populateRoomsList() method to rebuild the list of Rooms in the lobby view, to show the new one.
In case a private game was created, invitations are also sent to matching (or directly selected) players. An invitation is notified through the INVITATION event discussed in the next paragraph.
» Challenge a user

The Available players tab of the accordion in the lobby view shows, other than the list of users connected to the lobby Room, a button to challenge one of them. For the sake of simplicity, this is just a shortcut to the game creation, in which the game is set to private and the selected user in the list is also pre-selected in the creation panel.
As soon as the game is created, all invited users (selected by the SFSGame creator or by the server based on matching criteria) receive the INVITATION event, handled by the onInvitation() listener. This calls the processInvitation() method, passing the SFSInvitation object attached to the event:
	function onInvitation(event)
	{
		// Retrieve invitation data
		var invitation = event.invitation;

		// Display invitation panel
		processInvitation(invitation);
	}

	function processInvitation(invitation)
	{
		// Remove game creation panel (if open)
		$("#createGameWin").jqxWindow("closeWindow");

		// Check if a previous invitation was received (the panel is already displayed)
		// If yes, put the new invitation in a queue
		if (!$("#invitationWin").jqxWindow("isOpen"))
		{
			// Show invitation panel
			$("#invitationWin").jqxWindow("open");

			// Get invitation custom parameters
			var invCustomParams = invitation.params;

			var message = "";

			if (invCustomParams.get("message") != "")
				message += '<em>"' + invCustomParams.get("message") + '"</em><br/>';

			message += "You have been invited by <strong>" + invitation.inviter.name + "</strong> to play <strong>" + invCustomParams.get("gameType") + "</strong> in room <strong>" + invCustomParams.get("room") + "</strong>";

			// Display message in the invitation panel
			$("#invitationMsgLb").html(message);

			// Display remaining time for replying
			$("#expTimeLb").html(invitation.secondsForAnswer);

			// Save current invitations details
			currentInvitation = {};
			currentInvitation.inv = invitation;
			currentInvitation.timer = invitation.secondsForAnswer;

			// Launch timer to detect invitation
			currentInvitation.timeout = setTimeout(onInvitationTick, 1000, this);
		}
		else
		{
			var obj = {};
			obj.invitation = invitation;
			obj.time = (new Date()).getTime();

			invitationsQueue.push(obj);
		}
	}
As multiple invitations may be received by different users, the processInvitation() method handles a queue of them: in fact at its beginning it checks if an invitation popup is already visible. If yes, the new invitation is moved to the invitationsQueue array together with a timestamp, for later processing. Otherwise the method shows the panel after retrieving the invitation parameters.
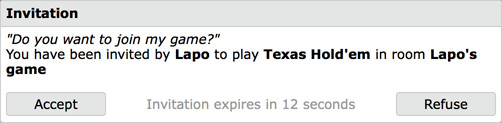
The base parameters of the SFSInvitation object are the inviter (a SFSUser object representing the user who sent the invitation) and the secondsForAnswer (the number of seconds after which the invitation expires). Additionally the invitation provides the params field, containing the custom parameters attached to the event on game creation: the game type, the Room name and a message from the inviter.
All the parameters are used to display the required information in the panel, so that the invitee can accept or refuse the invitation. The invitation is also saved in the global currentInvitation object (indicating the invitation being processed) together with a timer value initially set to secondsForAnswer.
In particular this is used to create a timed event using the setTimeout() function which executes the onInvitationTick() method after one second:
	function onInvitationTick(scope)
	{
		if (scope.currentInvitation != null)
		{
			scope.currentInvitation.timer -= 1;

			// Display remaining time for replying
			$("#expTimeLb").html(scope.currentInvitation.timer);

			if (scope.currentInvitation.timer <= 0)
			{
				// Auto-refuse invitation, just like if the user clicked the button
				scope.replyToInvitation(false);
			}
			else
			{
				// Keep running the timer
				scope.currentInvitation.timeout = setTimeout(onInvitationTick, 1000, scope);
			}
		}
	}
The purpose of this method is to check if the invitation expiration time was reached after subtracting one second from currentInvitation.timer property: if yes, the invitation is automatically refused by passing false to the replyToInvitation() method; if not, the timer displayed on the invitation popup is updated and a new timed event is scheduled after another second.
If the Accept or Refuse buttons are clicked by the user before the invitation expires, the replyToInvitation() method is called, passing respectively true or false:
	function replyToInvitation(accept)
	{
		// Clear timer
		clearTimeout(currentInvitation.timeout);

		var invitation = currentInvitation.inv;
		currentInvitation = null;

		// Remove invitation panel
		$("#invitationWin").jqxWindow("closeWindow");

		// Accept/refuse invitation
		var request = new SFS2X.InvitationReplyRequest(invitation, (accept ? SFS2X.InvitationReply.ACCEPT : SFS2X.InvitationReply.REFUSE));
		sfs.send(request);

		// If invitation was accepted, refuse all remaining invitations in the queue
		if (accept)
		{
			// Refuse other invitations
			for (var o in invitationsQueue)
			{
				var otherInv = invitationsQueue[o];
				sfs.send(new SFS2X.InvitationReplyRequest(otherInv.invitation, SFS2X.InvitationReply.REFUSE));
			}

			invitationsQueue = [];
		}

		// If invitation was refused, process next invitation in the queue (if any)
		else
		{
			while (invitationsQueue.length > 0)
			{
				var obj = invitationsQueue.splice(0, 1)[0];
				var invitation = obj.invitation;

				// Evaluate remaining time for replying (invitation.secondsForAnswer value is updated on the invitation object directly)
				var now = (new Date()).getTime();
				var elapsed = Math.ceil((now - obj.time) / 1000);
				invitation.secondsForAnswer -= elapsed;

				// Display invitation only if expiration will occur in 3 seconds or more
				if (invitation.secondsForAnswer >= 3)
				{
					processInvitation(invitation);
					break;
				}
			}
		}
	}
After clearing the expiration timeout and hiding the invitation panel, we have to actually reply to the invitation by sending an InvitationReplyRequest: its constructor requires the original SFSInvitation object instance and one of the constants in the InvitationReply enum indicating if the invitation is accepted or refused. If the invitation is accepted, the server will automatically join the invitee in the game Room, causing the usual ROOM_JOIN event to be fired, etc. If the invitation is refused, nothing else happens.
The last portion of the method checks if other invitations were received while the user was deciding whether to accept or refuse the first invitation: if the queue is not empty and the user accepted the invitation, all the subsequent ones are automatically refused; if the first invitation was refused, the method checks if the next one isn't expired yet; in such case it shows it to the user by calling the processInvitation() method.
» Game view
Whenever a game is joined, the application switches to the game view. As already highlighted before, there's no actual game to be played because the logic of a multiplayer game was outside the scope of this example, centered on the "lobby" concept.
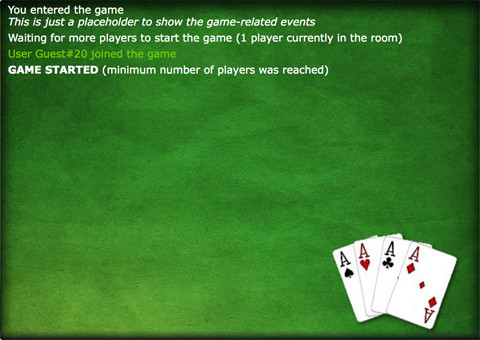
Anyway, it is interesting to discuss one last feature mentioned before: the game started notification.
As soon as we join a game Room (see the onRoomJoin() listener), the setGameState() method is called. This is also called when other players join or leave the same Room, which is notified by the USER_ENTER_ROOM and USER_EXIT_ROOM events respectively.
The method retrieves the reserved Room Variable RV_GAME_STARTED which is automatically set by SmartFoxServer if the minimum number of players configured for the SFSGame is reached. Based on its value we can make the game start on all the clients (in our example we just print different messages in the UI).
To see more advanced uses of SmartFoxServer, including complete turn-based and realtime games, you can now move onwards to the next examples.
NOTE
You should also read the comments to methods and properties in the example source code for additional informations.
» More resources
You can learn more about the SmartFoxServer basics by consulting the following resources:
- Game API (MatchExpressions, Invitations and SFSGame class)
- Zones and Rooms architecture (including Groups)