

SFS2X Docs / ExamplesJS / connector-npm-webpack
» Connector (npm+webpack variant)
» Overview
This tutorial describes a variant of the Connector example in which you will use npm as package manager and webpack as module bundler to build the distributable files. You will learn how to setup a basic npm project, install the required packages and integrate the SFS2X JavaScript client API.
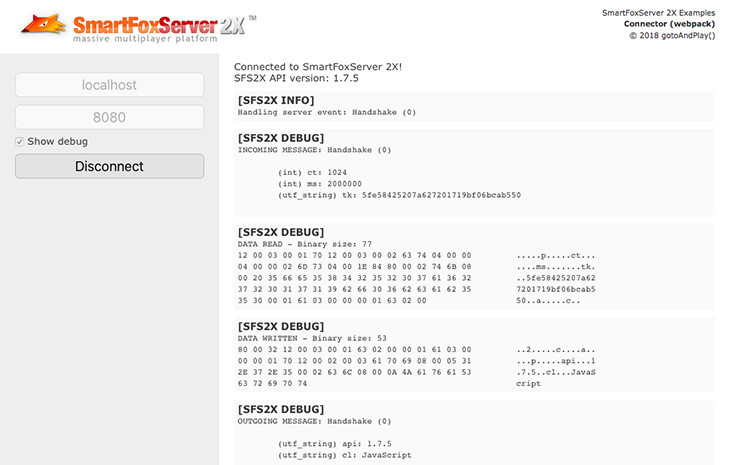
The actual features of the application will be the same, so you can refer to the previous tutorial to learn how to establish a connection with SmartFoxServer.
>> DOWNLOAD the source files <<
» Setup
This example makes use of npm, a package manager which helps installing and managing your project's dependencies, run development tools and much more. We assume that you have a basic understanding of this tool (other than having it installed in your development environment).
The npm's core configuration file is called package.json, which we already provide in the example's main folder. Let's give it a look:
	{
	  "name": "connector",
	  "description": "A simple example showing how to set the client configuration and connect to SmartFoxServer 2X",
	  "author": "gotoAndPlay()",
	  "license": "ISC",
	  "private": true,

	  "devDependencies": {
	    "source-map-loader": "^0.2.3",
	    "webpack": "^4.5.0",
	    "webpack-cli": "^2.0.14"
	  },

	  "dependencies": {
	    "sfs2x-api": "^1.7.11"
	  },

	  "scripts": {
	    "build": "webpack"
	  }
	}
Other than some basic project details at the top, the file's relevant sections are:
-
devDependencies
This section lists all the tools required to build the project; in our example they are all related to the webpack module bundler, as discussed later. These modules won't be part of the project's output, but they are needed to generate it.
-
dependencies
This is the list of the libraries that will be bundled with the application' source code by webpack when the distributable files are generated. In this example we only make use of the SFS2X JavaScript client API package, available in the npm's repository (version number may change).
-
scripts
This is the list of custom actions you can execute via the npm's run command. As described later, the build action launches the application's build process based on webpack.
Before proceeding you have to install the dependencies, which we don't distribute with the example to save quite a few MBytes. In order to do so, go to the example's main folder in a terminal/console window and execute this npm command:
> npm install
This command analyses the existing package.json file and downloads all the dependencies from the npm repository to a newly created node_modules folder.
In a real case scenario, you would create the package.json file from scratch using npm's init command and install all dependencies manually, by means of their identifier.
As an example, the following command installs the SFS2X JavaScript client API, retrieving the official package from the npm's repository:
> npm install sfs2x-api --save
For the development dependencies, a different flag is needed; for example:
> npm install webpack --save-dev
» Building the project
In order to run the example in a browser, you need to bundle — in other words "merge" — its source code (containing the core logic of the connection to SmartFoxServer) with the SFS2X API library linked in the project's dependencies. This process generates a single JavaScript file which can then be linked in the application's main html file.
For this task you will use webpack, the module bundler you just installed. Again, we assume you have a basic knowledge of this tool. If not, we strongly recommend that you check its excellent documentation.
Running the build process is straightforward: you just need to execute the build script defined in the package.json file, which in turn runs the webpack module. Go to the example's main folder in the terminal/console window and execute this npm command:
> npm run build
The behavior and output of the build process is controlled by the webpack.config.js configuration file provided in the example; this is loaded by default by webpack when launched. Let's examine the configuration:
	const path = require('path');
	const webpack = require('webpack');

	module.exports = {
	  entry: './src/main.js',
	  output: {
	    filename: 'bundle.js',
	    path: path.resolve(__dirname, 'dist')
	  },
	  mode: 'development',
	  devtool: 'source-map',
	  module: {
	    rules: [
		  {
	        test: /\.js$/,
	        use: ["source-map-loader"],
	        enforce: "pre",
	      }
	    ]
	  },
	  stats: {
		warningsFilter: /(sfs2x-api)/,
	  }
	};
The main and most relevant sections of the configuration are the entry and output properties.
Quoting webpack's documentation, the entry property "indicates which module webpack should use to begin building out its internal dependency graph. After entering the entry point, webpack will figure out which other modules and libraries that entry point depends on (directly and indirectly)".
In our example, the entry point is the main.js file from the src folder, which contains all our application logic. In more advanced applications you may have other source files (which we should call "modules") referenced by the main entry point (also indirectly). We will get back to the main.js file in the Code highlights section below.
The output setting indicates the name of the bundled file to be generated (bundle.js) and the target folder (dist). If you check the dist folder distributed with the example, you will find the following structure:
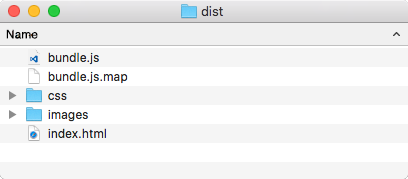
The bundle.js and bundle.js.map are the files generated by webpack (we will discuss the .map file in moment). All other files are static assets used by our example. Even if webpack is capable of bundling static assets too, we decided to simplify the project's setup and configuration by adding those assets to the dist folder manually.
In particular, the index.html file defines the example's simple user interface and imports the bundled JavaScript code with this statement:
<script type="text/javascript" src="bundle.js"></script>
» Source mapping
In case of errors in the JavaScript code, browsers will report them referencing the line numbers in the bundle.js file, which can make them hard to debug (if not impossible). Webpack can be instructed to generate a map file by means of the devtool setting, but this alone doesn't take the third-party libraries (like our API) into account.
As a complete mapping of the source code can be useful to spot possible bugs in the SFS2X API, in order to correctly map its code the webpack's source-map-loader module can be activated like shown in the configuration file above. Please notice that the module was installed previously using npm.
» Code highlights
The source code of this example is the same of the original Connector example, so you should refer to its tutorial to learn how to connect to SmartFoxServer and how to handle the events it fires.
The only two small differences in the JavaScript code are at the very beginning of the main.js file. Let's give them a look.
» Importing the SFS2X namespace
In order to access the SFS2X API classes, we need to import the SFS2X namespace using JavaScript's ES2015 syntax:
import * as SFS2X from "sfs2x-api";
sfs = new SFS2X.SmartFox(config);
» Setting the UI's event handlers
Due to the bundling process, the html code can't reference methods in the main.js file directly, just like it did in the original code where the onclick attribute of the Connect and Disconnect buttons was set to the onConnectBtClick and onDisconnectBtClick handlers respectively.
In this new setup we have to attach the listeners to the buttons on the JavaScript side, like this:
	document.getElementById("connectBt").onclick = onConnectBtClick;
	document.getElementById("disconnectBt").onclick = onDisconnectBtClick;
» More resources
You can learn more about npm and webpack by consulting the following resources: