

SFS2X Docs / ExamplesFlash / signup-login
» Sign Up and Login
In this tutorial we will show how to create a fully functional Sign Up and Login system by taking advantage of the Sign Up Assistant and Login Assistant components provided with SmartFoxServer 2X starting from version 2.7.
This example requires that you know how to configure a connection to your database server and that you are familiar with the Sign Up / Login components API. If you aren't we highly recommend to check these pages before getting started with this demo:
We will use the concepts learned in those tutorials to rapidly build a database-driven login and sign up system supporting:
- custom fields and related validation
- confirmation emails customization
- account activation
- password recovery
- permissions control
- secure login
>> DOWNLOAD the source files <<
» Getting started
» Installing the database
For this tutorial we have used a local installation of MySQL, but you can use any other database of your choice. If you want to use MySQL too we can recommend a few free solutions that you can use to quickly setup the database in your local environment:
- WinLamp for Windows
- MAMP for MacOSX
- Xampp for all platforms (Linux included)
» Database driver, Zone and Extension deployment
- If you are using MySQL you will find the related JDBC driver under the
 /deploy/database/ folder: copy the mysql-connector-java-5.1.12-bin under your SFS2X/extension/__lib__ folder;
 - copy the SignUp.zone.xml file (containing the Zone configuration) from the /deploy/zones folder to your SFS2X installation folder, under /SFS2X/zones;
- copy the /deploy/extensions/SignUpLogin/ folder under SFS2X/extensions/.
» Database configuration
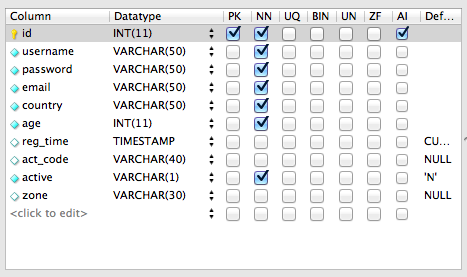
We can now proceed with the creation of a new empty database called sfs2x in which we will import the signup table that is provided in ![]() /deploy/database/signup.sql folder.
/deploy/database/signup.sql folder.
This is a standard SQL file that can be imported directly into your DB from it's administration tool (e.g. PhpMyAdmin) or you can simply copy and paste its SQL code to generate the necessary table. In our case we have used PhpMyAdmin to import the file. After this operation you should find a new table called signup_test that looks like this:
After this step you can start the SFS2X AdminTool, select the Zone Configurator module, select the SignUp Zone and click on the Database Manager tab to configure the access for SmartFoxServer 2X:
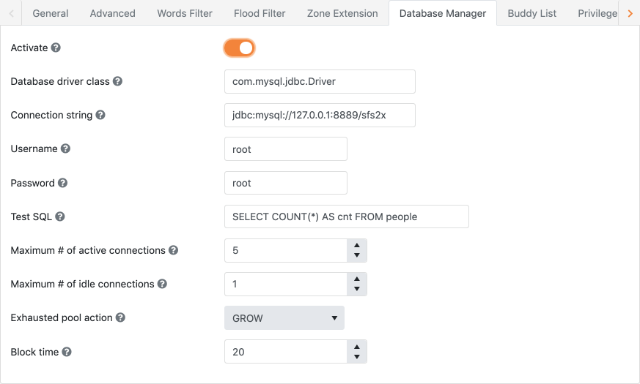
In our case we chose the MySQL driver, if you use a different one simply type in the proper driver name and connection string as directed by the database vender documentation.
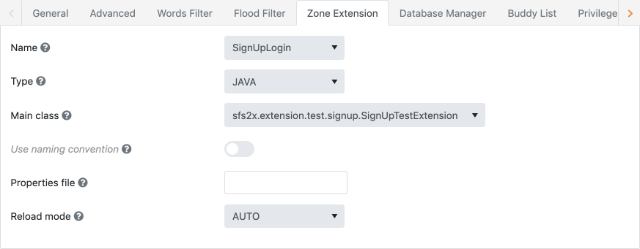
» Extension configuration
The next step is configuring the Extension in the SmartFoxServer Zone. From the same AdminTool panel select the Extension tab and set it up as follows:
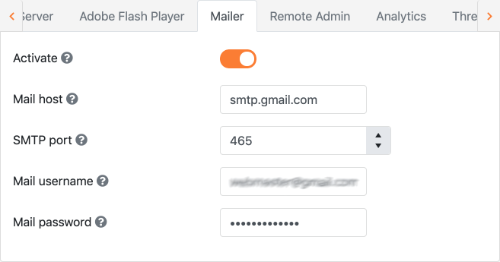
» Mailer configuration
This Sign Up example also make use of the SFS2X Mailer service to send confirmation and password rescue emails, so we will need to configure a functioning SMTP to make this feature work.
From the AdminTool select the Server Configurator and click the Mailer tab, then fill in the details for your SMTP server.
You can now restart SmartFoxServer and we're ready to test the application.
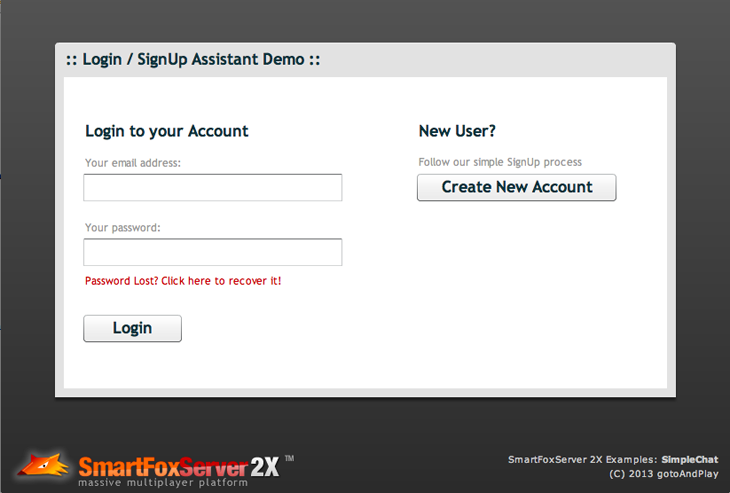
» Running the client
- make sure the client will connect to the right IP address by editing the <ip> entry in the xml file available under the /deploy/client/config folder;
- open the /deploy/client/SignUp.html file in a browser.
» Source code setup
The client-side assets are contained in the ![]() /source/client folder: create a new Flash Builder project, copy the content of the
/source/client folder: create a new Flash Builder project, copy the content of the ![]() /source/client/src folder to your project's source folder and link the libraries contained in the
/source/client/src folder to your project's source folder and link the libraries contained in the ![]() /source/client/libs folder.
/source/client/libs folder.
The example features a server-side Extension. In order to access its code, create and setup a new project in your Java IDE of choice as described in the Writing a basic Extension document. Copy the content of the ![]() /source/server/src folder to your project's source folder.
/source/server/src folder to your project's source folder.
» Application architecture
Before we move on with the code highlights let's take a look at what is going on behind the scenes with this example. In order to be able to create a new account or recover a lost password our client application needs to communicate with the Zone-level Extension which in turn requires to be at least logged in, so how does this work exactly?
» Using permission profiles
This is a good use case to use the permission profile feature offered in SmartFoxServer 2X which allows Users to log into a Zone with different privileges, for example as guest vs. registered users.
In our example we will let users log into the Zone as guest (the lowest permission level) for signing up or for accessing the password recovery service. There are four default permission profiles in SmartFoxServer 2X:
- GUEST: (id = 0) it is the lowest level and represents users that can login without registered credentials
- STANDARD: (id = 1) represents the regular registered user
- MODERATOR: (id = 2) for regular users with moderation privileges
- ADMIN: (id = 3) for administrators (typically operating the AdminTool)
In our example we will allow users to enter the Zone as GUESTs and if they login successfully they will be elevated to STANDARD users.
By using different privileges for different clients we can easily control what each user will be able to do in the system. For example we might use a very restrictive configuration for GUESTs allowing just to talk to a server Extension and denying all other requests (such as JoinRoom, CreateRoom, PublicMessage, etc).
» Server code highlights
The Extension source code is pretty simple and contains mostly setup code that configures the server components.
	@Override
	public void init()
	{
		initSignUpAssistant();
		initLoginAssistant();
	}

	private void initSignUpAssistant()
	{
		suac = new SignUpAssistantComponent();

		suac.getConfig().passwordMode = PasswordMode.MD5;
		suac.getConfig().signUpTable = "signup_test";
		suac.getConfig().extraFields = Arrays.asList("country", "age", "zone");
		suac.getConfig().activationCodeField = "act_code";
		suac.getConfig().preProcessPlugin = new CustomValidator(getParentZone().getName());

		suac.getConfig().emailResponse.isActive = true;
		suac.getConfig().emailResponse.fromAddress = "someone@somewebsite.net";
		suac.getConfig().emailResponse.subject = "Thanks for signing up";
		suac.getConfig().emailResponse.template = "SignUpEmailTemplates/SignUpConfirmation.html";

		// Password recovery setup
		suac.getConfig().passwordRecovery.isActive = true;
		suac.getConfig().passwordRecovery.mode = RecoveryMode.GENERATE_NEW;
		suac.getConfig().passwordRecovery.email.fromAddress = "someone@somewebsite.net";
		suac.getConfig().passwordRecovery.email.subject = "Password recovery service";
		suac.getConfig().passwordRecovery.email.template = "SignUpEmailTemplates/PasswordRecovery.html";

		addRequestHandler(SignUpAssistantComponent.COMMAND_PREFIX, suac);
	}
We begin by configuring the Sign Up Assistant component by setting the table we will use, the name of the activation field and the extra fields we want to populate upon registration. We have also included a zone field to store the Zone from which the registration was done. This could be useful if you are running several applications reusing the same Login / Sign Up extension. Also notice that we have set the passwordMode to MD5, so our passwords will not be store in clear in the database.
Let's skip the CustomValidator class for a moment, which is discussed below, and take a look at the emailResponse object configuration. In particular we're pointing at an HTML template file that is found in the specified path under the Extension folder. You can experiment with the template by customizing it to your likings as we explain in the Sign Up Assistant component tutorial.
The following lines activate and configure the Password Recovery service and similarly point to a different email template for the automated reply. The final call to the addRequestHandler method activates the component in the Extension, making it ready to receive requests.
The CustomValidator class is where we run our custom validation for the extra fields we have specified, in particular we want to make sure that the fields are populated and within certain range.
	private static final class CustomValidator implements ISignUpAssistantPlugin
	{
	    private final String zoneName;

	    public CustomValidator(String zoneName)
	    {
	        this.zoneName = zoneName;
	    }

	    @Override
	    public void execute(User user, ISFSObject params, SignUpConfiguration config) throws SignUpValidationException
	    {
	        Integer age = params.getInt("age");
	        String country = params.getUtfString("country");

	        if (age == null || age < 5)
	            throw new SignUpValidationException(SignUpErrorCodes.CUSTOM_ERROR, "Your age should be greater than 5 yrs. old!");

	        if (country == null || country.length() < 2)
	            throw new SignUpValidationException(SignUpErrorCodes.CUSTOM_ERROR, "Pleas specify your country");

	        String message = "";

	        if (age < 18)
	            message = "<p>Since your age is below 18, in-game purchases will not be available</p>";

	        HashMap<String, String> customMailFields = new HashMap<String, String>();
	        customMailFields.put("${ageComment}", message);
	        config.emailResponse.customEmailFields = customMailFields;

	        // Add the Zone id
	        params.putUtfString("zone", zoneName);

	    }
	}
After the age check we add a new custom message that will be populated in the confirmation email, by substituting the ${ageComment} place holder inside the HTML email template.
Finally we dynamically set the value for the database zone field with the current Zone name.
The initLoginAssistant method looks very similar to what we have already done with the previous component configuration. We set the various field names so that they match those in the database and add a post-process custom logic to elevate the User permissions to STANDARD after the login has been successful.
	private void initLoginAssistant()
	{
		lac = new LoginAssistantComponent(this);

		lac.getConfig().loginTable = "signup_test";
		lac.getConfig().userNameField = "email";
		lac.getConfig().passwordField = "password";
		lac.getConfig().nickNameField = "username";
		lac.getConfig().activationField = "active";
		lac.getConfig().activationErrorMessage = "Your account has not been activated yet!";

		lac.getConfig().extraFields = Arrays.asList("country", "age");

		lac.getConfig().postProcessPlugin = new ILoginAssistantPlugin()
		{
			@Override
			public void execute(LoginData loginData)
			{
				loginData.session.setProperty("$permission", DefaultPermissionProfile.STANDARD);
			}
		};
	}
» Wrapping up
Now that we have setup the database and SmartFoxServer and have taken a look at the Extension code we can move to the client side and see how the "magic" takes place.
» More resources
You can learn more about the described features by consulting the following resources: