

SFS2X Docs / ExamplesFlash / signup-login-part2
» Sign Up and Login (part 2)
If you missed it, read part 1.
» Client code highlights
In the SignUp.as file we start by defining the command constants that will be used with the Sign Up Assistant:
	private const CMD_SUBMIT:String = "$SignUp.Submit";
	private const CMD_ACTIVATE:String = "$SignUp.Activate";
	private const CMD_RECOVER:String = "$SignUp.Recover";
Each of these constants represent the command we want to execute on the server side, respectively:
- $SignUp.Submit: to submit the sign up data
- $SignUp.Activate: to activate a new account
- $SignUp.Recover: to recover a lost password
Next we take a look at the init() method which is executed as soon as the Flex application starts.
	private function init():void
	{
		tf_lostpassword.htmlText = "<a href='event:pass'>Password Lost? Click here to recover it!</a>";
		tf_lostpassword.addEventListener(TextEvent.LINK, onPasswordLostLinkClick);

		// Setup control handlers
		bt_signup.addEventListener(MouseEvent.CLICK, onBtSignupClick);
		bt_sup_submit.addEventListener(MouseEvent.CLICK, onBtSupSubmitClick);
		bt_activation.addEventListener(MouseEvent.CLICK, onBtActivationClick);
		bt_goBack.addEventListener(MouseEvent.CLICK, onBtGoBackClick);
		bt_login.addEventListener(MouseEvent.CLICK, onBtLoginClick);
		bt_disconnect.addEventListener(MouseEvent.CLICK, onBtDisconnectClick);
		bt_recover_email.addEventListener(MouseEvent.CLICK, onBtRecoverPasswordClick);
	}
This code simply takes care of assigning each button in the UI a different event handler, nothing special here. We may have expected to find the SmartFox client initialization code here, just like most of the other examples, instead the client initialization is done differently in this case. We have created a separate method:
	private function initSmartFox():void
	{
		// Clean up if a connection already existed
		if (sfs != null)
		{
			sfs.removeEventListener(SFSEvent.CONFIG_LOAD_FAILURE, onConfigLoadFailure);
			sfs.removeEventListener(SFSEvent.CONNECTION, onConnection);
			sfs.removeEventListener(SFSEvent.CONNECTION_LOST, onConnectionLost);
			sfs.removeEventListener(SFSEvent.LOGIN_ERROR, onLoginError);
			sfs.removeEventListener(SFSEvent.LOGIN, onLogin);
			sfs.removeEventListener(SFSEvent.EXTENSION_RESPONSE, onExtensionResponse);
		}

		// Create new Session
		sfs = new SmartFox();

		// Add event listeners
		sfs.addEventListener(SFSEvent.CONFIG_LOAD_FAILURE, onConfigLoadFailure);
		sfs.addEventListener(SFSEvent.CONNECTION, onConnection);
		sfs.addEventListener(SFSEvent.CONNECTION_LOST, onConnectionLost);
		sfs.addEventListener(SFSEvent.LOGIN_ERROR, onLoginError);
		sfs.addEventListener(SFSEvent.LOGIN, onLogin);
		sfs.addEventListener(SFSEvent.EXTENSION_RESPONSE, onExtensionResponse);

		// Load the config from file
		sfs.loadConfig("config/sfs-config.xml");
	}
We first check that another client connection was not created earlier and if it is, we get rid of it by removing all the previous listeners. We then proceed with creating a new SmartFox class instance which will de-reference the previous object, making it available for garbage collection.
The reason behind this approach is that we will use a different connection for each of the three operations provided by this demo application:
- Connect + login as guest to register a new account
- Connect + login as guest to retrive a lost password
- Connect + login as registered User in the Zone
Since each of these steps are asynchronous (connection, login, etc) we also need to keep an application state to be able to decide which operation needs to be executed next when the connection or login events are fired by the server.
In order to keep track of the current state we have defined an AppState class:
	public class AppStates
	{
	    public static const CONNECTION_SIGN_UP:int = 0;
	    public static const CONNECTION_LOGIN:int = 1;
	    public static const CONNECTION_PASS_RECOVER:int = 2;

	    public static const LOGIN_SIGN_UP:int = 3;
	    public static const LOGIN_LOGIN:int = 4;
	    public static const LOGIN_PASS_RECOVER:int = 5;
	}
and we have defined CURR_STATE variables under SignUp.as to keep track of the current application state. For example, when the User clicks the Create New Account button this code is executed:
	private function onBtSignupClick(evt:Event):void
	{
	 	mainView.selectedChild = view_signup;
		clearSignUpFields();

		panel_signup.enabled = false;
		CURR_STATE = AppStates.CONNECTION_SIGN_UP;
		initSmartFox();
	}
The main ViewStack child view is changed to the sign up panel, the CURR_STATE is assigned a new value and we finally invoke initSmartFox() to trigger the connection to the server. When the CONNECTION event will be received the client will be able to react based on the current state of the application.
	private function onConnection(evt:SFSEvent):void
	{
		if (evt.params.success)
		{
			// We're in the SignUp Panel, login as guest
			if (CURR_STATE == AppStates.CONNECTION_SIGN_UP)
			{
				CURR_STATE = AppStates.LOGIN_SIGN_UP;
				sfs.send(new LoginRequest());
			}

			// We're logging in as registered user, send the credentials
			else if (CURR_STATE == AppStates.CONNECTION_LOGIN)
				sendLogin();

			// We're logging in for recovering the password, use a guest login
			else if (CURR_STATE == AppStates.CONNECTION_PASS_RECOVER)
			{
				CURR_STATE = AppStates.LOGIN_PASS_RECOVER;
				sfs.send(new LoginRequest());
			}
		}

		// Connection failed
		else
		{
			Alert.show("I/O ERROR", "Connection to the server failed.\nPlease check if SFS2X is running!");
			mainView.selectedChild = view_main;
			resetButtons();
		}
	}
When the event handler recognizes that we're in CONNECTION_SIGN_UP state it will send a request for an anonymous (or guest) login and will set the current state to LOGIN_SIGN_UP, so that the next event handler will decide what to do.
» Communicating with the Sign Up Assistant component
Let's now take a look at the code that communicates with the SignUpAssistant instance in our Extensions. Let's see the sign up process first.
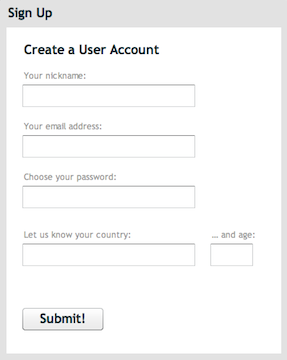
We have created a form with all the required fields and when the user finally hits the Submit button we run this code:
	private function onBtSupSubmitClick(evt:Event):void
	{
		bt_sup_submit.enabled = false;

		var sfso:SFSObject = new SFSObject();
		sfso.putUtfString("username", tf_sup_username.text);
		sfso.putUtfString("password", tf_sup_password.text);
		sfso.putUtfString("email", tf_sup_email.text);
		sfso.putUtfString("country", tf_sup_country.text);
		sfso.putInt("age", int(tf_sup_age.text));

		sfs.send(new ExtensionRequest(CMD_SUBMIT, sfso));
	}
All we need to do is populating an SFSObject with the values from each field in the form making sure to use the respective database field names as the object key. In other words if the user name field in the database is called username we will use the same key for the SFSObject parameters. Finally we send the object to the server Extension using the CMD_SUBMIT constant that have already seen.
NOTE
The server Extension takes care of validating all the fields and report errors for missing values, etc. However it is more efficient to enable a basic client-side validation that checks the presence of all mandatory fields. This way you avoid multiple exchanges between client and server when users forget to populate the required fields.
The server will receive the data and validate both the default and custom fields and send back a response. If the server response object contains the key success then our account registration has been successful, otherwise we will receive an error message.
Under the EXTENSION_RESPONSE event handler we have this:
	private function onExtensionResponse(evt:SFSEvent):void
	{
		var cmd:String = evt.params["cmd"];
		var sfso:ISFSObject = evt.params["params"];
		trace(cmd, sfso);

		// Server has replied to our Submit request
		if (cmd == CMD_SUBMIT)
		{
			if (sfso.containsKey("errorMessage"))
			{
				Alert.show(sfso.getUtfString("errorMessage"), "An error occurred");
				bt_sup_submit.enabled = true;
			}
			else if (sfso.containsKey("success"))
			{
				mainView.selectedChild = view_activate;
				tf_activation.text = "";
			}
		}

		...
	}
If the sign up process succeeded we switch the main view to the activation form where the user will copy and paste the activation code received in his email box. The code that handles the activation is this:
	private function onBtActivationClick(evt:Event):void
	{
		bt_activation.enabled = false;

		var sfso:SFSObject = new SFSObject();
		sfso.putUtfString("act_code", tf_activation.text);

		sfs.send(new ExtensionRequest(CMD_ACTIVATE, sfso));
	}
Similar to what we have done with the previous form we send an SFSObject with the activation code stored under the same key as the expected database field name, using the CMD_ACTIVATE constant, this time.

Also very similarly the EXTENSION_RESPONSE event handler will check for a success key in the response object or will display an error message:
	if (cmd == CMD_SUBMIT)
	{
	    if (sfso.containsKey("errorMessage"))
	    {
	        Alert.show(sfso.getUtfString("errorMessage"), "An error occurred");
	        bt_sup_submit.enabled = true;
	    }
	    else if (sfso.containsKey("success"))
	    {
	        mainView.selectedChild = view_activate;
	        tf_activation.text = "";
	    }
	}
Finally we take a look at the password recovery form. When the send button is clicked we check if a connection is already established. For example, if the user was trying to login his connection is already active and we can send the Password Recovery request right away. Otherwise will initiate a connection first and send the request later, when the connection is ready.
	private function onBtRecoverPasswordClick(evt:Event):void
	{
		if (tf_recover.text.length > 0)
		{
			bt_recover_email.enabled = false;

			// If connection doesn't exist, create it
			if (sfs == null || !sfs.isConnected)
			{
				CURR_STATE = AppStates.CONNECTION_PASS_RECOVER;
				initSmartFox();
			}

			// ... otherwise just sent the data
			else
				sendLoginForPasswordRecovery();
		}
	}
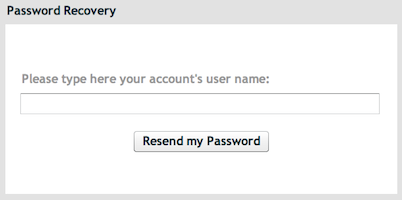
In the EXTENSION_RESPONSE handler will check if the operation was successful:
	// Server has replied to our Recover request
	else if (cmd == CMD_RECOVER)
	{
		bt_recover_email.enabled = true;
		var message:String;

		if (sfso.containsKey("errorMessage"))
			message = sfso.getUtfString("errorMessage");

		else if (sfso.containsKey("success"))
		{
			message = "An email with the password was sent to your account.";
			sfs.disconnect();
		}

		Alert.show(message, "Password Recovery");
	}
» Wrapping up
We have completed our tour of the Sign Up / Login example for the Flash platform. You can learn more about the may features of the Login Assistant and Sign Up Assistant server components here: