

SFS2X Docs / ExamplesJS / advanced-chat
» Advanced Chat
» Overview
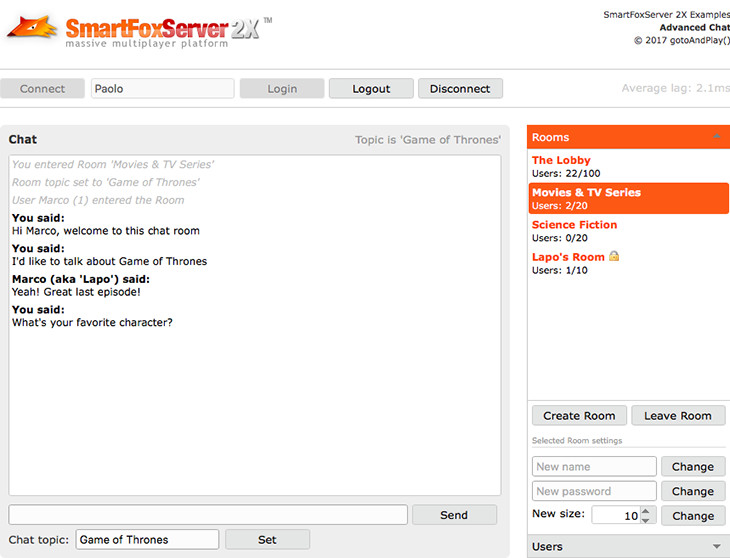
The Advanced Chat example is a complete browser-based chat application featuring public chat messaging, Room management, private chat messaging and more.
This example is an extended version of the Simple Chat one, so we strongly recommend to go through its tutorial before proceeding. In particular in this tutorial we will discuss the following additional features:
- create a Room
- join a password protected Room
- update the Room settings
- send and receive private chat messages
- monitor connection latency
With respect to the simplified version, in this example the right sidebar shows more controls: the Rooms tab contains buttons and textfields to manage Rooms and their properties, while the Users tab shows a mini-chat for private messaging with the selected user.
>> DOWNLOAD the source files <<
» Running the example
In order to run the example, follow these steps:
- make sure your SmartFoxServer 2X installation contains the BasicExamples Zone definition;
- start SmartFoxServer 2X (v2.13 or later is required);
- make sure WS protocol is enabled in SFS2X configuration (read Server setup in the intro);
- open the
 /index.html file in a browser (Firefox recommended).
» Code highlights
The example interface is set in the main index.html file, where all the controls and widgets are configured right after the page is loaded.
In order to speed up development and provide a refined user interface, this example makes use of the jQWidgets UI Toolkit. The widgets are distributed for learning purposes only and you are not entitled to use them in a commercial product. If needed, please visit the jQWidgets website to acquire a proper license.
The html file also links both the SmartFoxServer API library and the external JavaScript file containing the application logic (see the <head> tag). In particular the init() method is called at the very beginning (see the <body> tag) to instantiate and configure the SmartFox class, which is responsible of the client-server communication. For more information on the initialization, connection and login steps, please refer to the Connector and Simple Chat tutorials.
» Create a Room
In SmartFoxServer standard Rooms include regular and "game" Rooms. Both are "containers" to group users who are going to interact with each other; in particular game Rooms can be considered as containers of users playing a game together, in which they are identified as actual players or spectators. Other than standard Rooms, other kinds of Room exist: the SFSGame, which is a special game Room with additional features, and the MMORoom, dedicated to large MMO games.
Game Rooms, SFSGames and MMORooms will be further discussed in other tutorials.
When the Create Room button is clicked, a popup panel showing the main settings of a regular Room is displayed, divided into two tabs:
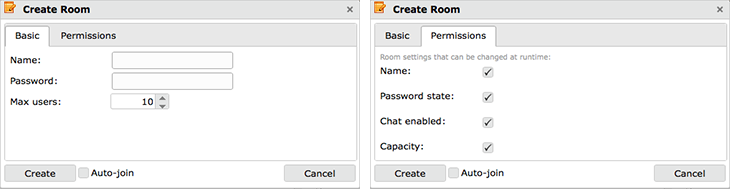
When creating a Room, the only mandatory parameter is the name, which must be unique within the Zone. Other basic parameters include a password (to create a private Room — more on this later) and the Room size (the maximum number of users allowed to join it).
Some advanced parameters include the permission flags to change the name, password protection and capacity of the Room after its creation or to enable the public chat. In particular, if the chat permission is removed, public messages won't be delivered to the other users in the Room when the Send button is pressed (while private messages described later will keep working).
When the Create button is clicked, the onDoCreateRoomBtClick() method is called:
	function onDoCreateRoomBtClick(event)
	{
		var autoJoin = $("#autoJoinCb").jqxCheckBox("checked");

		var roomSettings = new SFS2X.RoomSettings($("#roomNameIn").val());
		roomSettings.password = $("#passwordIn").val();
		roomSettings.maxUsers = Number($("#maxUsersIn").jqxNumberInput("decimal"));

		var permissions = new SFS2X.RoomPermissions();
		permissions.allowNameChange = $("#isNameChangeAllowedCb").jqxCheckBox("checked");
		permissions.allowPasswordStateChange = $("#isPwdStateChangeAllowedCb").jqxCheckBox("checked");
		permissions.allowPublicMessages = $("#isPublicMessageAllowedCb").jqxCheckBox("checked");
		permissions.allowResizing = $("#isResizeAllowedCb").jqxCheckBox("checked");
		roomSettings.permissions = permissions;

		// Send CreateRoom request
		var isSent = sfs.send(new SFS2X.CreateRoomRequest(roomSettings, autoJoin, sfs.lastJoinedRoom));

		if (isSent)
		{
			...
		}
	}
The method collects all the values from the inputs, setting them on an instance of the RoomSettings class from the SFS2X package of the API. In particular the Room permissions are collected in an instance of yet another SFS2X class, the RoomPermissions one.
The RoomSettings class provides a lot more configuration parameters: we encourage you to explore them in the API documentation.
It is now time to send the actual CreateRoomRequest: this of course accepts the settings class defined before and the value of the Auto-join checkbox displayed at the bottom of the Room creation panel: if true is passed, the server will automatically join the user in the new Room. The third parameter is the SFSRoom object representing the last Room joined by the client (if any; it could be null if no Room was joined before): this is required when auto-joining the Room, to let the server know if the previous Room should be left or not.
In fact SmartFoxServer supports multi-Room joining: a user can be in multiple Rooms at the same time. This is a quite advanced feature for specific use cases; in this example this is not needed, so the previous Room (returned by the SmartFox.lastJoinedRoom property) is always left when a new one is joined.
The request can cause a couple of events to be fired: the ROOM_CREATION_ERROR event is dispatched if an error occurs during the creation of the Room (for example another Room with the same name already exists); it is handled by the onRoomCreationError() method which just shows an alert box with the error message. The ROOM_ADD event is fired on all the clients connected to the target Zone when the creation is successful and it is handled by the onRoomAdd() listener, which just calls the populateRoomsList() method already discussed in the previous tutorial.
As we already pointed out in that tutorial, this is a rough approach, as we should add the specific item to the list, instead of rebuilding it entirely. The choice is due to the will to keep the code simple and easy to follow, but in a real case scenario this is not recommended.
If the Room is also joined automatically, whether this action is successful or not the related event is fired as discussed in the Simple Chat tutorial.
» Join a private Room
Supporting the creation of password-protected Room requires some changes to the Room-joining process too; in fact the UI must request to type in the password before sending the join request. This is how the onRoomSelected() method now looks like:
	function onRoomSelected(event)
	{
		var args = event.args;
	    var item = $("#roomList").jqxListBox("getItem", args.index);
		var room = item.originalItem.roomObj;

		if (sfs.lastJoinedRoom == null || room.id != sfs.lastJoinedRoom.id)
		{
			// If Room is private (password protected), show a popup requesting the password...
			if (room.isPasswordProtected)
			{
				$("#roomIdIn").val(room.id);
				$("#enterPasswordWin").jqxWindow("open");
			}

			// ...otherwise immediately join the selected Room
			else
				sfs.send(new SFS2X.JoinRoomRequest(room));
		}
	}
If the Room is private, instead of immediately joining it, a popup panel is shown. When the password is submitted, the onDoJoinRoomBtClick() method is in charge of sending the JoinRoomRequest; the request constructor is slightly different, as the password is also passed:
	function onDoJoinRoomBtClick(event)
	{
		var roomId = Number($("#roomIdIn").val());

		// Retrieve Room object
		var room = sfs.getRoomById(roomId);

		if (room != null)
		{
			var password = $("#joinPwdIn").val();

			// Send JoinRoom request
			sfs.send(new SFS2X.JoinRoomRequest(room, password));
		}

		// Hide window
		// (fields will be cleared by the onEnterPasswordClosed method, called automatically)
		$("#enterPasswordWin").jqxWindow("hide");
	}
» Leave a Room
In this example we included a Leave Room button, which just does what its label says: makes the user leave a previously joined Room. This is not a particularly useful feature, but we added it anyway to showcase the behavior of Rooms with respect to their "creator"'s behavior. In fact if a Room is created by a user as described above (so it is not owned by the server itself), it will be destroyed only when its creator disconnects (or logs out) from the server and the Room is empty. The behavior of game Rooms instead is different, as by default they are destroyed as soon as they are empty (no user is inside the Room anymore). This is useful for example when a game is completed and all the players leave it to return to the main lobby.
The button click calls the onLeaveRoomBtClick() method which in turn sends a LeaveRoomRequest to the server. This causes the USER_EXIT_ROOM event to be fired on all the clients still in the Room and on the one which just left it. By means of the SFSUser.isItMe property on the user object returned among the event parameters, in the onUserExitRoom() listener we can act accordingly (for example remove the user from the users list, or disable the private chat with the user who left the Room):
	function onUserExitRoom(event)
	{
		if (!event.user.isItMe)
			writeToChatArea("<em>User " + event.user.name + " (" + event.user.id + ") left the Room</em>");

		// For example code simplicity we rebuild the full user list instead of just removing the specific item
		populateUsersList();

		// Disable private chat
		if (event.user.isItMe || event.user.id == currentPrivateChat)
			enablePrivateChat(-1);
	}
When the Room is also removed, the ROOM_REMOVE event is fired and the onRoomRemove() listener rebuilds the Rooms list by calling the populateRoomsList() method (usual caveat applies here: it would be better to just remove the gone Room from the list).
» Update the Room settings
Depending on the permissions set for a Room when it was created, it may be possible to change some of its settings at a later time. Specifically these settings are:
- name
- password protection — can be removed or activated, or the password can be changed
- size — the maximum number of users that can join the Room
In this example each setting can be changed using the dedicated UI fields and buttons; clicking the button fires the related click event, whose listener sends the specific request to SmartFoxServer. The requests are, respectively: ChangeRoomNameRequest, ChangeRoomPasswordStateRequest and ChangeRoomCapacityRequest.
	function onSetRoomNameBtClick(event)
	{
		var isSent = sfs.send(new SFS2X.ChangeRoomNameRequest(sfs.lastJoinedRoom, $("#newRoomNameIn").val()));

		if (isSent)
			$("#newRoomNameIn").val("");
	}

	function onSetRoomPwdBtClick(event)
	{
		var isSent = sfs.send(new SFS2X.ChangeRoomPasswordStateRequest(sfs.lastJoinedRoom, $("#newPasswordIn").val()));

		if (isSent)
			$("#newPasswordIn").val("");
	}

	function onSetRoomSizeBtClick(event)
	{
		var newMaxUsers = Number($("#newRoomSizeIn").jqxNumberInput("decimal"));
		var isSent = sfs.send(new SFS2X.ChangeRoomCapacityRequest(sfs.lastJoinedRoom, newMaxUsers, 0));

		if (isSent)
			$("#newRoomSizeIn").jqxNumberInput({decimal:10});
	}
All three requests have the same structure, with a constructor accepting the target Room and the new value for the parameter being changed. Only ChangeRoomCapacityRequest requires an additional parameter because in game Rooms you may want to change the maximum number of spectators too; in the code above, we always pass 0 because we are not dealing with game Rooms.
Similarly, all three requests trigger two events.
A success event (ROOM_NAME_CHANGE, ROOM_PASSWORD_STATE_CHANGE and ROOM_CAPACITY_CHANGE respectively) is dispatched to all the clients, so that the UI can be updated accordingly (for example changing the Room name in the list, or showing the lock icon if a password was set, etc). In this example all users receive this event; in more advanced use cases this can be fine tuned by means of the Room Groups feature (not discussed in this tutorial). The success event always causes the populateRoomsList() method to rebuild the full list of Rooms, so the usual caveat applies.
An error event (ROOM_NAME_CHANGE_ERROR, ROOM_PASSWORD_STATE_CHANGE_ERROR and ROOM_CAPACITY_CHANGE_ERROR respectively) is dispatched to the requester client if he is not the owner of the Room (he is not the one who created the Room). For the ChangeRoomNameRequest, an error is also dispatched if the new name doesn't match the related criteria in Zone configuration (name length) or a Room with the same name already exists.
Please note that if the Room permissions don't allow a setting to be changed, no error is fired and a warning is logged on the server side only, like this:
11:43:53,925 WARN  [SFSWorker:Sys:4] v290.SystemReqController
com.smartfoxserver.v2.exceptions.SFSRoomException: Attempt to change name to a Room that doesn't support it.
[ Room: The Lobby, Id: 0, Group: default, isGame: false ]
( User Name: Guest#0, Id: 2, Priv: 0, Sess: 127.0.0.1:62539 )
» Private chat
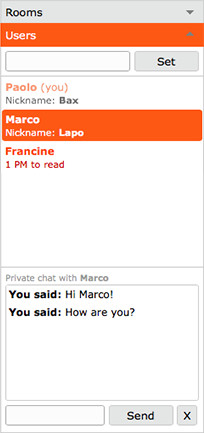
With respect to the Simple Chat example, here the the users panel in the accordion was improved to feature the private chat. This includes clickable user items in the list, also showing a counter of unread messages if needed, and dedicated controls at the bottom to display the ongoing conversation.
Now, we should mention that in SmartFoxServer 2X private messaging is not limited to users in the same Room. In fact we can exchange private messages with any user connected to the same Zone, provided there's a way to "discover" them. In this example such way is the list of users in the current Room, so to all intents and purposes we can chat privately with users in the same Room only. But, again, this is the application design, not a SFS limitation.
When a user is selected, method onUserSelected() is called. This retrieves the ID of the clicked user, enables the chat controls and refreshes the list of users:
	function onUserSelected(event)
	{
		var args = event.args;
		var selectionType = args.type;

		// Only consider user selection made using mouse or keyboard (API call is excluded)
		if (selectionType != "none")
		{
			var item = $("#userList").jqxListBox("getItem", args.index);
			var user = item.originalItem.userObj;

			// Enable private chat
			if (currentPrivateChat != user.id)
				enablePrivateChat(user.id);

			// For example code simplicity we rebuild the full userlist instead of just editing the specific item
			// This causes # of PM to read being updated
			populateUsersList();
		}
	}
As the application supports concurrent private chats, other than activating the chat controls, the enablePrivateChat() method is in charge of clearing the text area (in case we switched from one user to another) and fill it again with the messages history if we are continuing a previous conversation. Of course, due to the simplified design of this example, the history is limited to the messages exchanged since the last login (in other words no history is saved on the server).
The populateUsersList() method is called here to rebuild the list of users, to clear the unread messages notification if needed. Again, just like with the Rooms list, this is a waste of resources as we should only update the clicked item.
Typing a message and clicking the Send button triggers the PrivateMessageRequest:
	function onSendPrivateMessageBtClick(event)
	{
		var params = new SFS2X.SFSObject();
		params.putInt("recipient", currentPrivateChat);

		var isSent = sfs.send(new SFS2X.PrivateMessageRequest($("#privateMsgIn").val(), currentPrivateChat, params));

		if (isSent)
			$("#privateMsgIn").val("");
	}
It is important to note that the request parameters are the text of the message, the ID of the recipient and the optional custom SFSObject containing the recipient ID once again. The reason why we use the optional parameter like this will become clear in a second.
Whenever a private message is received, this is notified through the PRIVATE_MESSAGE event to both the sender and the recipient so that they can keep the messages sequence synchronized. The onPrivateMessage() listener is in charge of identifying the sender and the recipient, initialize the chat history if needed and display the message or notify it as unread:
	function onPrivateMessage(event)
	{
		var user;

		if (event.sender.isItMe)
		{
			var userId = event.data.get("recipient"); // "data" is an SFSObject
			user = sfs.userManager.getUserById(userId);
		}
		else
			user = event.sender;

		if (privateChats[user.id] == null)
			privateChats[user.id] = {queue:[], toRead:0};

		var message = "" + (event.sender.isItMe ? "You" : event.sender.name) + " said: " + event.message;
		privateChats[user.id].queue.push(message);

		if (currentPrivateChat == user.id)
			writeToPrivateChatArea(message);
		else
		{
			privateChats[user.id].toRead += 1;

			// For code simplicity we rebuild the full user list instead of just editing the specific item
			// This causes # of PM to read being displayed
			populateUsersList();
		}
	}
As the default parameters of the event only include the SFSUser object representing the sender and the message itself, and in case we are the sender, normally we wouldn't have a way to know who the supposed recipient was. This is needed to put the message in the right chat history queue for example. So the first action in the code above is to retrieve the user we are chatting with, directly using the event.sender property or indirectly by means of the event.data object (which is the custom SFSObject sent by... the sender of course).
The second action is to create a messages queue for the specific user we are chatting with, if not yet available. The queue is just an array with the user ID (which is unique) as the index. Each object in the array contains a sub-array of messages, which is the actual queue, and a counter of unread messages.
The received message is then added to the queue.
The last action is to display the message in the chat's text area (if currently active) or notify the unread message by calling the populateUsersList() method (usual caveat applies!).
» Lag monitoring
The lag monitoring has been added to this example to showcase the feature, even if it's mostly useless in a chat app or even a turn-based game. Instead it certainly comes into play in realtime games, to put lag compensation techniques in place.
The monitoring is started right after the login, in the onLogin() listener, using the SmartFox.enableLagMonitor() method: we only need to pass the time interval between lag each measurement, expressed in seconds:
sfs.enableLagMonitor(true, 5);
This makes an internal request to be exchanged between the API and the server at a regular interval, measuring the round-trip time it takes to the request to reach the server and come back to the client.
The measured value (on average, over a configurable number of requests) is then returned through the PING_PONG event, which in our example is listened by the onPingPong() method. This simply rounds and displays the value in the top, right corner of the user interface:
	function onPingPong(event)
	{
		var avgLag = Math.round(event.lagValue * 100) / 100;
		$("#lagLb").text("Average lag: " + avgLag + "ms");
	}
A much more meaningful usage example of this feature will be provided in the advanced SpaceWar tutorial.
To see more advanced uses of SmartFoxServer you can now move onwards to the next examples.
NOTE
You should also read the comments to methods and properties in the example source code for additional informations.
» More resources
You can learn more about the SmartFoxServer basics by consulting the following resources: