

SFS2X Docs / ExtensionsJava / quick-start
» Java Extensions: an overview
SmartFoxServer 2X allows developers to write their server side code to extend the server's capabilities, integrate it with other technologies and manage the game state in a centralized place.

The diagram above shows a simplified version of the server stack, where at the bottom clients connect via a number of protocols and can invoke both the public server API and the custom functions exposed by the game developer via Extensions.
In simple terms SmartFoxServer Extensions are to games what PHP/JSP pages are to websites. They allow for custom code to run on the server side and add entirely new application logic.
In SmartFoxServer 2X Extensions can be attached to a Zone or a Room, depending on the scope of the Extension itself. A Room Extension has a smaller scope, dealing with events, calls and users of that Room, while a Zone Extension can listen for a much larger number of events and controls all Rooms and users.
» Let's write an Extension
public class MyExtension extends SFSExtension
{
	@Override
	public void init()
	{
	    trace("Hello, this is my first SFS2X Extension!");

	    // Add a new Request Handler
	    addRequestHandler("sum", SumReqHandler.class);
	}

	public static class SumReqHandler extends BaseClientRequestHandler
	{
		@Override
		public void handleClientRequest(User sender, ISFSObject params)
		{
			// Get the client parameters
			int n1 = params.getInt("n1");
			int n2 = params.getInt("n2");

			// Create a response object
			ISFSObject resObj = new SFSObject();
			resObj.putInt("res", n1 + n2);

			// Send it back
			send("sum", resObj, sender);
		}
	}
}
Every Extension inherits from the SFSExtension base class and implements an init() method, which is called by the server at start up. Here we can initialize global objects or data structures and register event handlers. In this example we declare a command called "sum" which is handled by our SumReqHandler.
The handler extracts the parameters from the SFSObject passed by the client (used to transport data between client and server) and sends the response back. You can think of SFSObject as a simple dictionary-like object to store key/value pairs, with the added benefit of declaring exactly what type each data is. This in turn allows to optimize the network usage.
More information on SFSObject is available in this document; also check the JSDoc.
Extensions can also declare a destroy() method but it's not mandatory. It is only required for deallocating resources that require manual release such as active database connections, open files, or scheduled tasks.
As a side note, the trace() method allows you to output log information on the server side.
Let's now build a simple client to connect to the server and test our custom server code:
		public class ExtensionTester : MonoBehaviour
		{
			private SmartFox sfs;

			void Start()
			{
				// Create SmartFox client instance
				sfs = new SmartFox();

				// Add event listeners
				sfs.AddEventListener(SFSEvent.CONNECTION, OnConnection);
				sfs.AddEventListener(SFSEvent.CONNECTION_LOST, OnConnectionLost);
		        sfs.AddEventListener(SFSEvent.LOGIN, OnLogin);
			    sfs.AddEventListener(SFSEvent.LOGIN_ERROR, OnLoginError);
			    sfs.AddEventListener(SFSEvent.EXTENSION_RESPONSE, OnExtensionResponse);

				// Set connection parameters
				ConfigData cfg = new ConfigData();
				cfg.Host = "127.0.0.1";
				cfg.Port = 9933;
				cfg.Zone = "BasicExamples";

				// Connect to SFS2X
				sfs.Connect(cfg);
			}

			void Update()
			{
				if (sfs != null)
					sfs.ProcessEvents();
			}

			private void OnConnection(BaseEvent evt)
			{
				if ((bool)evt.Params["success"])
				{
					Debug.Log("Connected");

					// Send login request
					sfs.Send(new Sfs2X.Requests.LoginRequest(""));
				}
				else
					Debug.LogError("Connection failed");
			}

			private void OnConnectionLost(BaseEvent evt)
			{
				Debug.Log("Disconnected");
			}

			private void OnLogin(BaseEvent evt)
			{
				Debug.Log("Logged in as: " + sfs.MySelf.name);

				// Send test request to Extension
			    ISFSObject params = SFSObject.NewInstance();
			    params.PutInt("n1", 25);
			    params.PutInt("n2", 17);

			    sfs.Send(new Sfs2x.Requests.ExtensionRequest("sum", params));
			}

			private void OnLoginError(BaseEvent evt)
			{
				Debug.LogError("Login error: " + (string)evt.Params["errorMessage"]);
			}

			private void OnExtensionResponse(BaseEvent evt)
			{
				// Retrieve response object
				ISFSObject responseParams = (SFSObject)evt.Params["params"];

			    Debug.Log("Result: " + responseParams.GetInt("res"));
			}
		}
		window.onload = function()
		{
			// Set connection parameters
			var config = {};
			config.host = "127.0.0.1"
			config.port = 8080;
			config.zone = "BasicExamples";

			// Create SmartFox client instance
			sfs = new SFS2X.SmartFox(config);

			// Add event listeners
			sfs.addEventListener(SFS2X.SFSEvent.CONNECTION, onConnection, this);
			sfs.addEventListener(SFS2X.SFSEvent.CONNECTION_LOST, onConnectionLost, this);
		    sfs.addEventListener(SFS2X.SFSEvent.LOGIN, onLogin, this);
		    sfs.addEventListener(SFS2X.SFSEvent.LOGIN_ERROR, onLoginError, this);
		    sfs.addEventListener(SFS2X.SFSEvent.EXTENSION_RESPONSE, onExtensionResponse, this);

			// Connect to SFS2X
			sfs.connect();
		};

		function onConnection(evtParams)
		{
			if (evtParams.success)
			{
				console.log("Connected");

				// Send login request
				sfs.send(new SFS2X.LoginRequest(""));
			}
			else
				console.error("Connection failed");
		}

		function onConnectionLost(evtParams)
		{
			console.log("Disconnected");
		}

		function onLogin(evtParams)
		{
		    console.log("Logged in as: " + sfs.mySelf.name);

			// Send test request to Extension
		    var params = new SFS2X.SFSObject();
		    params.putInt("n1", 25);
		    params.putInt("n2", 17);

		    sfs.send(new SFS2X.ExtensionRequest("sum", params));
		}

		function onLoginError(evtParams)
		{
		    console.log("Login error: " + evtParams.errorMessage);
		}

		function onExtensionResponse(evtParams)
		{
			// Retrieve response object
			var responseParams = evtParams.params;

		    console.log("Result: " + responseParams.getInt("res"));
		}
		public class ExtensionTester extends Sprite
		{
		    private var sfs:SmartFox

		    public function ExtensionTester()
		    {
		    	// Create SmartFox client instance
				sfs = new SmartFox();

				// Add event listeners
				sfs.addEventListener(SFSEvent.CONNECTION, onConnection);
		        sfs.addEventListener(SFSEvent.CONNECTION_LOST, onConnectionLost);
		        sfs.addEventListener(SFSEvent.LOGIN, onLogin);
			    sfs.addEventListener(SFSEvent.LOGIN_ERROR, onLoginError);
			    sfs.addEventListener(SFSEvent.EXTENSION_RESPONSE, onExtensionResponse);

				// Set connection parameters
				var cfg:ConfigData = new ConfigData();
				cfg.host = "127.0.0.1";
				cfg.port = 9933;
				cfg.zone = "BasicExamples";

				// Connect to SFS2X
				sfs.connectWithConfig(cfg);
		    }

		    private function onConnection(evt:SFSEvent):void
		    {
		        if (evt.params.success)
		        {
		        	trace("Connected");

		        	// Send login request
					sfs.send(new LoginRequest(""));
		        }
		        else
		            trace("Connection failed");
		    }

		    private function onConnectionLost(evt:SFSEvent):void
		    {
			    trace("Disconnected");
		    }

		    private function onLogin(evt:SFSEvent):void
			{
			    trace("Logged in as: " + sfs.mySelf.name);

				// Send test request to Extension
			    var params:ISFSObject = new SFSObject();
			    params.putInt("n1", 25);
			    params.putInt("n2", 17);

			    sfs.send(new ExtensionRequest("sum", params));
			}

			private function onLoginError(evt:SFSEvent):void
			{
			    trace("Login error: " + evt.params.errorMessage);
			}

			private function onExtensionResponse(evt:SFSEvent):void
			{
				// Retrieve response object
				var responseParams:ISFSObject = evt.params.params as SFSObject;

			    trace("Result: " + responseParams.getInt("res"));
			}
		}
In the onLogin() function we wrap our parameters and send the command via the ExtensionRequest object. To handle the server response we make sure to register for the EXTENSION_RESPONSE event and read the result using the same key(s) used on the server side.
» Server side events
In addition to handling client requests a server-side Extension can also listen for a number of Server's events, such as login events, logout, join room and many more.
Listening for server events is as simple as handling client requests: we just create a function and register it as event handler. Here's a basic example with no purpose other than demonstrating this functionality:
		public class MyExtension extends SFSExtension
		{
			@Override
			public void init()
			{
			    trace("Hello, this is my first SFS2X Extension!");

			    // Add a new Event Handler
			    addEventHandler(SFSEventType.USER_JOIN_ZONE, ZoneEventHandler.class);
			}

			@Override
			public void destroy()
			{
		    	// Always make sure to invoke the parent class first
				super.destroy();

				trace("Destroy is called!");
			}

			public class ZoneEventHandler extends BaseServerEventHandler
			{
			    @Override
			    public void handleServerEvent(ISFSEvent event) throws SFSException
			    {
			        User user = (User) event.getParameter(SFSEventParam.USER);

			        trace("Welcome new user: " + user.getName());
			    }
			}
		}
Each event provides a number of parameters that can be accessed as shown in the code. For a full list of events, check the documentation here.
» Extension deployment
Finally we can take a look at how we can deploy our code to the server and run it. To create an extension you will need to create a new folder under SFS2X/extensions/

We then need to export our compiled Java classes to a jar file. This step is typically done with the help of your IDE of choice such as Eclipse, Netbeans or Intellij IDEA. Next we open the AdminTool, select the Zone Configurator and click the Zone Extension tab.
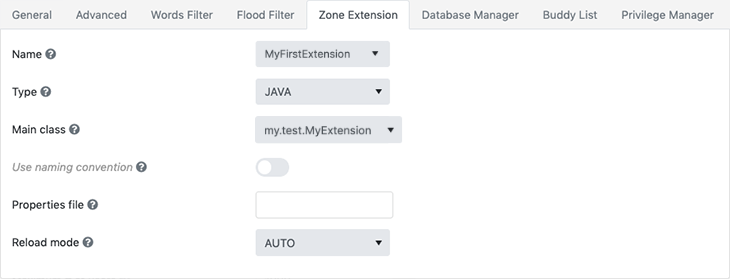
First make sure the Type dropdown is set to JAVA, then from the top dropdown select the Extension folder and the "Main class" which is the one with the init() method. We can now save and restart the server to activate the changes.
The Reload mode option set to AUTO allows to auto-reload an Extension every time a change is made to the main file, thus making it very quick to reload our code on the fly. This is convenient for development and testing but in production it is best to set this to MANUAL to avoid accidental reloads.
NOTE: if you want to attach the Extension to a specific Room instead of a Zone you can repeat the same exact process, this time selecting the target Room from the Zone Configurator.
» Next steps
There is a lot more ground to cover on Extension development. Once you have digested this introduction we recommend to watch this video tutorial and follow the next articles in this section.