

SFS2X Docs / ExtensionsJava / signup-assistant-activation
» Sign Up Assistant | Activation and emails
The Sign Up Assistant component allows developers to send custom confirmation emails so that user can keep a reference to their access credentials. Additionally the component allows to secure the sign up process by generating a unique activation code.
If this option is selected the User will be required to look for the confirmation email in his mailbox and activate the account by providing the unique activation code. Failure in doing this will prevent the client to access the application.
» Sending emails
SmartFoxServer 2X already provides all the necessary tools to easily send emails to clients. All we need to do is configuring a valid SMTP server that we will use to send the confirmation emails. To do so launch the AdminTool, select the Server Configurator and click the Mailer tab.
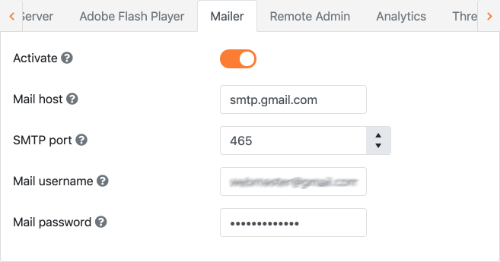
Make sure to activate the service, fill the form with your SMTP credentials and restart the server.
» A simple confirmation email example
Confirmation emails are very easy to create and customize, in fact they consist of HTML templates that you can design as you please and that the system will populate with dynamic data at runtime.
For this example we will create a simple HTML template and store it under our Extension folder inside a subfolder called SignUpEmailTemplates/.
The Sign Up Assistant will detect special placeholders in our HTML like ${username} and ${password} and will automatically replace them with the actual user name and password chosen by the user. Additionally you can define any number of other placeholders following the same naming convention: ${placeholder-name} and pass along dynamic data that will populate your emails.
This is the code we will use to activate the Sign Up Assistant's mailer service:
	suac.getConfig().emailResponse.isActive = true;
	suac.getConfig().emailResponse.fromAddress = "webmaster@myapplication.com";
	suac.getConfig().emailResponse.subject = "Thanks for signing up!";
	suac.getConfig().emailResponse.template = "SignUpEmailTemplates/SignUpConfirmation.html";
It can't get any simpler than this, we just need to provide the essential parameters such as the subject, "from address" and the template file path. Now every time a user account is successfully created an email will be sent for confirmation.
This is a simple HTML snippet we can use for the email, which will be saved as SignUpConfirmation.html under {ExtensionFolder}/SignUpEmailTemplates/:
	<html>
	<body>
		<h2>Thanks for your registration, ${userName}</h2>
		<p>Please make sure to keep this email as a reminder of your access credentials:</p>
		<ul>
			<li><strong>User Name</strong>: ${userName}</li>
			<li><strong>Password</strong>: ${password}</li>
		</ul>
		<hr>
		<p>Thanks, The MyApplication Staff</p>
	</body>
	</html>
» Custom email fields
Let's take a quick look at how we can add custom fields to the email which can be populated with runtime values. Suppose we have several Zones in our SmartFoxServer 2X instance, running different games and we want to customize the confirmation email with the right game title, based on the Zone name. Also we want to add a special warning for users with age < 18 years saying that they will not be able to use the in-game purchase service.
Here is a code example of how this can be accomplished:
	private final class MyPostProcessPlugin implements ISignUpAssistantPlugin
	{
	    private final String zoneName;

	    public MyPostProcessPlugin(String zoneName)
	    {
	        this.zoneName = zoneName;
	    }

	    @Override
	    public void execute(User user, ISFSObject params, SignUpConfiguration config) throws SignUpValidationException
	    {
	        // By default we just insert a line break
	        String message = "<br />";

	        // If age below 18 we show a message
	        int age = params.getInt("age");
	        if (age < 18)
	            message = "<p>Since your age is below 18, in-game purchases will not be available</p>";

	        Map<String, String> customMailFields = new HashMap<String, String>();
	        customMailFields.put("${ageComment}", message);
	        customMailFields.put("${gameWelcome}", "Welcome to the " + zoneName + " game.");

	        // Pass the new fields to the Component's configuration
	        config.emailResponse.customEmailFields = customMailFields;
	    }
	}
We then assign this class to the postProcessPlugin property in the configuration object, so that it is executed after the user data has been written to the database:
suac.getConfig().postProcessPlugin = new MyPostProcessPlugin(getParentZone().getName());
In the execute() method of our custom class we are provided with three object references
- user: the reference to the user that has sent the request
- params: the response SFSObject that will be sent back to the user
- config: the component's configuration object
We can easily populate the customEmailFields property in the configuration object with a custom Map of strings where each key represents the placeholder in the HTML that we want to process. Also notice that the params object can be populated with custom values to be sent back to the client, if needed.
» Adding the activation code in the sign up process
Let's now see how we can better secure the registration process by adding the activation code. Before looking at the code we will need to update our database table with two additional fields, one for the activation code and one which will tell us if the user has properly activated his account.
| field name | type | length | index | default value |
|---|---|---|---|---|
| id | int | -- | primary, autoincrement |
-- |
| username | varchar | 30 | -- | -- |
| password | varchar | 30 | -- | -- |
| varchar | 30 | -- | -- | |
| age | int | -- | -- | -- |
| country | varchar | 30 | -- | -- |
| act_code | varchar | 32 | -- | -- |
| active | varchar | 1 | -- | N |
The new field called act_code will hold the activation code, which is a string of fixed length (32 chars). The active code instead works like a flag and tells the system if the account has been activated or not. By convention this field will only contain one character "Y" or "N" and by default it will be set to "N", in the database field configuration.
Again we will need a minimum of configuration code to be added in our Extension that will tell the Sign Up Assistant which name those fields have in the database.
	suac.getConfig().activationCodeField = "act_code";
	suac.getConfig().userIsActiveField = "active";
NOTE
By default the activationCodeField is set to null which means that no activation is required during the sign up process.
We're almost ready to test the activation process, but before we go ahead we must modify the confirmation email so that it will contain the activation code. This is done by adding an extra place holder in the HTML called ${activationCode}:
	<html>
	<body>
		<h2>Thanks for your registration, ${userName}</h2>
		<p>Please make sure to keep this email as a reminder of your access credentials:</p>
		<ul>
			<li><strong>User Name</strong>: ${userName}</li>
			<li><strong>Password</strong>: ${password}</li>
	        <li><strong>Activation Code</strong>: ${activationCode}</li>
		</ul>
		<hr>
		<p>Thanks, The MyApplication Staff</p>
	</body>
	</html>
» User account activation
At this point the new user can sign up a new account and receive the confirmation and activation code to his email address. But how does the client send the code back to the server to complete the process?
The operation is very simple and similar to the code we have used for the Submit operation. The user will be shown on screen an input field where to copy and paste the activation code. The application will then send the data as follows:
	// Define SignUp extension command
    private string CMD_ACTIVATE = "$SignUp.Activate";
	/**
	 * Send activation data.
	 */
    private void sendSignUpData()
    {
        ISFSObject sfso = SFSObject.NewInstance();
        sfso.PutUtfString("act_code", tf_activation.text);

        sfs.Send(new Sfs2X.Requests.ExtensionRequest(CMD_ACTIVATE, sfso));
    }
	/**
	 * Process extension response.
	 */
	private void OnExtensionResponse(BaseEvent evt)
    {
        string cmd = (string)evt.Params["cmd"];
		SFSObject sfso = (SFSObject)evt.Params["params"];

        if (cmd == CMD_ACTIVATE)
        {
            if (sfso.getBool("success"))
                Console.WriteLine("Thanks, your account has been activated");
            else
                Console.WriteLine("Activation error:" + (string)evt.Params["errorMessage"]);
        }
    }
	// Define SignUp extension command
    var CMD_ACTIVATE = "$SignUp.Activate";
	/**
	 * Send activation data.
	 */
    function sendSignUpData()
    {
        var sfso = new SFS2X.SFSObject();
        sfso.putUtfString("act_code", document.getElementById("tf_activation").value);

        sfs.send(new SFS2X.ExtensionRequest(CMD_ACTIVATE, sfso));
    }
	/**
	 * Process extension response.
	 */
	function onExtensionResponse(evt)
    {
        var cmd = evt.cmd;
        var sfso = evt.params;

        if (cmd == CMD_ACTIVATE)
        {
            if (sfso.getBool("success"))
                console.log("Thanks, your account has been activated");
            else
                console.warn("Activation error:" + evt.errorMessage);
        }
    }
	// Define SignUp extension command
    var CMD_ACTIVATE:String = "$SignUp.Activate";
	/**
	 * Send activation data.
	 */
    private function sendSignUpData():void
    {
        var sfso:SFSObject = new SFSObject();
        sfso.putUtfString("act_code", tf_activation.text);

        sfs.send(new ExtensionRequest(CMD_ACTIVATE, sfso));
    }
	/**
	 * Process extension response.
	 */
	private function onExtensionResponse(evt:SFSEvent):void
    {
        var cmd:String = evt.params["cmd"];
        var sfso:ISFSObject = evt.params["params"];

        if (cmd == CMD_ACTIVATE)
        {
            if (sfso.getBool("success"))
               trace("Thanks, your account has been activated");
            else
                trace("Activation error:" + evt.params["errorMessage"]);
        }
    }
This time we're sending a single parameter, the activation code, by using as key the name of the field that holds the code in the database. The server will then reply with a success parameter if the operation was successful or send a detailed error message.
» Resending the Activation code
There can be cases in which the User might want to request the activation code again, possibly because the first email wasn't received. In this case the client application can send a specific request to trigger a new email send from the server.
	// Define SignUp extension command
    private string CMD_RESEND_EMAIL = "$SignUp.ResendEmail";
	/**
	 * Request a new email with the activation code.
	 */
    private void sendSignUpData()
    {
       sfs.Send(new Sfs2X.Requests.ExtensionRequest(CMD_RESEND_EMAIL));
    }
	// Define SignUp extension command
    var CMD_RESEND_EMAIL = "$SignUp.ResendEmail";
	/**
	 * Request a new email with the activation code.
	 */
    function sendSignUpData()
    {
        sfs.send(new SFS2X.ExtensionRequest(CMD_RESEND_EMAIL));
    }
	// Define SignUp extension command
    var CMD_RESEND_EMAIL:String = "$SignUp.ResendEmail";
	/**
	 * Request a new email with the activation code.
	 */
    private function sendSignUpData():void
    {
        sfs.send(new ExtensionRequest(CMD_RESEND_EMAIL));
    }
This particular request does not return any data from the server and it can be invoked only a limited amount of times for each user. By default a maximum of 3 re-send calls can be called, although the setting can be customized from the configuration of the SignUp Assistant component.
		// Define SignUp extension command
	    private string CMD_RESEND_EMAIL = "$SignUp.ResendEmail";
		/**
		 * Request a new email with the activation code.
		 */
	    private void sendSignUpData()
	    {
			ISFSObject sfso = SFSObject.NewInstance();
	        sfso.PutUtfString("email", "me@myself.com");

	        sfs.Send(new Sfs2X.Requests.ExtensionRequest(CMD_RESEND_EMAIL, sfso));
	    }
		// Define SignUp extension command
	    var CMD_RESEND_EMAIL = "$SignUp.ResendEmail";
		/**
		 * Request a new email with the activation code.
		 */
	    function sendSignUpData()
	    {
		    var sfso = new SFS2X.SFSObject();
	        sfso.putUtfString("email", "me@myself.com");

	        sfs.send(new SFS2X.ExtensionRequest(CMD_RESEND_EMAIL, sfso));
	    }
		// Define SignUp extension command
	    var CMD_RESEND_EMAIL:String = "$SignUp.ResendEmail";
		/**
		 * Request a new email with the activation code.
		 */
	    private function sendSignUpData():void
	    {
		    var sfso:SFSObject = new SFSObject();
	        sfso.putUtfString("email", "me@myself.com");

	        sfs.send(new ExtensionRequest(CMD_RESEND_EMAIL, sfso));
	    }
The "email" key used in the example must correspond to the value set for SignUpConfiguration.emailField on the server side. The default value is "email".
» Wrapping up
In this chapter we have seen how we can send confirmation emails using common HTML templates and how we can easily add an activation for our sign up process.
We can now learn how to activate and use the Password Recovery feature provided by the Sign Up Assistant.
Choose your next destination: