

SFS2X Docs / GettingStarted / admintool-custom-modules
» Custom Admin Modules
Starting with SmartFoxServer 2X v2.16 we introduced the possibility to create custom modules for our AdminTool. When ready, a module can be deployed in the AdminTool folder of your SFS2X instance to provide integrated configuration, monitoring and management capabilities of your game or application.
» Introduction
In multiplayer games and applications, a common requirement is to be able to monitor how users are behaving during their sessions. In general, this is something the default AdminTool's modules (in particular Zone Monitor and Analytics) provide at a global level, based on the server status being monitored in realtime (or not).
But oftentimes developers also need to manage their application "on-the-fly", or monitor its status through specific parameters which are inner to the server side Extension and to which the default modules don't have access (and wouldn't know how to treat anyway).
A few use cases:
- show statistics on quests, items, weapons, spells, etc, to drive future developments and changes to the gameplay;
- control the status of Non-Player Characters (NPC); add or remove them, or adjust the rules controlling their behavior;
- trigger game-specific events for a selection of users, or all of them;
- monitor the behavior of users to identify specific cheating attempts;
- etc.
Custom AdminTool Modules have been introduced to help developers easily create their own monitoring and management tools, specific for their games and applications, and collect them in one convenient place. The AdminTool provides the connection to the server and a secure admin login system, it offers an existing interface with useful basic features (for example notifications and alerts) and it integrates well known UI frameworks (like Bootstrap), so developers can concentrate on the core logic of their tools and speed up the development process.
An AdminTool module is made of two separate parts: a server side request handler and the client side user interface. In the following chapters we will describe how to create a sort of template module, showing how to develop both parts and handle the network communication between the two. Files can be downloaded at the bottom of this tutorial.
We will call our custom module Game Manager.
And for the purpose of this tutorial, we will also assume that a MyGame Zone exists in SmartFoxServer, with its own Java Extension attached to it. The Extension handles the server side logic of our hypothetical game.
» Requirements
We need a Java IDE to assist us in writing the server side code, compiling it and creating a binary package (jar file) that will be deployed to SFS2X. In this tutorial we will be using Eclipse.
A text editor and an image editor capable of exporting in svg format is then needed for the module definition. The text editor is enough for the client side coding (both HTML5 and JavaScript) too, but if you want to use an IDE, we suggest Atom.
Finally, some experience in SFS2X Extensions development is required, as you will better understand most of the concepts discussed here.
» Module development pt.1: definition
In this chapter we will show how to define a new module, so that it is loaded by SmartFoxServer when started.
» Module definition
Defining the custom module is the first step we need to take. In order to do it, let's browse the SFS2X installation folder looking for this file: {sfs-install-dir}/SFS2X/config/admin/admintool.xml. Open it with a text editor.
This file contains the definition of all the default AdminTool modules, and this is where we will add our custom one too. A custom module definition needs the following attributes.
- id: this is the main identifier of the module, which we will use throughout this tutorial. Following the default modules' convention, we will set the id after the module's name, so GameManager.
- name: the actual module's name, displayed in the user interface. In our example Game Manager.
- description: a short description of the module's purpose. It will be displayed in a tooltip when the mouse pointer hovers the module's icon in the AdminTool interface. We can set it to Management tool for our game as an example.
- className: this attribute is reserved specifically to custom modules. It indicates the full name of the Java class that implements the request handler that SFS2X must load and instantiate when started. In this example we will use a fake namespace: my.namespace.GameManagerReqHandler.
Let's add the following line to the modules' definition file. The position in the list will determine where the module's icon will appear in the AdminTool interface. In our example it will be the last one.
<module id="GameManager" name="Game Manager" description="Management tool for our game" className="my.namespace.GameManagerReqHandler"/>
» Module icon
The module also requires a vector icon in SVG format. For coherence, we suggest to use a white + orange (#fd7d25) color scheme. The following is an example of icon on a dark background.
The icon must be saved under the {sfs-install-dir}/SFS2X/config/admin/icons folder. Depending on the SFS2X version, in the same folder you may also find icons in PNG format. Those are legacy icons still available for compatibility with an older version of the AdminTool. Ignore them.
» Module development pt.2: the server side
In this chapter we will show how to create a basic request handler listening to commands coming from the module's client, and how to deploy it.
» Project setup
A request handler serves the purpose of receiving a specific set of requests from the client and sending back the related responses. The "request handler" is one of the core concepts of SmartFoxServer Extensions development, so more information is available here.
Specifically, the request handler of a custom AdminTool module receives commands from the module's client.
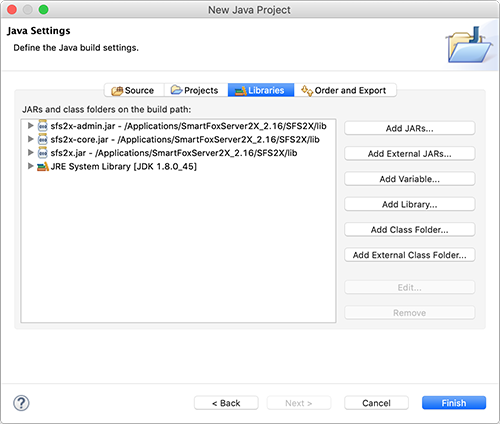
Let's start Eclipse and from the File menu choose New > Java Project. In the window that pos up, we give the project a name, for example GameManagerCustomModule, and proceed to the next screen.
Now it is time to add the libraries that are needed to compile our handler. Click on Libraries tab, then on the Add External JARs... button and browse your file system to your {sfs-install-dir}/SFS2X/lib folder.
Select three files: sfs2x-admin.jar, sfs2x-core.jar and sfs2x.jar, then click the Finish button in the window.
The new project will appear in the Package Explorer panel which by default is located at the top left column of your interface. Now you can create a new Java class by right-clicking on the src folder and selecting New > Class from the menu.
Here we can enter the name of the class, GameManagerReqHandler (as declared in the module definition), and its package, my.namespace (again as declared before). After clicking on the Finish button, the newly created class will look like this:
package my.namespace;

public class GameManagerReqHandler
{

}
» Base handler code
We can now add the boilerplate code to turn the newly created class into the request handler that we need.
package my.namespace;

@MultiHandler
@Instantiation(InstantiationMode.SINGLE_INSTANCE)
public class GameManagerReqHandler extends BaseAdminModuleReqHandler
{
	public static final String MODULE_ID = "GameManager";
	private static final String COMMANDS_PREFIX = "gameMan";

	public CustomToolReqHandler()
	{
		super(COMMANDS_PREFIX, MODULE_ID);
	}

	@Override
	protected void handleAdminRequest(User sender, ISFSObject params)
	{
		String cmd = params.getUtfString(SFSExtension.MULTIHANDLER_REQUEST_ID);
	}
}
We added the following elements:
-
The class must be annotated:
- @MultiHandler tells SmartFoxServer that multiple request types will be managed by this request handler.
- @Instantiation tells SmartFoxServer if a new instance of the handler should be created or not when a request is delivered; setting it to SINGLE_INSTANCE makes it possible not to lose the handler state between requests.
- The class must extend BaseAdminModuleReqHandler, which takes care of validating the request (is the user allowed to access this module? — check the Administrators table under the Remote Admin tab of the Server Configurator module) and provides other useful methods as described in the appendix of this document.
-
A couple of constants:
- MODULE_ID must match the ID set for the module in its definition above, so GameManager in our example; this is used internally by the parent class (BaseAdminModuleReqHandler) for the mentioned validation and other tasks.
- COMMANDS_PREFIX is the prefix string which identifies all the commands (requests) directed to this module. In fact the same string (in our example gameMan) will be used later during the development of the module's client part. This prefix must be unique among all the AdminTool modules, you can't use the following strings: admin, analytics, banManager, bBoxMonitor, console, dashboard, extensionMan, licenseMan, logViewer, serverConfig, servletMan, zoneConfig, zoneMonitor.
- A constructor, which must call the parent constructor passing the two constants defined before.
- The implementation of the parent class abstract method handleAdminRequest, in which we extract the actual request identifier (cmd) sent by the client, as we will see later.
The handleAdminRequest method is the core of the module's server side handler. This is where all commands coming from the client are processed. With the help of an if-else statement we can execute different actions based on the actual command sent by the client.
As an example, let's suppose we want to know the total number of users connected to our MyGame Zone (remember we assumed in the beginning that this Zone exists on the server and it has an Extension attached). This is requested by the command "userCount"; an additional parameter is also sent by the client to indicate if we want to retrieve the total number of users or just the actual players (assuming that our game allows users to join as spectators too). Let's update the handleAdminRequest method:
@Override
protected void handleAdminRequest(User sender, ISFSObject params)
{
	String cmd = params.getUtfString(SFSExtension.MULTIHANDLER_REQUEST_ID);

	if (cmd.equals("userCount"))
	{
		// Retrieve flag sent by the client
		boolean playersOnly = params.getBool("playersOnly");

		// Retrieve Zone
		Zone myZone = sfs.getZoneManager().getZoneByName("MyGame");

		// Count users
		int count = 0;

		if (!playersOnly)
			count = myZone.getUserCount();
		else
		{
			for (Room room : myZone.getRoomList()) {
				count += room.getPlayersList().size();
			}
		}

		// Send response back to client
		ISFSObject outParams = new SFSObject();
		outParams.putInt("value", count);
		outParams.putBool("playersOnly", playersOnly);

		sendResponse("userCount", outParams, sender);
	}
}
In this code, the main if checks what command (request) was sent by the client, which is then processed.
First of all, we know that this request comes with an additional boolean parameter, which we retrive; then the appropriate count is made. Finally the response is sent back to the sender of the request (aka the client part of our module) using a service method made available by the BaseAdminModuleReqHandler parent class. The first parameter passed to the sendResponse method is the string identifier of the response, which the client will use to know what to do with the returned data. For convenience we use the same identifier of the request ("userCount"), but this is not mandatory. Among the returned data we also send the flag indicating if the user count includes all users or players only.
» Communicating with the Extension
As mentioned in the introduction, when creating a custom module the actual benefit comes from being able to access our game Extension to extract informations on the game state, send commands and more.
Communicating with an Extension from the request handler can be easily achieved through the Extension's handleInternalMessage method, described in the Java Extensions in-depth overview (see Extension interoperability paragraph).
For example we want to display some overall stats about "spells" cast by players in the game, for example the total amount per spell type. Let's assume this information is requested by the module's client through a generic "stats" command (which may include other stats too).
@Override
protected void handleAdminRequest(User sender, ISFSObject params)
{
	String cmd = params.getUtfString(SFSExtension.MULTIHANDLER_REQUEST_ID);

	if (cmd.equals("userCount"))
	{
		// ...
	}

	else if (cmd.equals("stats"))
	{
		// Get a reference to the Zone Extension
		ISFSExtension ext = sfs.getZoneManager().getZoneByName("MyGame").getExtension();

		// Extract stats about "spells" from Extension
		ISFSObject spellsObj = (ISFSObject) ext.handleInternalMessage("spells", null);

		// Send response back to client
		ISFSObject outParams = new SFSObject();
		outParams.putSFSObject("spells", spellsObj);
		//outParams.putSFSObject("others", otherObj); // Other stats collected by the Extension

		sendResponse("stats", outParams, sender);
	}
}
Adding an else to the main if, we identify the new request coming from the client. There we get a reference to the Extension attached to our MyGame Zone and get the data we need using the handleInternalMessage method, passing an identifier of the data we need to extract ("spells"). The second parameter of the method is set to null, because in this example we don't need to pass additional parameters (which could be useful in a real case scenario, for example to provide a filter). For convenience, the call to the Extension returns an SFSObject, which we can immediately send back to the client. Again, the response uses the same identifier of the request ("stats").
For the sake of completeness, the following code shows how the handleInternalMessage method could look like inside the Extension code:
@Override
public Object handleInternalMessage(String cmdName, Object params)
{
	if (cmdName.equals("stats"))
	{
		ISFSObject spellsObj = new SFSObject();
		spellsObj.putInt("teleport", this.getTeleportSpellCount());
		spellsObj.putInt("fireball", this.getFireballSpellCount());
		spellsObj.putInt("protection", this.getProtectionSpellCount());
		spellsObj.putInt("heal", this.getHealSpellCount());

		return spellsObj;
	}

	return null;
}
» Deployment
Assuming our handler is now complete, we can deploy it in SmartFoxServer. In the Package Explorer right-click the project folder and choose Export.... In the next dialogue box open the Java folder and choose JAR file, then click the Next button. In the JAR Export window click the Browse... button and navigate to the {sfs-install-dir}/SFS2X/extensions/__lib__, specifying then a name for the jar file to be created (for example GameManagerAdminModule).
We can now start (or restart) SmartFoxServer. Just have a look at the startup log, to make sure the request handler is loaded without errors.
» Module development pt.3: the client side
In this chapter we will show how to develop and deploy the client part of a custom AdminTool module.
The AdminTool application is based on the Custom Elements web standard. This means that our custom AdminTool module must follow the same approach: in a nutshell, we have to declare a custom html tag and the JavaScript class defining it — in other words, the view and its controller.
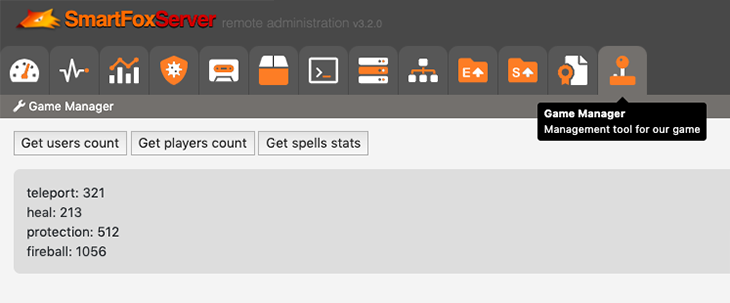
The purpose of the following paragraphs is to show how to create a very simple module displaying the data returned in response to the "userCount" and "stats" requests handled by the server side handler described before.
» Creating the HTML5 view
The module's html is made of a single custom tag at the root level, which then encapsulates all the other html elements which make up our interface. The name of the custom tag must follow a strict naming convention: its the module ID in lowercase characters, with all the words separated by a dash (kebab-case) and followed by -module. The tag must also have the CSS class module applied to it.
We can now open our editor of choice and type:
<game-manager-module class="module"></game-manager-module>
We can now add more elements to our view, including some styling. In order to prevent possible conflicts in the DOM, we strongly recommend that you use a prefix for all IDs and class names. Alternatively it is possible to make use of the Custom Element's Shadow DOM, although this is not mandatory because we are not creating an actually reusable web component (for which the Shadow DOM comes in handy).
In our example we go with a plain DOM and use the "gm-" prefix where needed:
<style>
	game-manager-module {
		padding: 1rem;
	}

	.gm-output {
		padding: 1rem;
		margin-top: 1rem;
		background-color: #ddd;
		border-radius: .5rem;
	}
</style>

<game-manager-module class="module">
	<div>
		<button id="gm-usersBt" type="button" class="gm-button">Get users count</button>
		<button id="gm-playersBt" type="button" class="gm-button">Get players count</button>
		<button id="gm-spellsBt" type="button" class="gm-button">Get spells stats</button>
	</div>
	<div id="gm-outputArea" class="gm-output">Click on a button.</div>
</game-manager-module>
Other than the <style> tag, our view contains 3 buttons and a <div> in which we will display the data returned by our server side request handler.
You will later find out that some html elements, like the buttons, come with a styling different from the browser default. This is due to the frameworks we use in the AdminTool. More on this subject at the end of the chapter.
Save the html file with the name game-manager.html (module ID in lowercase and kebab-case).
» The JavaScript controller behind the view
It is now time write the actual logic of our module. Let's start with the basic scaffolding:
export default class GameManager extends BaseModule
{
	constructor()
	{
	    super('gameMan');
	}

	initialize(idData, shellController)
	{
		// Call super method
		super.initialize(idData, shellController);
	}

	destroy()
	{
		// Call super method
		super.destroy();
	}

	onExtensionCommand(cmd, data)
	{

	}
}
Please note the following:
- This is a JavaScript class as introduced by ECMAScript 2015 standard. Its name must be equal to the module ID as per its definition. The export and default keywords make it possibile to load this class dynamically when needed.
- Usually a class which defines a Custom Elements should extend HTMLElement. In our case instead, we have to extend a class provided by the AdminTool itself, BaseModule, which in turn extends HTMLElement. Similarly to what happens on the server side, this class provides some useful methods that you can call or you must override. More information in the appendix below.
- The class constructor must call the constructor of the parent class, passing the same commands prefix defined on the server side, in this example gameMan.
- The initialize and destroy methods are called by the AdminTool when the module is loaded or unloaded respectively. We can override them to initialize and destroy inner components of our module for example. If we do, we must always call the super methods too, passing the provided parameters (which will be described in the appendix).
- The onExtensionCommand method is the one that gets called when a response (or more generically a "command") is sent by our server side request handler.
NOTE
The AdminTool will take care of loading this class dynamically and use it to "upgrade" the custom html element we defined in our module's view. We don't have to explicitly call the window.customElements.define method as normal in Custom Elements development.
We can now write the code to send requests to and receive responses from the server side request handler.
export default class GameManager extends BaseModule
{
	constructor()
	{
	    super('gameMan');
	}

	initialize(idData, shellController)
	{
		// Call super method
		super.initialize(idData, shellController);

		// Add buttons click listeners
		document.getElementById('gm-usersBt').addEventListener('click', () => this._onUserCountReqClick(false));
		document.getElementById('gm-playersBt').addEventListener('click', () => this._onUserCountReqClick(true));
		document.getElementById('gm-statsBt').addEventListener('click', () => this._onStatsReqClick());
	}

	destroy()
	{
		// Call super method
		super.destroy();
	}

	onExtensionCommand(cmd, data)
	{
		// Clear output area
		document.getElementById('gm-outputArea').innerHTML = '';

		// Handle response to "userCount" request
		if (cmd == 'userCount')
		{
			const playersOnly = data.getBool('playersOnly');
			const count = data.getInt('value');

			document.getElementById('gm-outputArea').innerHTML = `Total ${playersOnly ? 'players' : 'users'}: ${count}`;
		}

		// Handle response to "stats" request
		else if (cmd == 'stats')
		{
			const spellStats = data.getSFSObject('spells');
			const spells = spellStats.getKeysArray();

			for (let spell of spells)
				document.getElementById('gm-outputArea').innerHTML += `${spell}: ${spellStats.getInt(spell)}
`;
		}
	}

	_onUserCountReqClick(playersOnly)
	{
		const params = new SFS2X.SFSObject();
		params.putBool('playersOnly', playersOnly);

		this.sendExtensionRequest('userCount', params);
	}

	_onStatsReqClick()
	{
		this.sendExtensionRequest('stats');
	}
}
This is what we did:
- In the initialize method we added the listeners to the button click events (actually we should also remove them in the destroy method). The listeners call the sendExtensionRequest method made available by the parent class, which sends the required command and additional parameters where needed.
- The onExtensionCommand, as already mentioned, receives the responses sent by our server side request handler. In this simple example, both responses are handled similarly, by displaying the returned data in the UI. The difference is in how such data is returned by the server, which requires a different approach to print it.
Save the js file with the name game-manager.js (module ID in lowercase and kebab-case).
» Deployment
We are now ready to deploy the client part of our custom module. First of all we need to browse the folder containing the AdminTool in our SmartFoxServer2X instance: {sfs-install-dir}/SFS2X/www/ROOT/admin.
Copy the html file (game-manager.html) under the /modules subfolder.
Copy the js file (game-manager.js) under the /assets/js/custom-modules subfolder.
We can now finally launch the AdminTool (local url: http://localhost:8080/admin), click on the newly added module to open it and click on one of the buttons in the UI to test the data retrieval:
» A note on frameworks
The AdminTool makes use of the following frameworks and libraries, which are then available to you in the development of your custom modules:
- jQuery v3.3.1
The popular JavaScript library providing simple and powerful methods for HTML document traversal and manipulation, event handling, etc. - Bootstrap v4.4.1 (with modified primary color)
The most popular front-end toolkit to quickly design mobile-ready interfaces. Using the CSS classes provided by the embedded Bootstrap you can give your module the same look and feel of the default modules. - FontAwesome v5.8.1
The free version of the popular set of vector icons. - jQuery Scrolling Tabs v2.6.1
A useful jQuery plugin to make Bootstrap Tabs scroll horizontally rather than wrap. - JS Cookie v2.2.0
A simple, lightweight JavaScript API to handle browser cookies.
The following library is also included in the AdminTool, but you are not allowed to use it unless you own or acquire a license.
- Kendo UI for jQuery v2019.3.917 (with Bootstrap 4 theme + modified primary color)
A complete jQuery UI component library to quickly build responsive web applications.
» Download
The module definition and icon, the server side request handler Java project and the client side HTML and JavaScript files can be downloaded as a zip file with the following link:
» Appendix
As discussed above, when developing a custom module, you need to extend a base class both on the server side (BaseAdminModuleReqHandler) and on the client side (BaseModule). This appendix provides a list of the methods an properties you may need to access to.
» Server side
BaseAdminModuleReqHandler class
| Type | Method |
|---|---|
| void |
handleAdminRequest(User sender, ISFSObject params) Abstract method to be implemented by the custom request handler. This method receives the requests from the client side of the custom AdminTool module. |
| void |
sendResponse(String cmd, User recipient) Sends a simple command to a specific user, without additional parameters. Parameters cmd [String]: the identifier of the response. recipient [User]: the User to send the response to. |
| void |
sendResponse(String cmd, List<User> recipients) Sends a simple command to multiple users, without additional parameters. Parameters cmd [String]: the identifier of the response. recipients [List<User>]: the list of Users to send the response to. |
| void |
sendResponse(String cmd, ISFSObject params, User recipient) Sends a response to a specific user, including a number of additional parameters. |
| void |
sendResponse(String cmd, ISFSObject params, List<User> recipients) Sends a response to multiple users, including a number of additional parameters. |
| void |
trace(ExtensionLogLevel level, Object ... args) Prints a message to the console and log files using the specified logging level. Parameters level [ExtensionLogLevel]: the level of the message to be logged. args [Object...]: any number of strings/objects to log. |
» Client side
BaseModule class
| Type | Constructor |
|---|---|
| none |
constructor(commandsPrefix) The BaseModule class constructor. Must be invoked with super in the costructor of the client side custom module controller. Parameters commandsPrefix [string]: the prefix to be used to deliver the requests to the appropriate server side request handler. |
| Type | Property |
| Object |
idData An object containing the module configuration parameters:
|
| ShellController |
shellCtrl A reference to the controller class of the AdminTool shell, providing useful general methods to display notification, alerts, etc. Check the class ShellController class API below. |
| SmartFox |
smartFox A reference to the SFS2X HTML5/JavaScript API instance managed by the AdminTool controller class. Provides access to all client API methods; check the API JSDoc for more information. |
| Type | Method |
| none |
initialize(idData, shellController) Called when the module is loaded. This method can be overridden to perform specific initialization tasks. If overridden, the parent method must always be called through the super keyword, passing the received parameters. Parameters idData [Object]: an object containing the module configuration parameters (see idData property above). shellController [ShellController]: a reference to the controller class of the AdminTool shell (see shellCtrl property above). |
| none |
destroy() Called when the module is unloaded. This method can be overridden to perform specific tasks on module unload (i.e. remove event listeners). If overridden, the parent method must always be called through the super keyword. |
| none |
onExtensionCommand(cmd, data) Called when a response from the server side request handler is received. This method must be overridden to execute the custom module logic. Parameters cmd [String]: the identifier of the response. data [SFSObject]: an object containing the response payload. |
| none |
onUptimeUpdated(values) Called by the AdminTool shell controller once per second. This method can be overridden to display the uptime inside the custom module or make calculations based on the server uptime. Parameters values [Array]: an array containing, in order, the uptime days, hours, minutes and seconds. |
| none |
sendExtensionRequest(command, data = null) Sends a request to the module's server side request handler. Parameters command [String]: the identifier of the request. data [SFSObject]: an optional object containing the parameters accompanying the request. |
ShellController class
| Type | Method |
|---|---|
| none |
logMessage(message, type = 'log') Prints a message in the browser's console. Parameters message [String]: the message to be printed in the browser's console. type [String]: the message importance level among info, warn, error, log (default). |
| none |
removeDialog() Removes all currently opened dialog or alert panels. |
| none |
showConfirmWarning(text, confirmHandler) Opens a modal panel and displays a warning message, asking for a confirmation. The panel shows an Ok button to confirm and a Cancel button to deny. The title of the panel is always "Warning". Parameters text [String]: the message to be displayed in the modal panel. confirmHandler [Function]: a function to be called if the Ok button is clicked. |
| none |
showNotification(title, message) Shows a notification in the upper right corner of the AdminTool interface. The notification is removed automatically after a few seconds. The message is also logged in the browser's console. Parameters title [String]: the title of the notification. message [String]: the message to be displayed in the notification; can contain html tags. |
| none |
showSimpleAlert(text, isWarning = true) Opens a modal panel and displays a message. Parameters text [String]: the message to be displayed in the modal panel. isWarning [Boolean]: if true (default), the title of the modal panel will be "Warning", otherwise it will be "Information". |