SFS2X Docs / GettingStarted / client-api-csharp
» Client API setup | C#
The C# API is used to develop multiplayer games and applications:
- for PC, Mac, Linux, iOS, Android, through the Unity publishing features;
- for all modern browsers through the Unity's WebGL build option;
- for native .Net, Mono and Universal Windows platforms.
All Unity target platforms are supported too (see the Unity publishing options), but we didn't test them directly. So... thank you for your feedback in case you do!
The API is distributed in the form of four DLL libraries to be used alternatively or in conjunction with each other (read below) depending on your development platform:
The libraries are available in the release and debug versions. Using the release version is always recommended. The debug version allows API's internal debug messages to be printed to the output panel in Visual Studio when developing applications for Universal Windows Platform.
IMPORTANT FOR .Net/Mono and UWP
When developing native applications/games for .Net or Universal Windows Platform, always remember to set the API's property SmartFox.ThreadSafeMode (here) to false explicitly!
The default true value requires an event queue processing thread, like in Unity.
» .Net / Mono
After creating a new project in Visual Studio (PC, Mac), edit the project's References and add the SmartFox2X.dll library contained in the /Release/DotNet folder of the API zip file.
» Universal Windows Platform
After creating a new project in Visual Studio (PC), edit the project's References and add the SmartFox2X_UWP.dll library contained in the /Release/UWP folder of the API zip file.
» Unity
» Editor and Standalone, iOS, Android builds
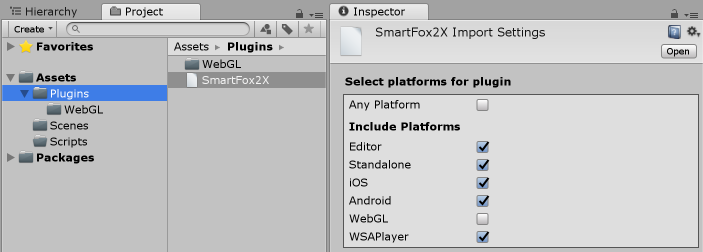
Create a new project in Unity and create a folder — for example /Assets/Plugins — where to copy the SmartFox2X.dll library contained in the /Release/Unity folder of the API zip file.
Now click on the SmartFox2X plugin and go to the Inspector panel; select Editor and the target platforms you need, excluding WebGL. Finally click on the Apply button.

» WebGL build
In addition to the Unity Editor setup described before, create a new folder under /Assets/Plugins — for example /Assets/Plugins/WebGL — and copy to it the SmartFox2X_WebGL.dll and SFSWebSockets.jslib files contained in the /Release/Unity_WebGL folder of the API zip file.
Now click on the newly added SmartFox2X plugin and go to the Inspector panel; select WebGL, deselect all the other platforms (including Editor) and click on the Apply button.
Unity will use the DLL in the /Assets/Plugins folder when working in the Editor and the other library files in the /Assets/Plugins/WebGL folder when exporting for browser execution.
» Multi-platform projects
If you need to build the same Unity project for multiple platforms at once, among which WebGL, you will need a bit of conditional compilation in your code.
The reason is that WebGL build connects to SmartFoxServer 2X via websocket, while all the other builds connect via regular socket connection. On the server side, the two connections use different ports (defaults are 9933 for regular socket connection and 8080 for websocket connection).
The following code snippet shows how to setup the basic connection configuration (using default ports), create the SmartFox object instance and connect:
	// Set connection parameters
	ConfigData cfg = new ConfigData();
	cfg.Host = “YourDomainOrIP";
	cfg.Zone = "YourZone";
	#if UNITY_WEBGL
	cfg.Port = 8080;
	#else
	cfg.Port = 9933;
	#endif

	// Initialize SFS2X
	#if UNITY_WEBGL
	sfs = new SmartFox(UseWebSocket.WS);
	#else
	sfs = new SmartFox();
	#endif

	// Add SFS2X listeners
	...

	// Connect to SFS2X
	sfs.Connect(cfg);
Other than using the right connection port, the conditional compilation allows calling the proper constructor for websocket connection. Check the API documentation for more information and the Unity tutorials for full examples.
» Godot 4.x and higher
In order to get started with Godot and SmartFoxServer 2X you need the following:
- Create a new project in Godot and create a folder — for example /SFS2XAPI — where to copy the SmartFox2X.dll library contained in the /Release/DotNet folder of the API zip file.
- Depending on which external C# editor you are using (Visual Studio, VS Code etc.) make sure to add a reference to the SmartFox2X.dll in your IDE.
Once this is done you are ready to build your project.
» Exporting
At the time of writing this article (last update: July 2023), the Godot Mono editor can export for desktop targets such as Windows, macOS and Linux but it's not ready yet for mobile and HTML5.
» Learning and Examples
We highly recommend to start learning about Godot and SmartFoxServer here:
- The Godot tutorials provide a series of increasingly more complex examples with source code.
- The API documentation for more details on the C# API.


