

SFS2X Docs / GettingStarted / client-api-objc
» Client API setup | Objective-C / Swift
The Objective-C API provides a number of frameworks to develop native applications and games for Apple's iOS, tvOS and macOS.
View the instructions for your target platform:
- iOS, Xcode 11 and higher
- tvOS, Xcode 10 and higher
- maxOS, Xcode 10 and higher
- Notes on developing with Swift
- Notes for XCode 12+ users
» iOS, with Xcode 11 and higher
NOTE: Since release 1.17.13 we use the new Framework format (.xcframework) which supports both iOS and iOS+Catalyst apps.
Compatibility: the lowest version of iOS currently supported is iOS 10.
In the Project navigator, select your project, and select your target. Click on the Build Phases tab and expand Link Binaries With Libraries. Click the plus icon (+) and select Add Other... at the bottom left of the Frameworks window. Navigate to the SFS2XAPIIOS.xcframework folder that was unpacked previously, and select the SFS2XAPIIOS.xcframework folder (not the SFS2XAPIIOS file). Click Open.
» Other dependencies
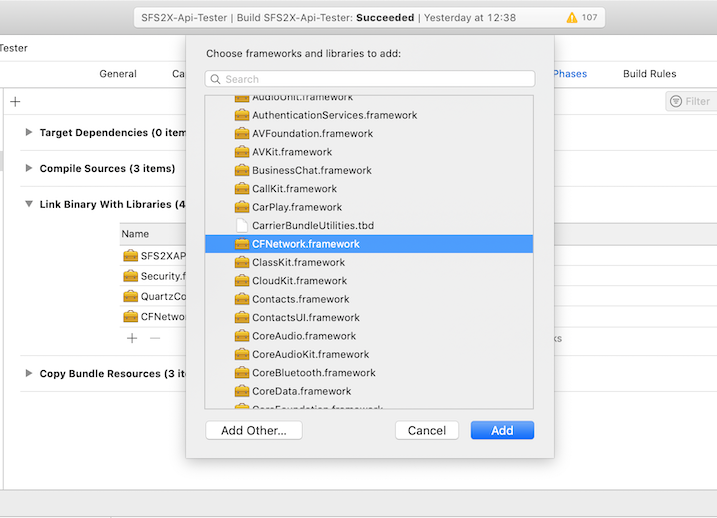
Keep the Link Binaries With Libraries tab open from the previous step and click the plus icon (+).
- Select the CFNetwork.framework from the list and click Add.
- Select the QuartzCore.framework from the list and click Add.
- Select the Security.framework from the list and click Add.
» Importing the API in your code
In order to start developing an SFS2X client you can import the API using:
#import <SFS2XAPIIOS/SmartFox2XClient.h>
If you are using Swift check this section for more details.
» tvOS development with Xcode 10 and higher
Compatibility note: the lowest version of tvOS currently supported is tvOS 9.0.
In the Project navigator, select your project, and select your target:
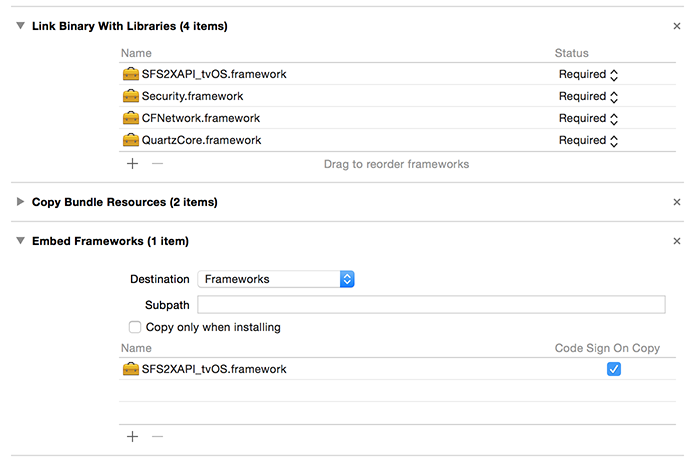
- Click on the Build Phases tab and expand Embedded Frameworks.
- Click the plus icon (+) and select Add Other... at the bottom left of the window.
- Navigate to the SFS2XAPI_tvOS.framework file under your project's folder, select it and click Open.
Keeping the same tab open, expand Link Binary with Libraries and add the following:
- Select the CFNetwork.framework from the list and click Add.
- Select the QuartzCore.framework from the list and click Add.
- Select the Security.framework from the list and click Add.
- Select Add Other... Navigate to the SFS2XAPI_tvOS.framework file under your project's folder, select it and click Open.
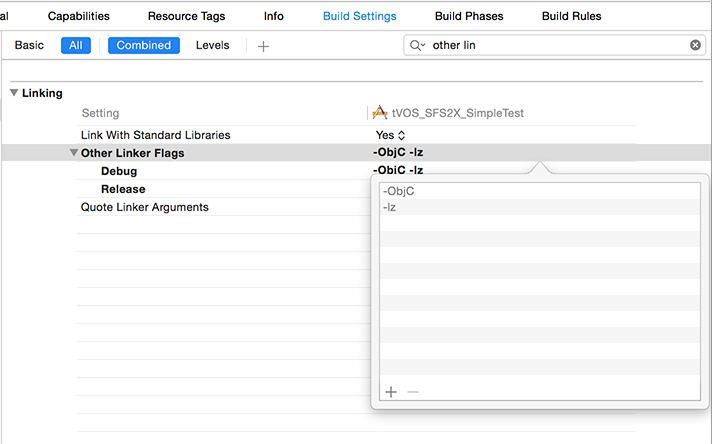
» Other Linker Flags
Display your project settings by clicking on your project in the Project navigator and select the Build Settings tab. Type "other linker flags" in the search field. Enter -lz and -ObjC as values.
Finally import <SFS2XAPI_tvOS/SmartFox2XClient.h> in order to start using the SFS2X API.
If you are using Swift check this section for more details.
» macOS, with Xcode 10 and higher
Compatibility note: the lowest version of macOS currently supported is Mac OS X 10.11 (El Capitan).
In the Project navigator, select your project, and select your target. Click on the Build Phases tab and expand Link Binaries With Libraries. Click the plus icon (+) and select Add Other... at the bottom left of the Frameworks window. Navigate to the SFS2XAPIOSX.framework folder that was unpacked previously, and select the SFS2XAPIOSX.framework folder. Click Open.
» Other dependencies
Keep the Link Binaries With Libraries tab open from the previous step and click the plus icon (+).
- Select the CFNetwork.framework from the list and click Add.
- Select the QuartzCore.framework from the list and click Add (for API version 1.3.5 and higher).
- Select the Security.framework from the list and click Add (for API version 1.6.0 and higher).
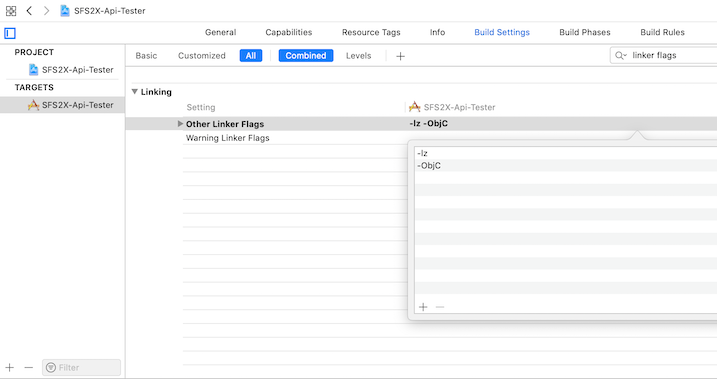
» Other Linker Flags
Display your project settings by clicking on your project in the Project navigator and select the Build Settings tab. Type "other linker flags" in the search field. Enter -lz and -ObjC as values.
Finally import <SFS2XAPIOSX/SmartFox2XClient.h> in order to start using the SFS2X API for macOS.
If you are using Swift check this section for more details.
NOTE: in order to run an macOS application that is dependent on the SFS2X API you will need to have a copy of the library in your /Library/Frameworks/ folder. Failing to do so will cause a library loading error as soon as you hit the "Run" button.
» Notes on developing with Swift
If you're going to use Swift as your main language for iOS/tvOS/macOS development you will need a few extra steps to make sure you have a "bridging header" file, which allows to import and work with Objective-C libraries, such as the SFS2X API.
- Create your new Swift project, via File > New > Project...
- Create the bridging header:
- File > New > File > (iOS, watchOS, tvOS, or macOS) > Source > Header File
- The file name must be the project's name followed by "-Bridging-Header.h". If the project is called MyGame the header file name must be MyGame-Bridging-Header.h
- Open the header file and add the following content:
#import <Foundation/Foundation.h>

#import <CFNetwork/CFNetwork.h>
#import <QuartzCore/QuartzCore.h>
#import <Security/Security.h>

#import <SFS2XAPIIOS/SmartFox2XClient.h>
- Navigate to your project's Build Settings and search for Objective-C Bridging-Header under Swift Compiler - General section
- Edit the field with name-of-project/name-of-bridging-header.h -- Example: MyGame/MyGame-Bridging-Header.h
- NOTE: to avoid path issues make sure the bridging header file is stored under your project's root folder. If not, move it there.
Now you're ready to start coding in Swift. You can modify the default AppDelegate file to see if everything is in order:
	import UIKit

	@UIApplicationMain
	class AppDelegate: UIResponder, UIApplicationDelegate, ISFSEvents
	{
	    var window: UIWindow?
	    var sfs:SmartFox2XClient?

	    func application(_ application: UIApplication, didFinishLaunchingWithOptions launchOptions:
	    [UIApplication.LaunchOptionsKey: Any]?) -> Bool
	    {
	        sfs = SmartFox2XClient(smartFoxWithDebugMode: true, delegate: self)
	        NSLog("Version: %@", (sfs?.version)!)

	        // Override point for customization after application launch.
	        return true
	    }

	    // ...
	    // Other default methods
	    // ...
	}
Finally build and run the project in the Simulator. Once the app starts it will output the version of the SFS2X API to your XCode debug console.
» Notes for XCode 12+ users
If you're working with XCode 12 (or higher) on Intel or ARM Macs you may stumble upon a build error when testing your application via the Simulator.
You may see this build message:
...building for iOS Simulator, but linking in an object file built for iOS, for architecture 'arm64'
This is an issue that has become quite popular in developers' forums and can be easily fixed by exluding the arm64 architecture from the Simulator build.
You can read all the details about this issue and the relative solution in this stackoverflow discussion.