SFS2X Docs / GettingStarted / admintool-ZoneMonitor
» Zone Monitor module
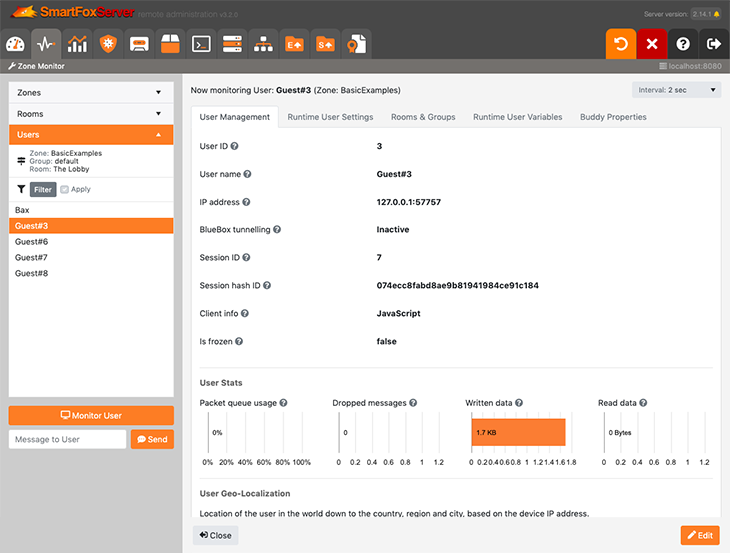
The AdminTool's Zone Monitor allows runtime monitoring of SmartFoxServer 2X Zones, Rooms and Users. It is also possible, to a certain extent, to apply live changes to some of their parameters.

» Usage
Data displayed by this module is not updated in realtime, but a refresh rate can be selected in the Interval dropdown in the top-right corner of the module; two seconds is the default value.
» Zones, Rooms and Users
When the module is accessed, the list of the running Zones is displayed in the accordion on the left. The counter between brackets indicates the current number of Users connected to the Zone. Select a Zone and click on the Rooms accordion header to open the panel containing the list of Rooms belonging to that Zone. Again, each Room shows the User counter between brackets.
The Rooms panel shows a label indicating the selected Zone name, and controls to filter the list (more on this later). In particular, the dropdown allows displaying all Rooms belonging to a specific Group: it contains all available Groups (see the Group ID parameter in the General tab of the Room configuration settings) plus the [any] option to show all Rooms in the Zone. By default the predefined default Group is shown.
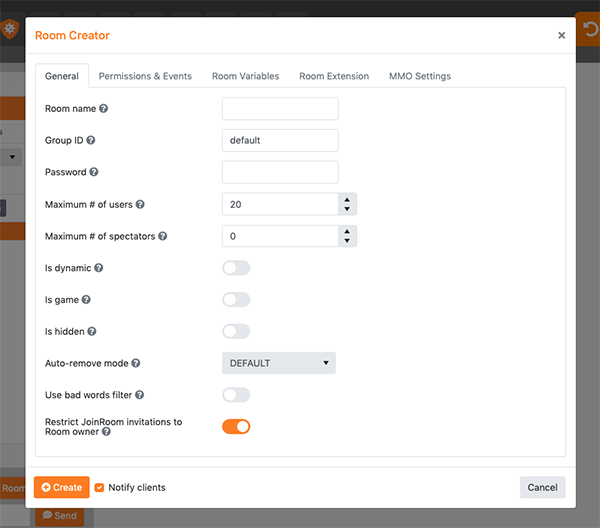
The Rooms panel also features Create and Remove buttons, to add a Room to the selected Zone on-the-fly or remove an existing Room respectively.
The Room creation process is the same as described in the Zone Configurator module, but Rooms created here are not saved in the server configuration, and they will be lost on server restart. The Notify client switch can be used to trigger the ROOM_ADD event on clients which have subscribed the Group to which the new Room has been assigned.

In order to remove a Room, select it in the list, click the Remove button and confirm the action in the pop-up alert. This always causes the ROOM_REMOVE event to be dispatched to clients which have subscribed the Group to which the Room belongs. Please notice that the Room must be empty for the action to be executed successfully.
Select a Room and click on the Users accordion header to open the panel containing the list of Users located in that Room. The panel also contains a label showing the selected Zone, Group and Room names, and controls to filter the list.
NOTE
In order to display the list of all users in a Zone, including those who didn't join a Room, in the Group dropdown of the Rooms panel select [any], then go to the Users panel.
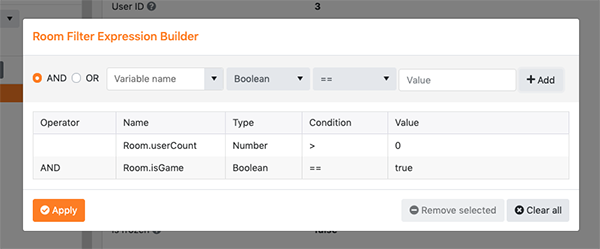
Both the Rooms and Users panels contain an Edit button to create an advanced filter based on default or custom properties, and a switch to apply or remove it on-the-fly (enabled if a filter is defined only). When clicking the Edit button, the following panel is displayed:

A filter is made of one or more rules linked together by an AND or OR operator. In order to create a rule you have to choose the operator (starting from the second rule only) and enter the following information.
- Variable name: the name of a custom Room or User Variable, or one of the exposed properties of the Room or User classes (for example Room.userCount, Room.maxUsers, User.name, etc).
- Type: the variable's type; valid types are boolean, number or string.
- Condition: the matching condition, depending on the selected variable type.
- Value: the variable's value.
For example, the filter defined in the above image would return all the Game Rooms containing at least one User.
Click on the Apply button to close the panel applying the filter; click the Clear all button to remove all the defined rules, or select one rule and click on Remove selected button to remove it.
NOTE
Depending on the filtering criteria applied to Rooms or Users, the returned data could be huge. For this reason a limit of 500 list items has been added. If this limit is exceeded, a system message is displayed and additional filters should be set.
» Runtime data monitoring
Double-clicking an item in Zones, Rooms or Users panel (or selecting it and pressing the Monitor selection button below the accordion) starts the actual monitoring of the entity's runtime parameters in the right area of the module. A Close button to available at the bottom of the monitoring area to stop the monitoring.
Parameters are organized into tabs: those showing edit controls can be modified at runtime. In order to do this you have to click the Edit button, which also prevents the settings to be reset during the next refresh cycle. Click on the Submit button to apply the changes or the Cancel button to leave the editing mode.
IMPORTANT
Changing the runtime values of Zone, Room or User parameters doesn't affect the server configuration: in case of server restart, the runtime changes get lost and the saved configuration (see the Server Configurator and Zone Configurator modules) is applied.
» Sending a message to users
By means of the text input field and Send button located below the Monitor selection button, the administrator can send an "admin message" to one or more users. If the Zones/Rooms panel is opened and a Zone/Room is selected, the message will be delivered to all the users in that Zone/Room. If the Users panel is opened and a user is selected, the message will be sent to that user only.
Please notice that the users will be able to receive the message if the ADMIN_MESSAGE event is handled by the client application only.
» Runtime parameters
The Zone, Room and User runtime parameters are divided into a number of tabs, which can also contain additional controls to execute some tasks, or charts which better visualize specific information. Most of the parameters are self-explanatory, anyway they are all accompanied by the Help icon: keeping the mouse pointer over it for a moment shows up a brief description in a tooltip.
The following pages show the screenshots of all the Zone, Room and User tabs and enter into deeper details about the less straightforward parameters and the additional controls.


